> ## Documentation Index
> Fetch the complete documentation index at: https://chatbase.co/docs/llms.txt
> Use this file to discover all available pages before exploring further.
# Settings
> This page provides all the details for the specified workspace, including member information, plan and billing details, Chatbase API keys, and API keys for the external LLM.
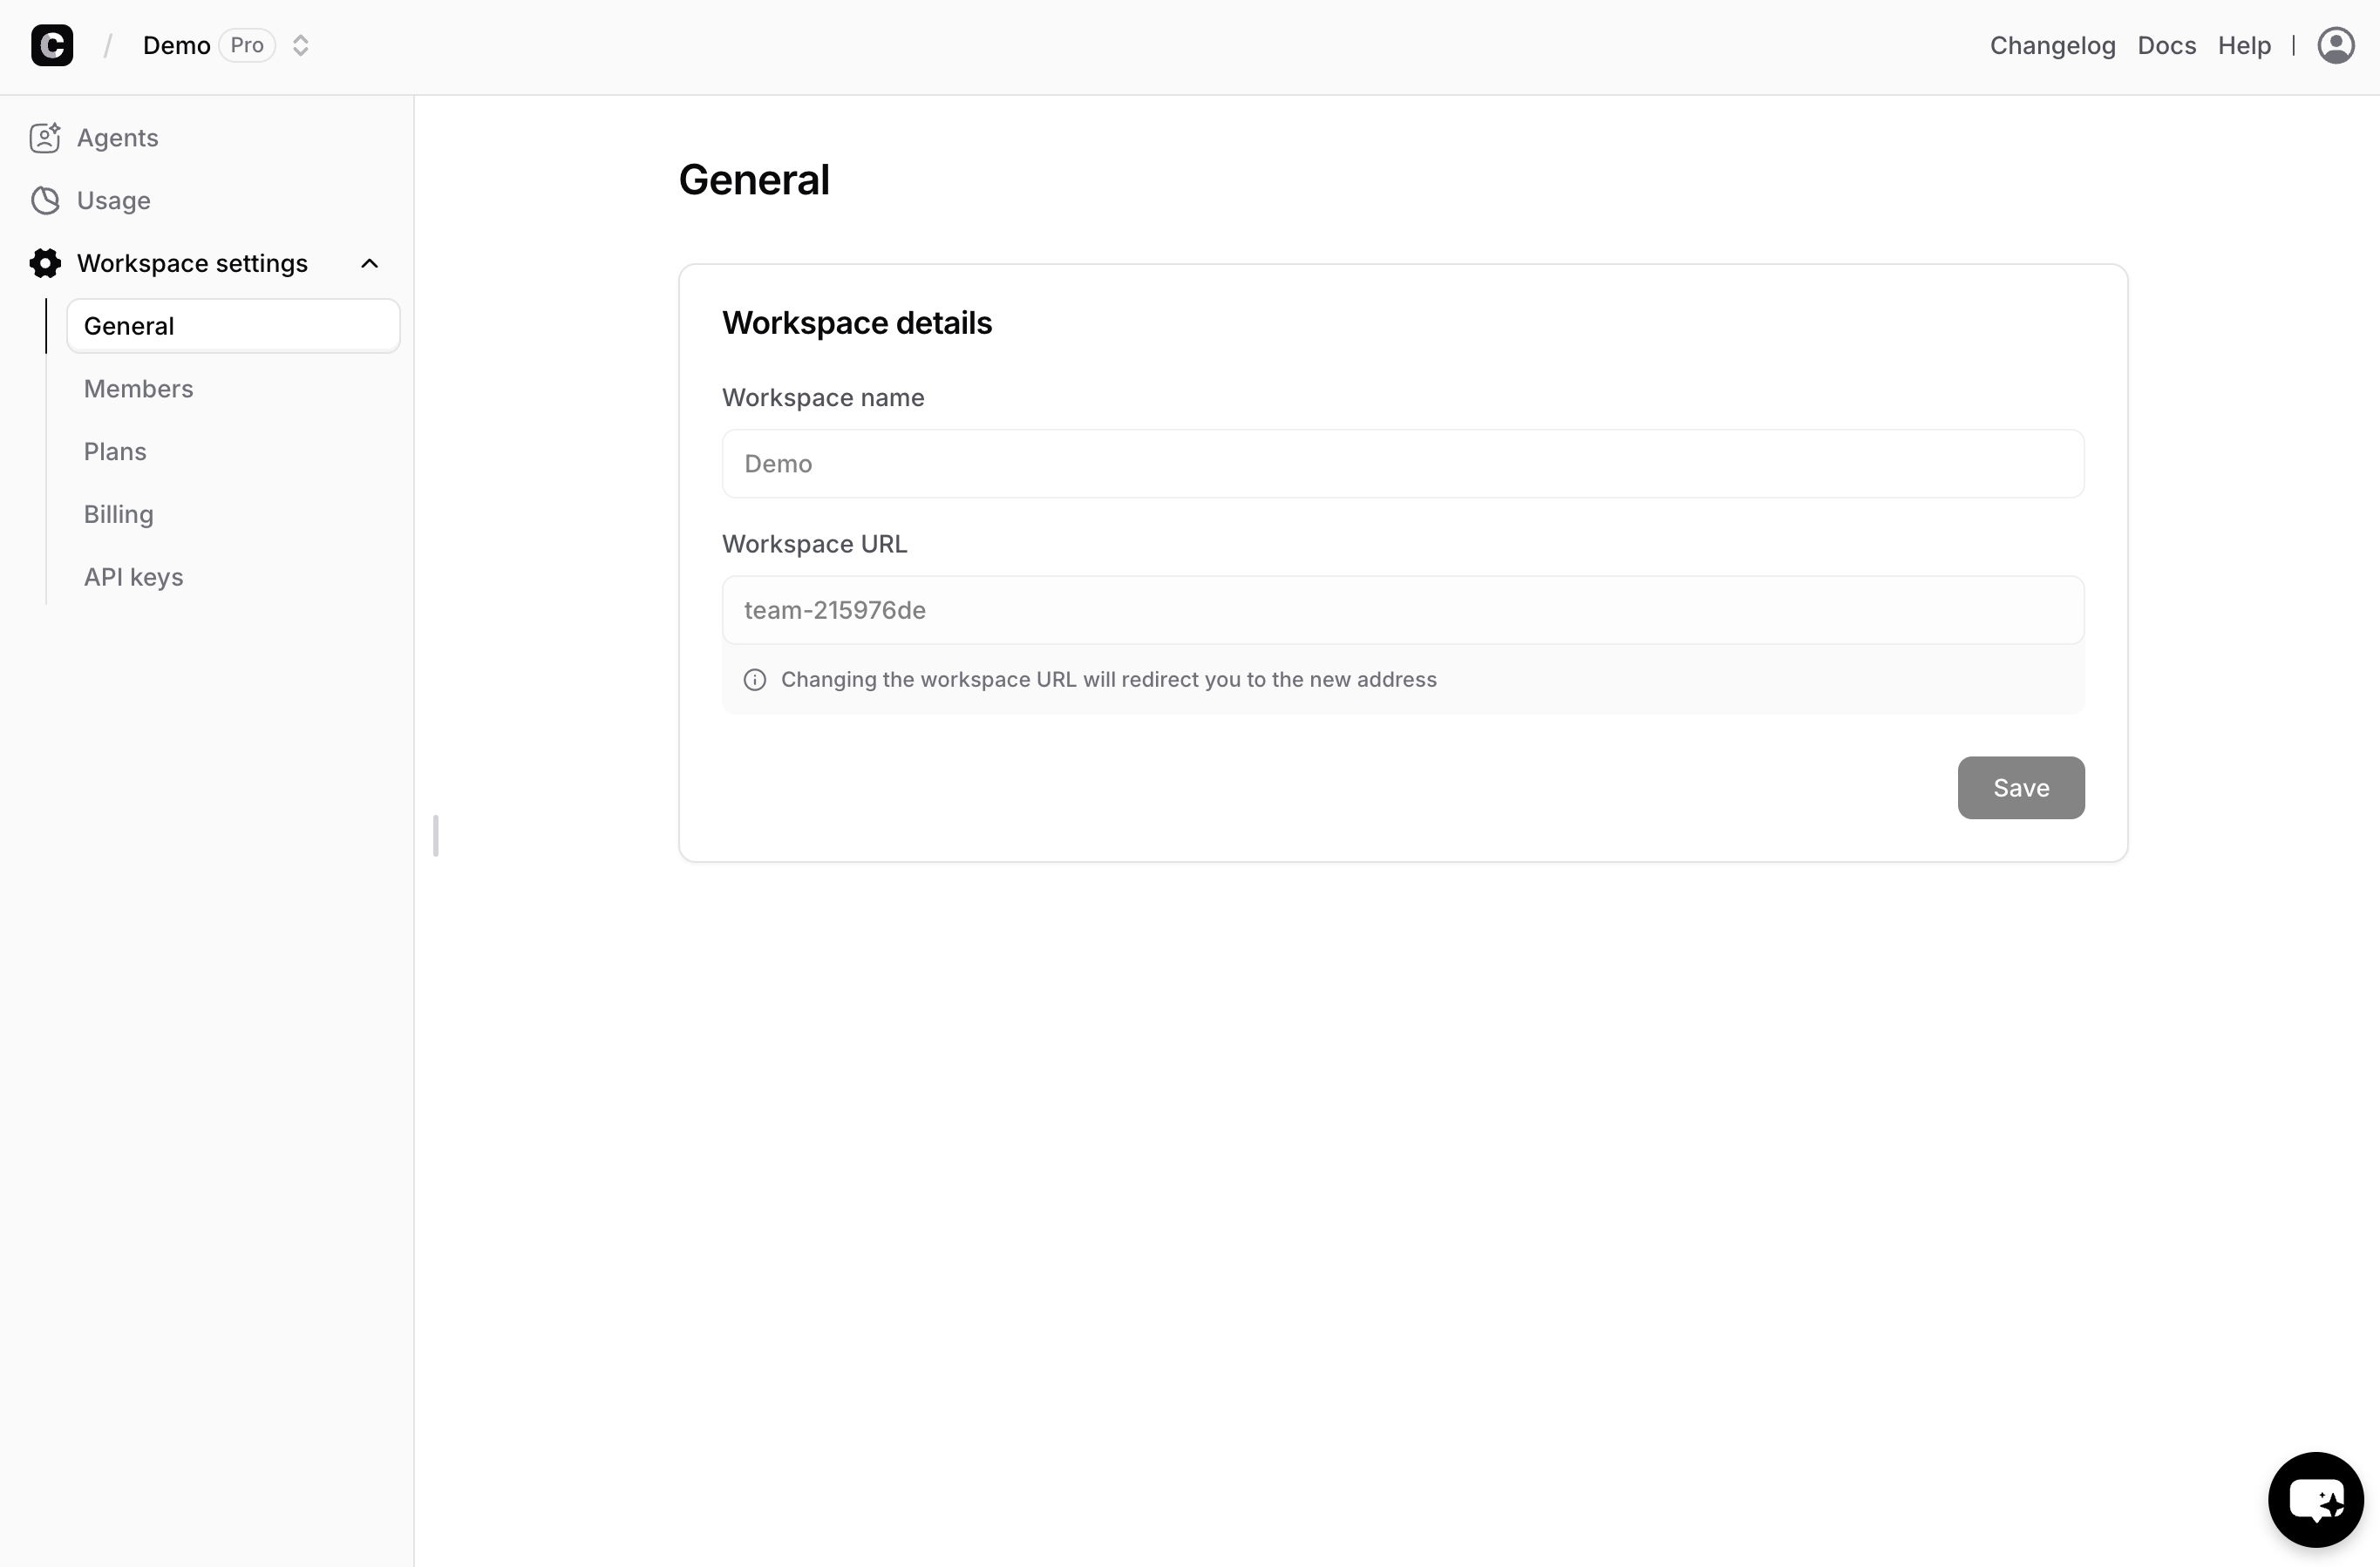
## General
This tab provides general information about the agent, including the Workspace Name and Workspace URL. The Workspace Name is displayed on the dashboard and in the AI agent path, while the Workspace URL appears in the address bar when accessing the workspace or its agents.
To modify the name or URL, simply edit the text in the field and click "Save."
You can also delete the entire workspace and all its AI agents by clicking the "Delete" button at the bottom of the page.
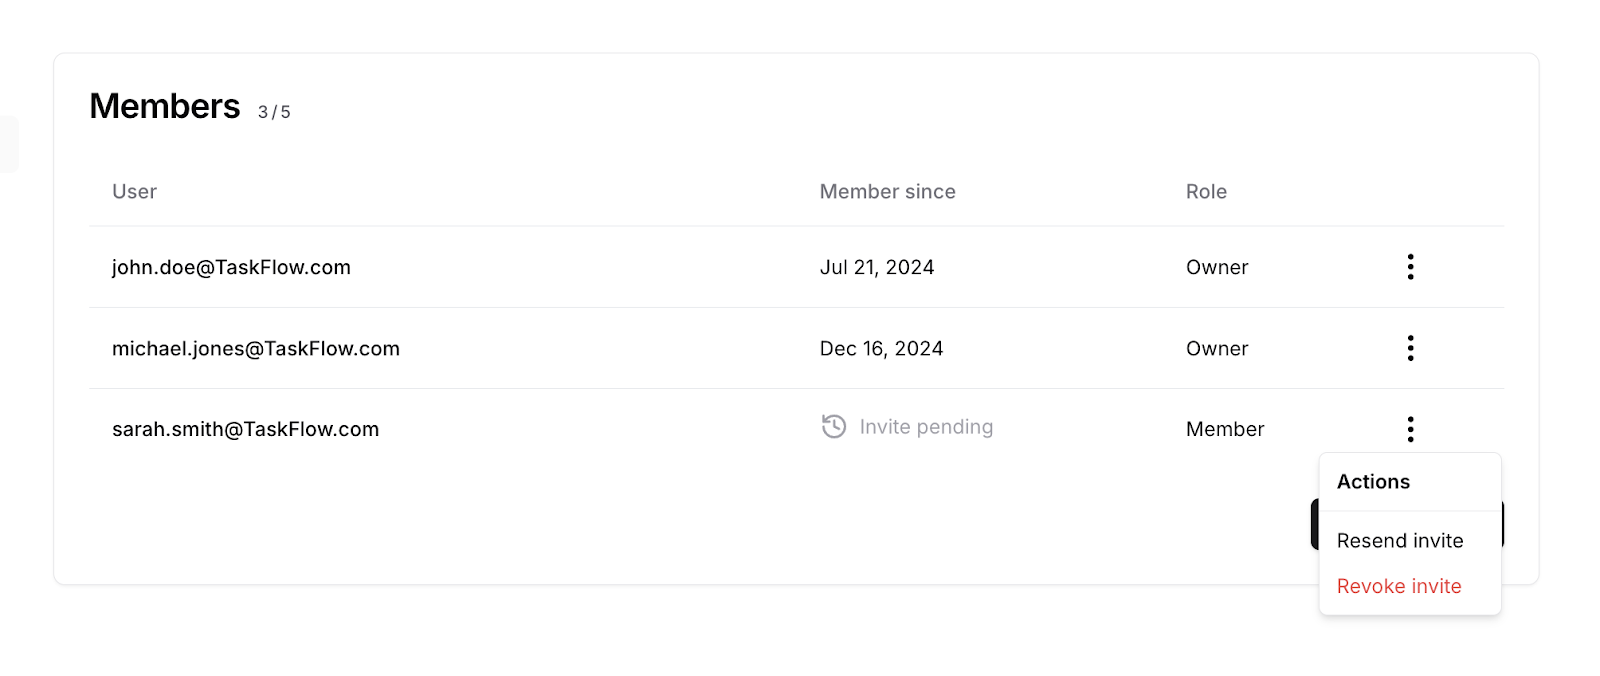
 ### Members
This tab displays all the information about your workspace members, as well as those you've invited but haven't responded yet.
### Members
This tab displays all the information about your workspace members, as well as those you've invited but haven't responded yet.
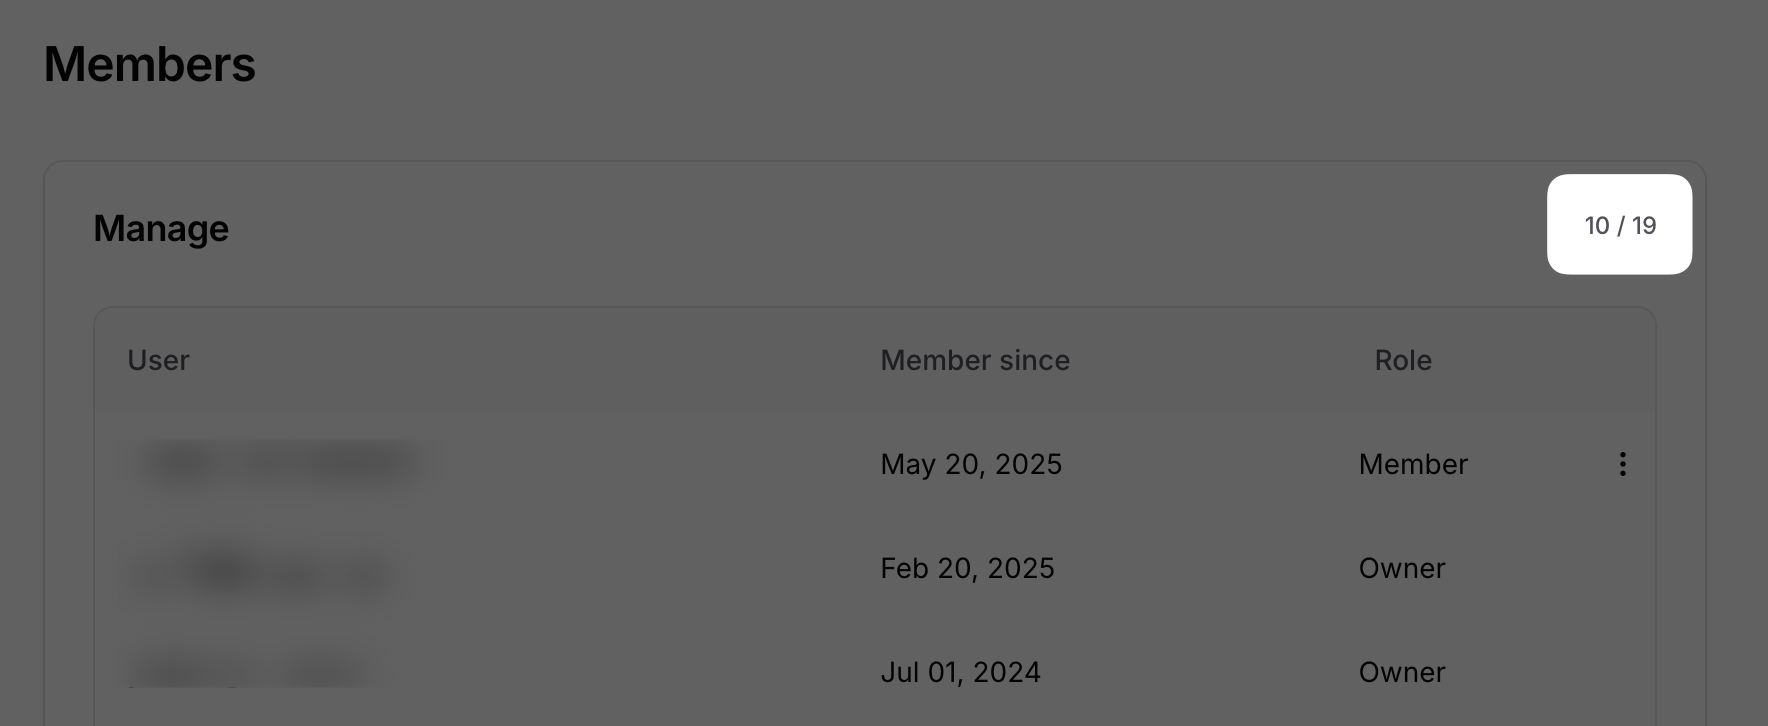
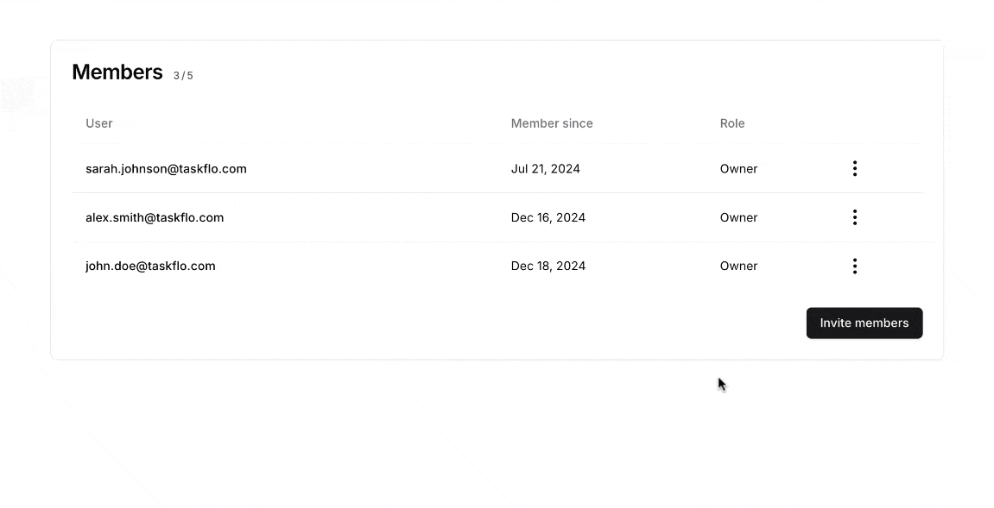
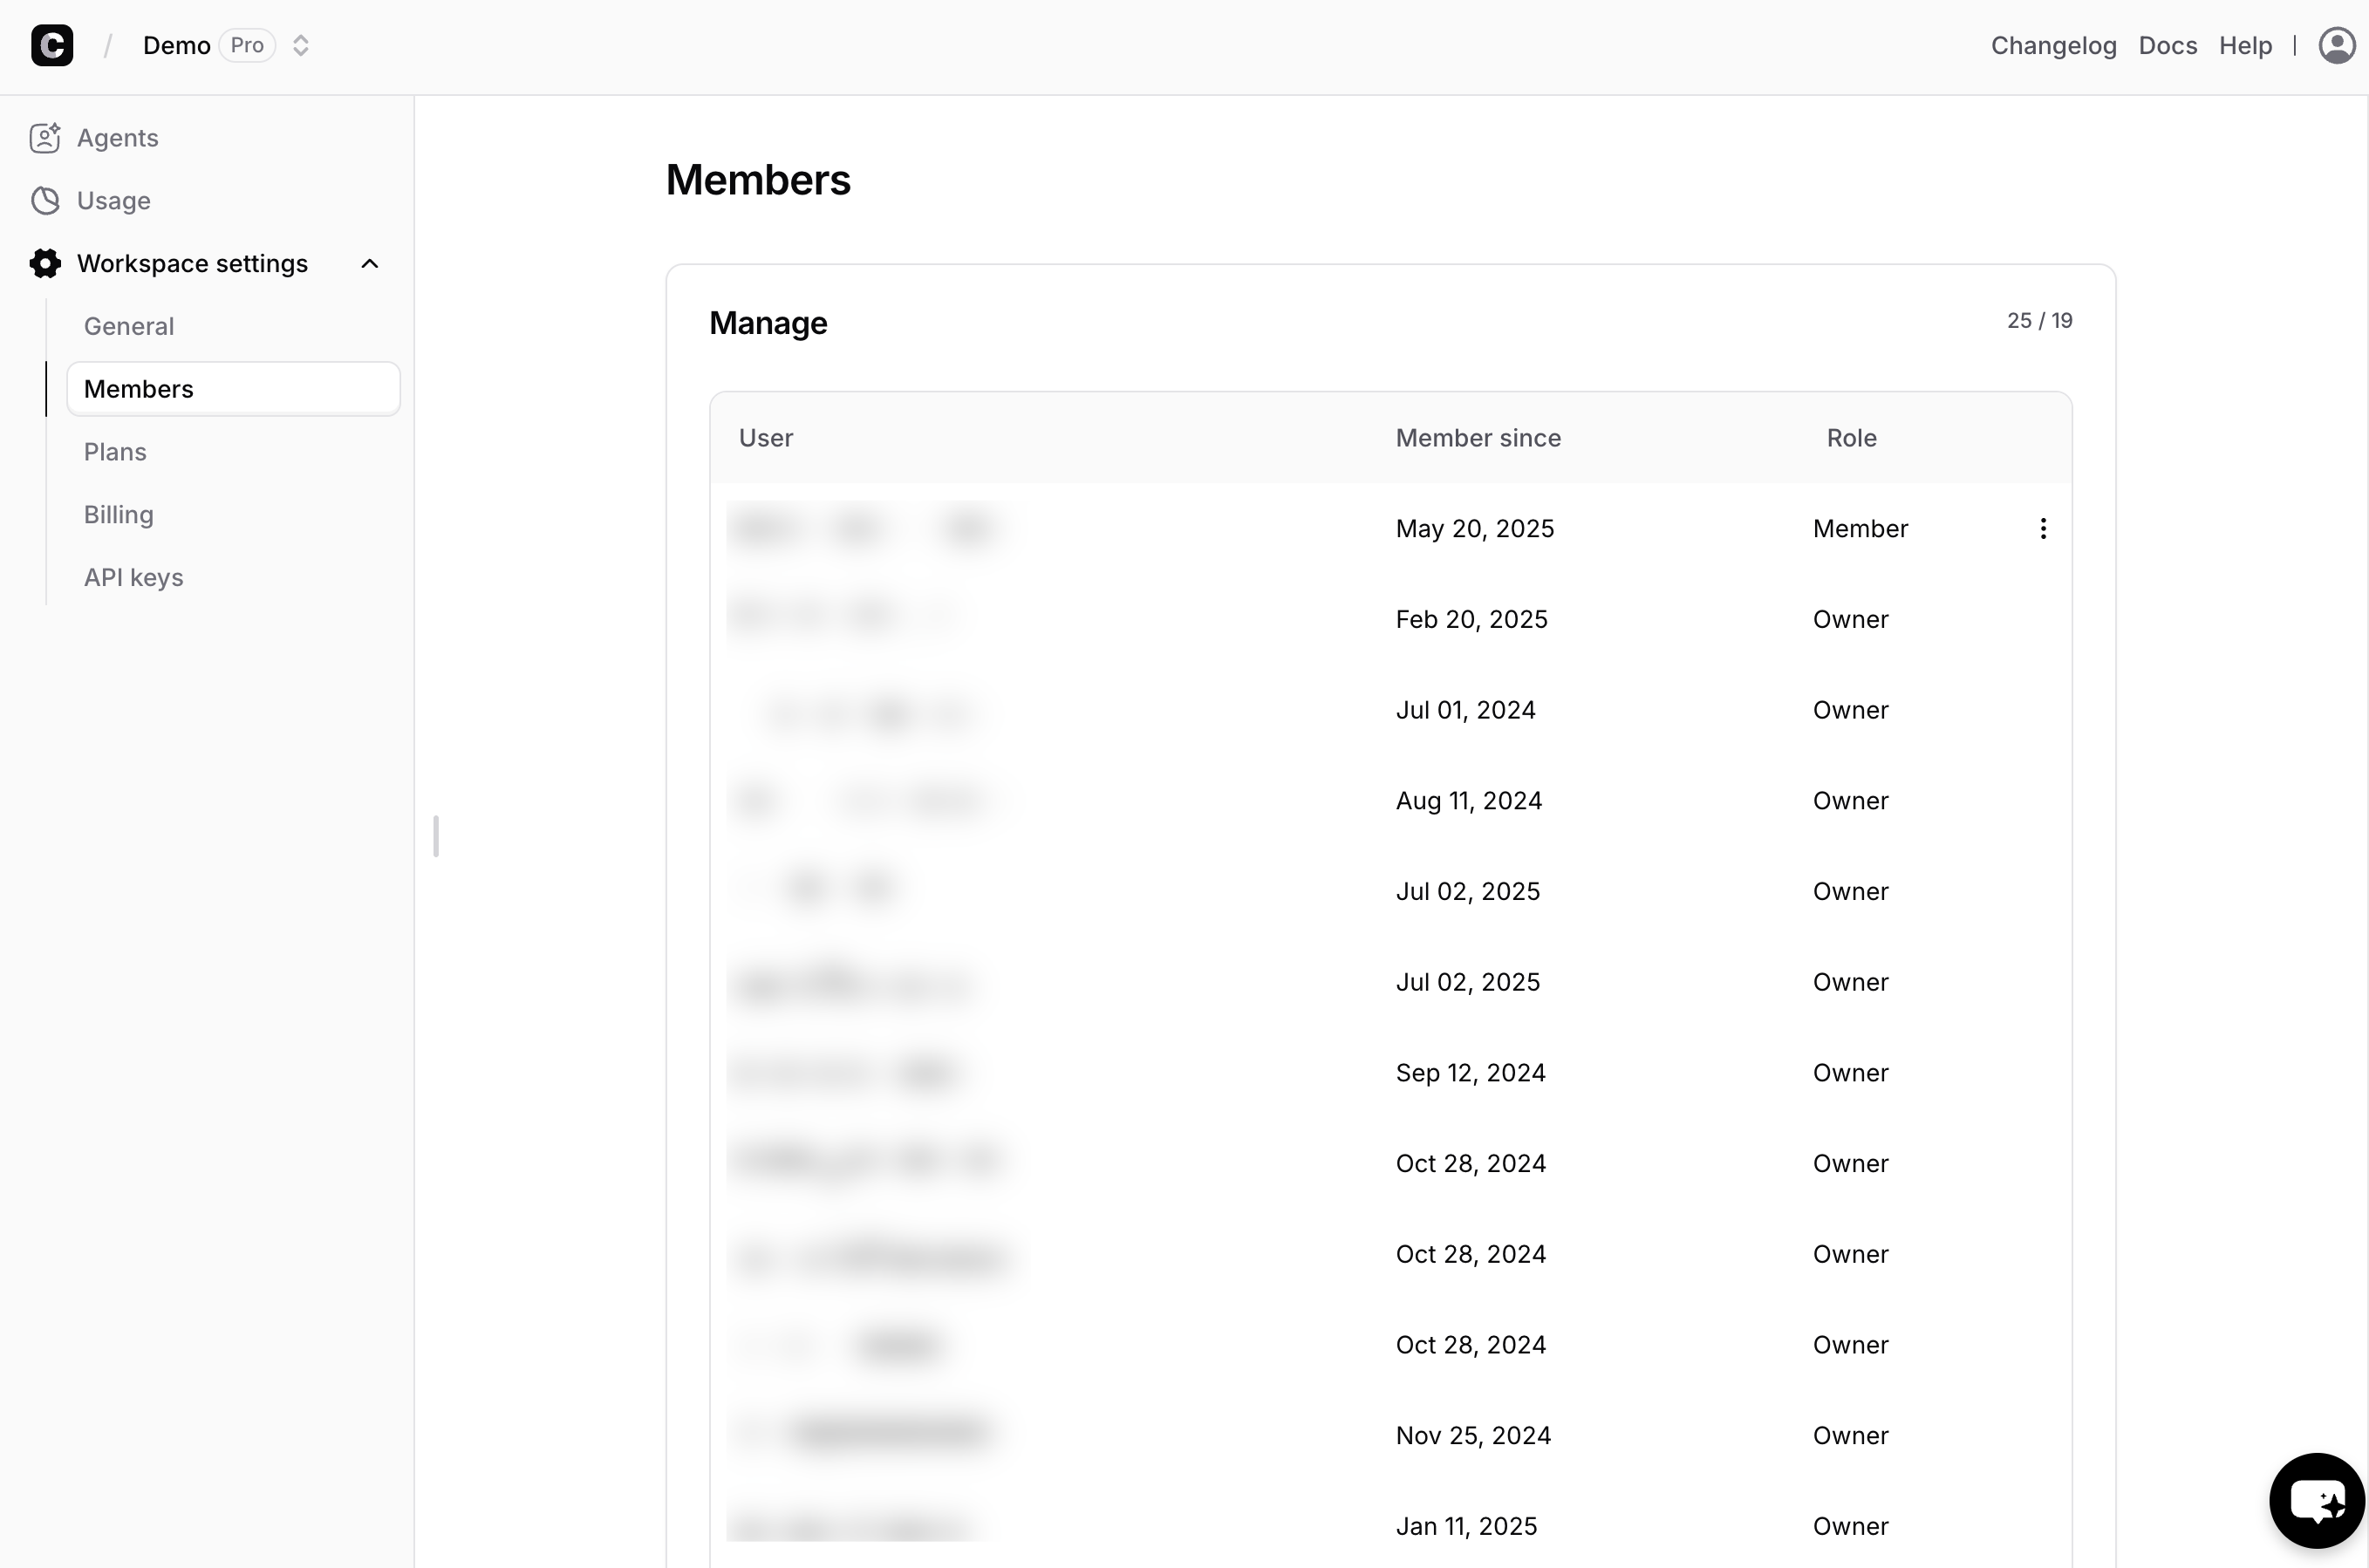 ### Number of members
This shows the number of workspace members and invited members. In this example, the user has 3 members and invitations, with a maximum limit of 5.
### Number of members
This shows the number of workspace members and invited members. In this example, the user has 3 members and invitations, with a maximum limit of 5.
 ### Modify workspace member role
To modify a workspace member's role or remove them, click the three dots next to their name.
* **Owners**: Can change billing information, modify plans, rename or delete the workspace, and manage all AI agents within the workspace.
* **Members**: Can update training data, view analytics, and delete AI agents. They cannot alter workspace settings.
* **Viewer**: Provides read-only access to view resources and analytics. Users cannot modify any settings, but they can still test the agent through the playground and compare sections.
#### Custom Roles
On **the Enterprise plan**, custom roles can be created to control what different members of your workspace can access and manage. This allows teams to assign permissions based on responsibilities and maintain better control over sensitive features.
Each custom role includes configurable permissions across different areas of the platform, such as:
* **Agents** – View, create, edit, or delete agents
* **Sources** – Manage knowledge sources used by agents
* **Chatlogs** – View, delete, or export conversation history
* **Contacts** – Access and manage stored contacts
* **Integrations** – Configure external integrations
* **Billing** – View or manage billing settings
* **Subscription** – Manage the workspace subscription
* **Members** – View or manage workspace users
* **Webhooks** – Configure webhook integrations
* **Workspace** – Manage workspace-level settings
* **API Keys** – Create and manage API keys
* **Actions** – View automation actions
* **Analytics** – Access analytics dashboards
* **Leads** – View and export collected leads
Custom roles appear alongside the default roles (Owner, Member and Viewer) and can be assigned to workspace members to provide the appropriate level of access.
### Remove workspace member
To remove a member from the workspace
### Modify workspace member role
To modify a workspace member's role or remove them, click the three dots next to their name.
* **Owners**: Can change billing information, modify plans, rename or delete the workspace, and manage all AI agents within the workspace.
* **Members**: Can update training data, view analytics, and delete AI agents. They cannot alter workspace settings.
* **Viewer**: Provides read-only access to view resources and analytics. Users cannot modify any settings, but they can still test the agent through the playground and compare sections.
#### Custom Roles
On **the Enterprise plan**, custom roles can be created to control what different members of your workspace can access and manage. This allows teams to assign permissions based on responsibilities and maintain better control over sensitive features.
Each custom role includes configurable permissions across different areas of the platform, such as:
* **Agents** – View, create, edit, or delete agents
* **Sources** – Manage knowledge sources used by agents
* **Chatlogs** – View, delete, or export conversation history
* **Contacts** – Access and manage stored contacts
* **Integrations** – Configure external integrations
* **Billing** – View or manage billing settings
* **Subscription** – Manage the workspace subscription
* **Members** – View or manage workspace users
* **Webhooks** – Configure webhook integrations
* **Workspace** – Manage workspace-level settings
* **API Keys** – Create and manage API keys
* **Actions** – View automation actions
* **Analytics** – Access analytics dashboards
* **Leads** – View and export collected leads
Custom roles appear alongside the default roles (Owner, Member and Viewer) and can be assigned to workspace members to provide the appropriate level of access.
### Remove workspace member
To remove a member from the workspace
 ### Modify Invitations
You can resend the invitation if it expired after 24 hours or if the invitee didn't see it in their inbox. You can also revoke the invitation to cancel it and prevent the invitee from joining the workspace.
### Modify Invitations
You can resend the invitation if it expired after 24 hours or if the invitee didn't see it in their inbox. You can also revoke the invitation to cancel it and prevent the invitee from joining the workspace.
 ### Invite Members
You can use this button to send new invitations to your workspace from the dashboard. To invite multiple members at once, click "Add Member."
New members can be added either by manually adding an extra member from the add-on card inside the dashboard or when an invited member accepts their invitation
When an owner removes team members, the number of extra member slots does not decrease automatically, so billing remains the same. You’ll need to manually reduce the extra member count from the Plans page.
## Plans
This tab provides information about all available plans and lets you modify your current plan or add new add-ons.
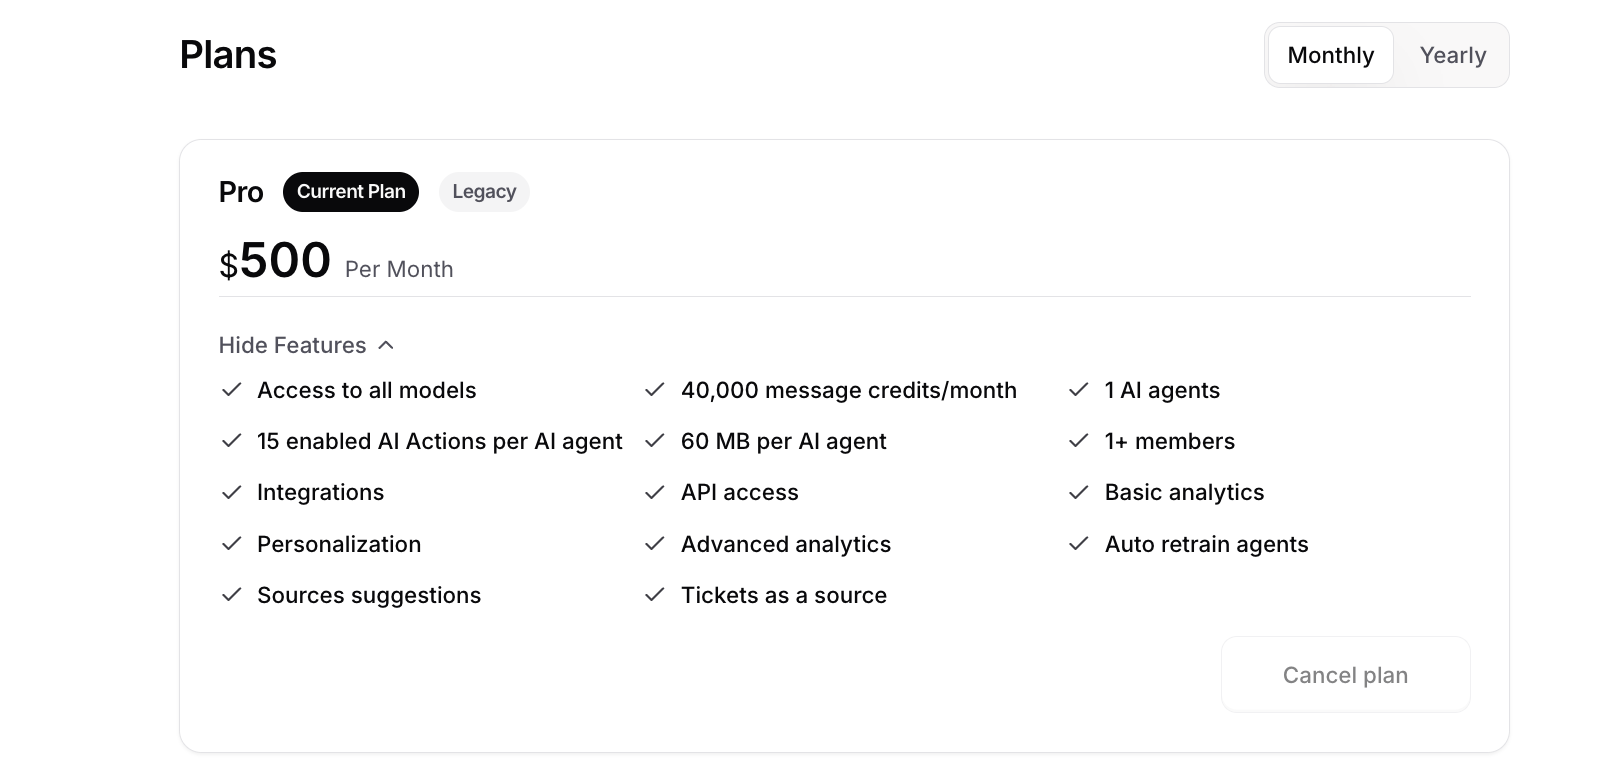
### Current Plan
This section is optional and will only appear if you're on a legacy plan. It provides details about the current plan, including your allowed features and limits.
### Invite Members
You can use this button to send new invitations to your workspace from the dashboard. To invite multiple members at once, click "Add Member."
New members can be added either by manually adding an extra member from the add-on card inside the dashboard or when an invited member accepts their invitation
When an owner removes team members, the number of extra member slots does not decrease automatically, so billing remains the same. You’ll need to manually reduce the extra member count from the Plans page.
## Plans
This tab provides information about all available plans and lets you modify your current plan or add new add-ons.
### Current Plan
This section is optional and will only appear if you're on a legacy plan. It provides details about the current plan, including your allowed features and limits.
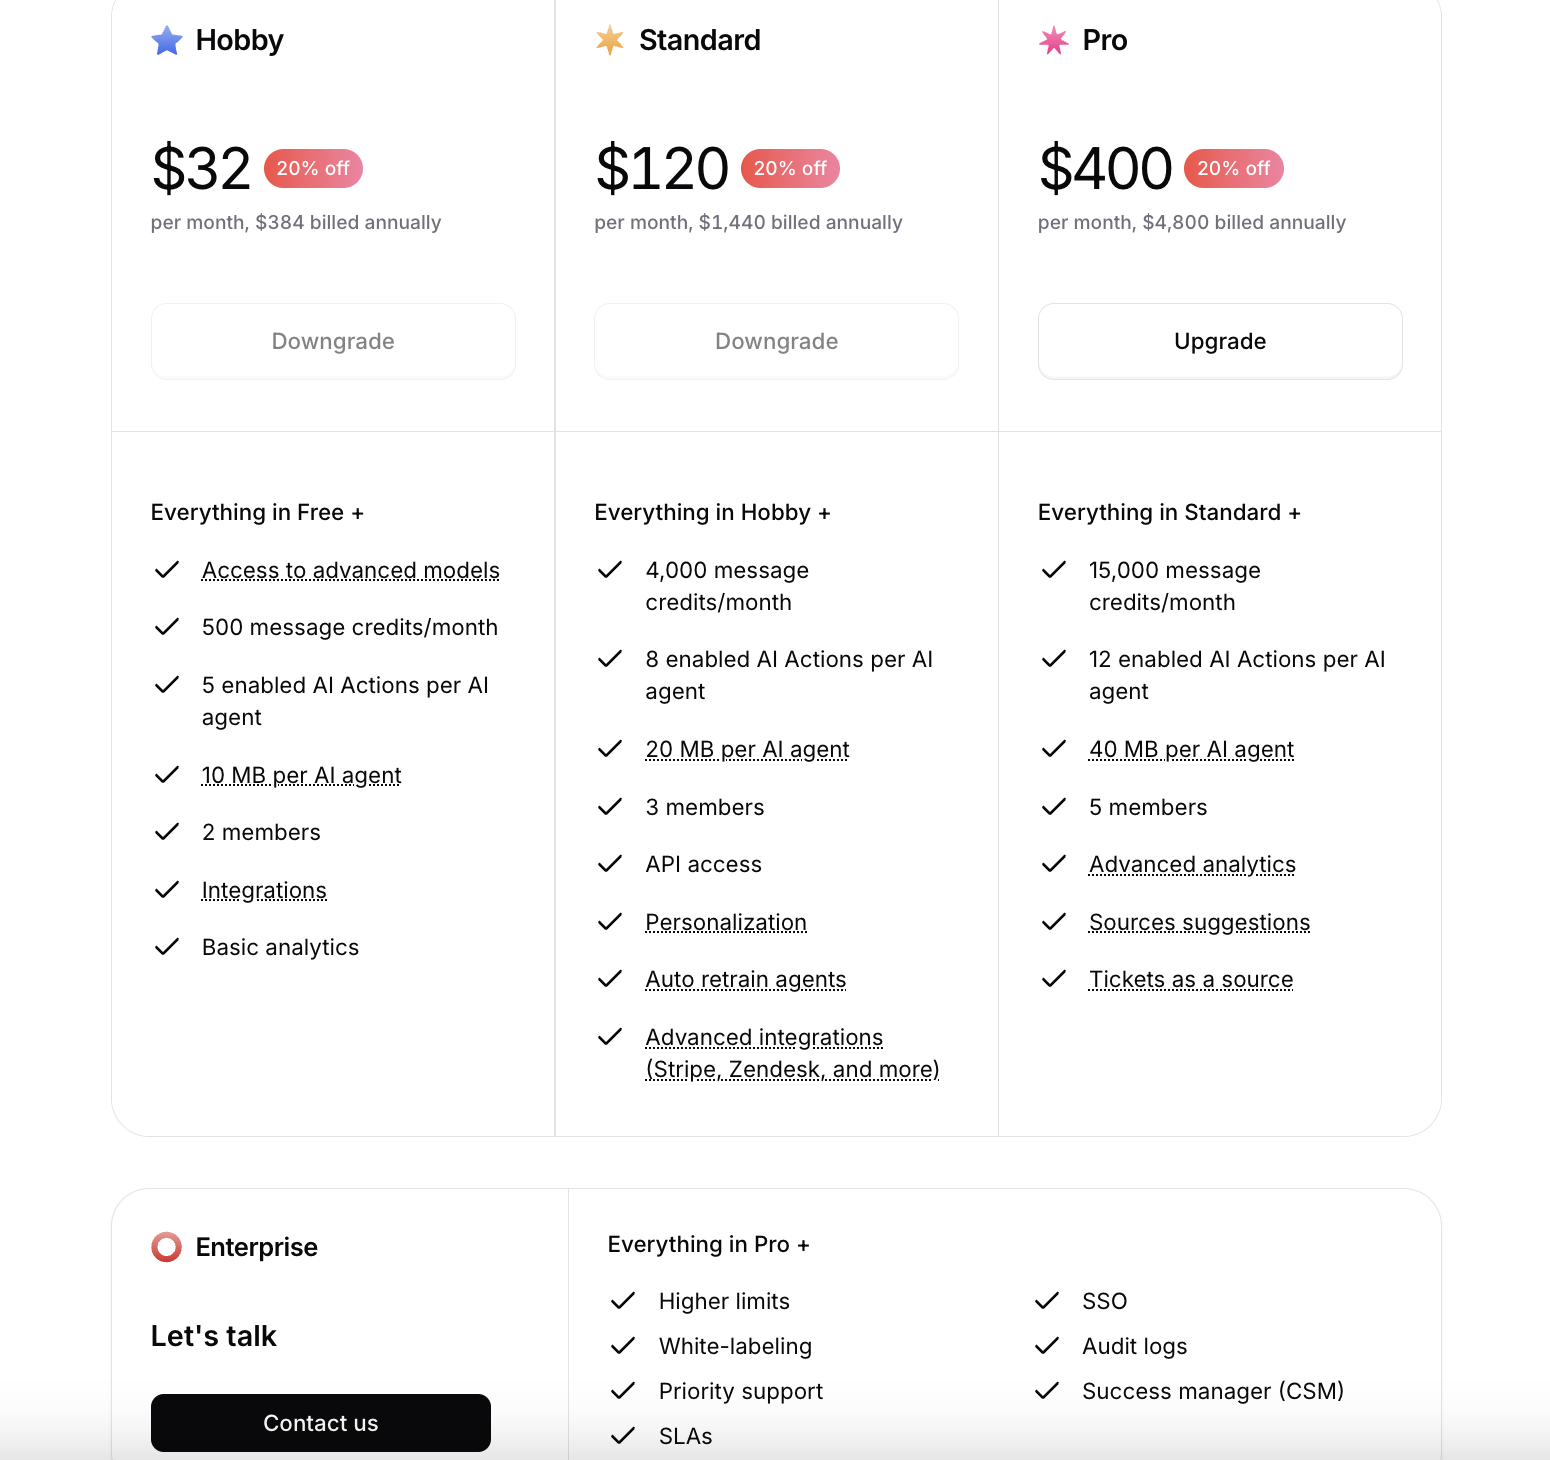
 ### Available Plans
This section displays all available plans for subscription. You can switch between monthly and yearly by toggling the option. It's important to note that subscribing annually lets you pay for 10 months instead of 12.
For more details about the available plans, please check out [our Pricing page](https://www.chatbase.co/pricing).
Please note that if you're on the old pricing packages, you won't be affected unless you want to upgrade your payment to annual or change the plan.
### Available Plans
This section displays all available plans for subscription. You can switch between monthly and yearly by toggling the option. It's important to note that subscribing annually lets you pay for 10 months instead of 12.
For more details about the available plans, please check out [our Pricing page](https://www.chatbase.co/pricing).
Please note that if you're on the old pricing packages, you won't be affected unless you want to upgrade your payment to annual or change the plan.
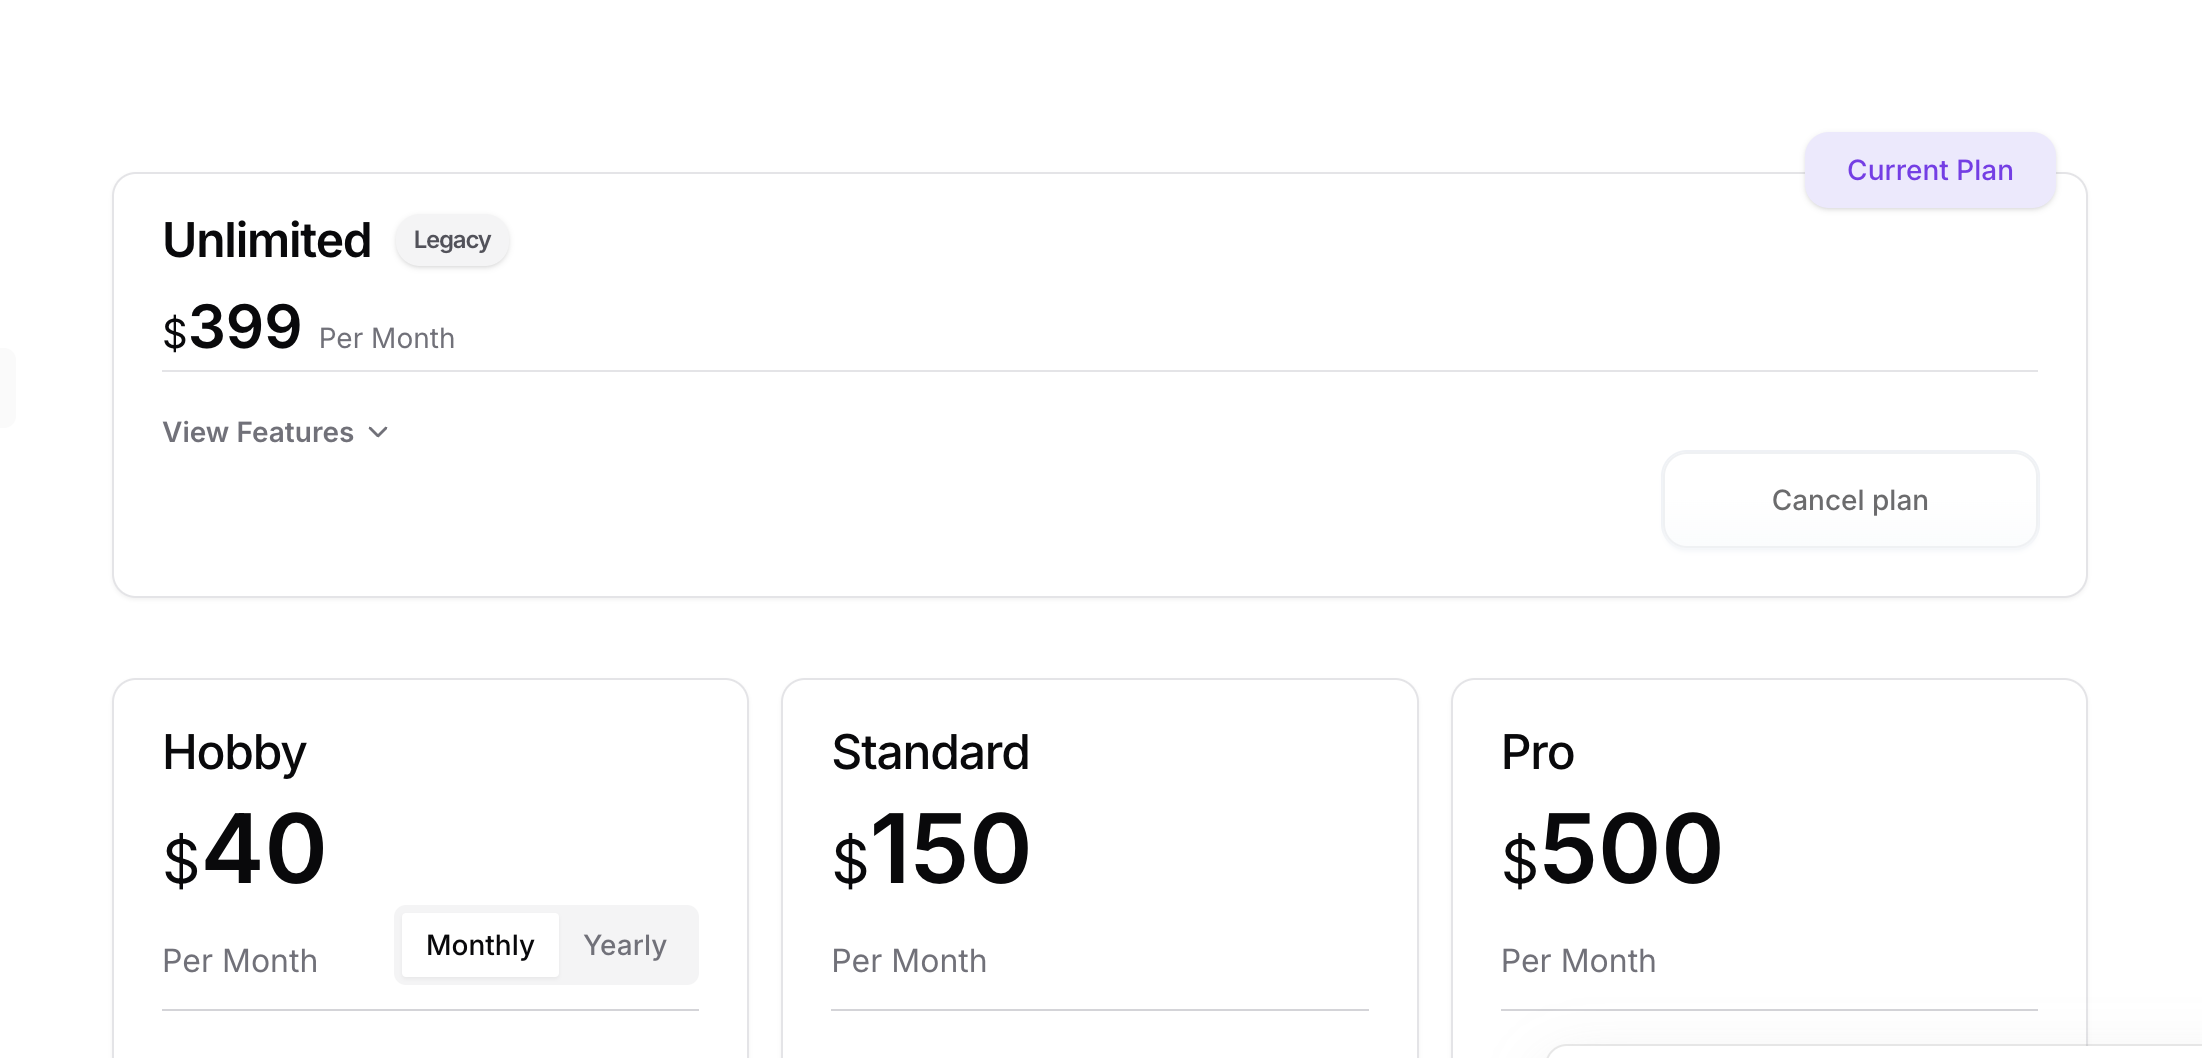
 If you choose to downgrade to a lower plan, such as from Standard to Hobby, the downgrade will take effect immediately. You'll receive a prorated credit based on the remaining time on your current plan, which will be applied to your new plan and any future invoices until the credit is used up.
Clicking "Cancel Plan" under your active plan disables auto-renewal. Your current plan will remain active until the next renewal date, after which you'll be downgraded to the free plan to avoid further charges. Your addons will also be active until the end of your billing period then removed when the plan expires.
***Note:*** Legacy plan users can now see the "Cancel Plan" button, as their active plan is listed. To downgrade to the free plan, please click on the cancel plan button, as shown below:
If you choose to downgrade to a lower plan, such as from Standard to Hobby, the downgrade will take effect immediately. You'll receive a prorated credit based on the remaining time on your current plan, which will be applied to your new plan and any future invoices until the credit is used up.
Clicking "Cancel Plan" under your active plan disables auto-renewal. Your current plan will remain active until the next renewal date, after which you'll be downgraded to the free plan to avoid further charges. Your addons will also be active until the end of your billing period then removed when the plan expires.
***Note:*** Legacy plan users can now see the "Cancel Plan" button, as their active plan is listed. To downgrade to the free plan, please click on the cancel plan button, as shown below:
 ### Add Ons
This section is responsible for adding extra features on top of your current plan.
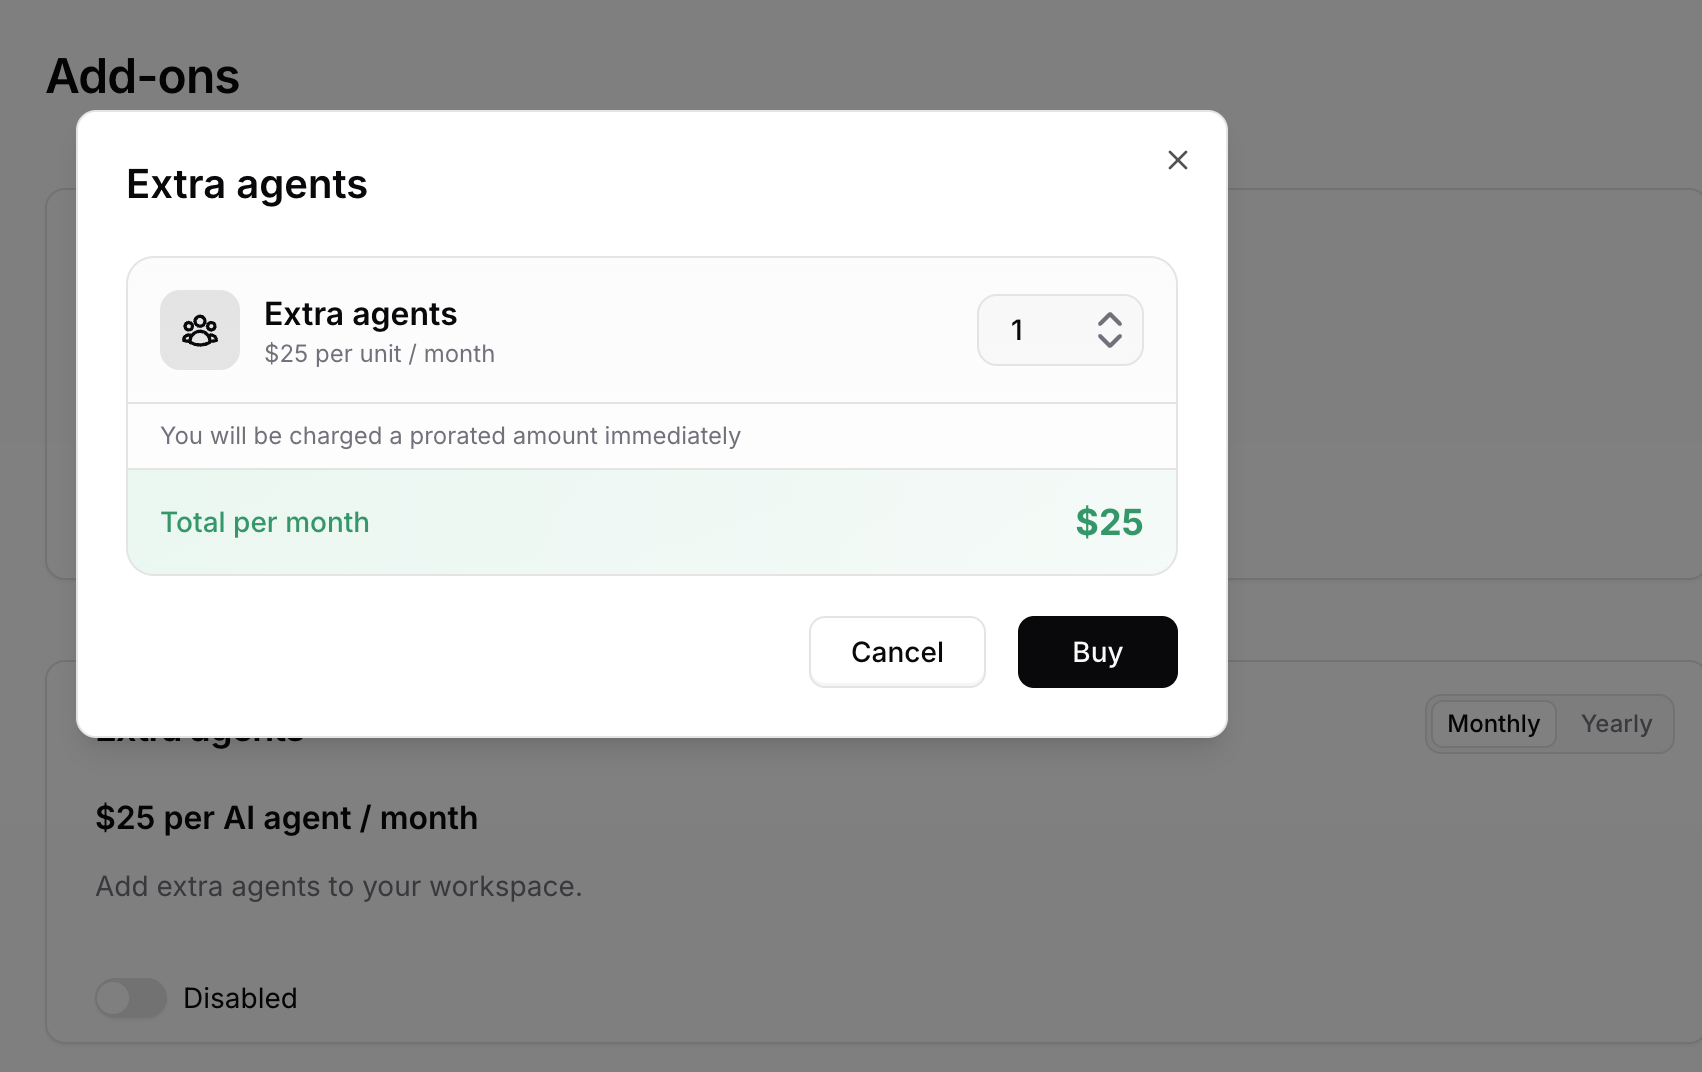
If you are choosing an add-on that can have quantities like extra AI agents, you will see a prompt similar to this:
### Add Ons
This section is responsible for adding extra features on top of your current plan.
If you are choosing an add-on that can have quantities like extra AI agents, you will see a prompt similar to this:
 Free users must subscribe to a base plan before adding any add-ons.
#### Auto recharge credits
When your credits fall below the threshold you set, we'll automatically add credits that don't expire to your account, ensuring uninterrupted service.
#### Extra AI agents
You can add extra AI agents to help you scale your service by managing multiple agents simultaneously.
#### Custom Domains
Use your own custom domains for the embed script, iframe, and AI agent link, offering a personalized and branded experience for your users.\
Note that this add-on is available only for the Enterprise plan.
Custom Domains add-on is only available on the Enterprise plan.
Custom Domains add-on is only available on the Enterprise plan.
#### Remove 'Powered By Chatbase'
Remove the Chatbase branding from the iframe and widget for a cleaner, custom experience.
Add-ons can be subscribed to on a monthly or yearly basis. \
\
The billing interval must be consistent: monthly plans can only include monthly add-ons, and yearly plans can only include yearly add-ons.
Cancelling an addon will remove it immediately and credit your account for the remaining days of your billing period.
## Billing
This section displays your billing details, including the email addresses receiving invoice copies, the data on the invoices, the payment methods used, and all past invoices.
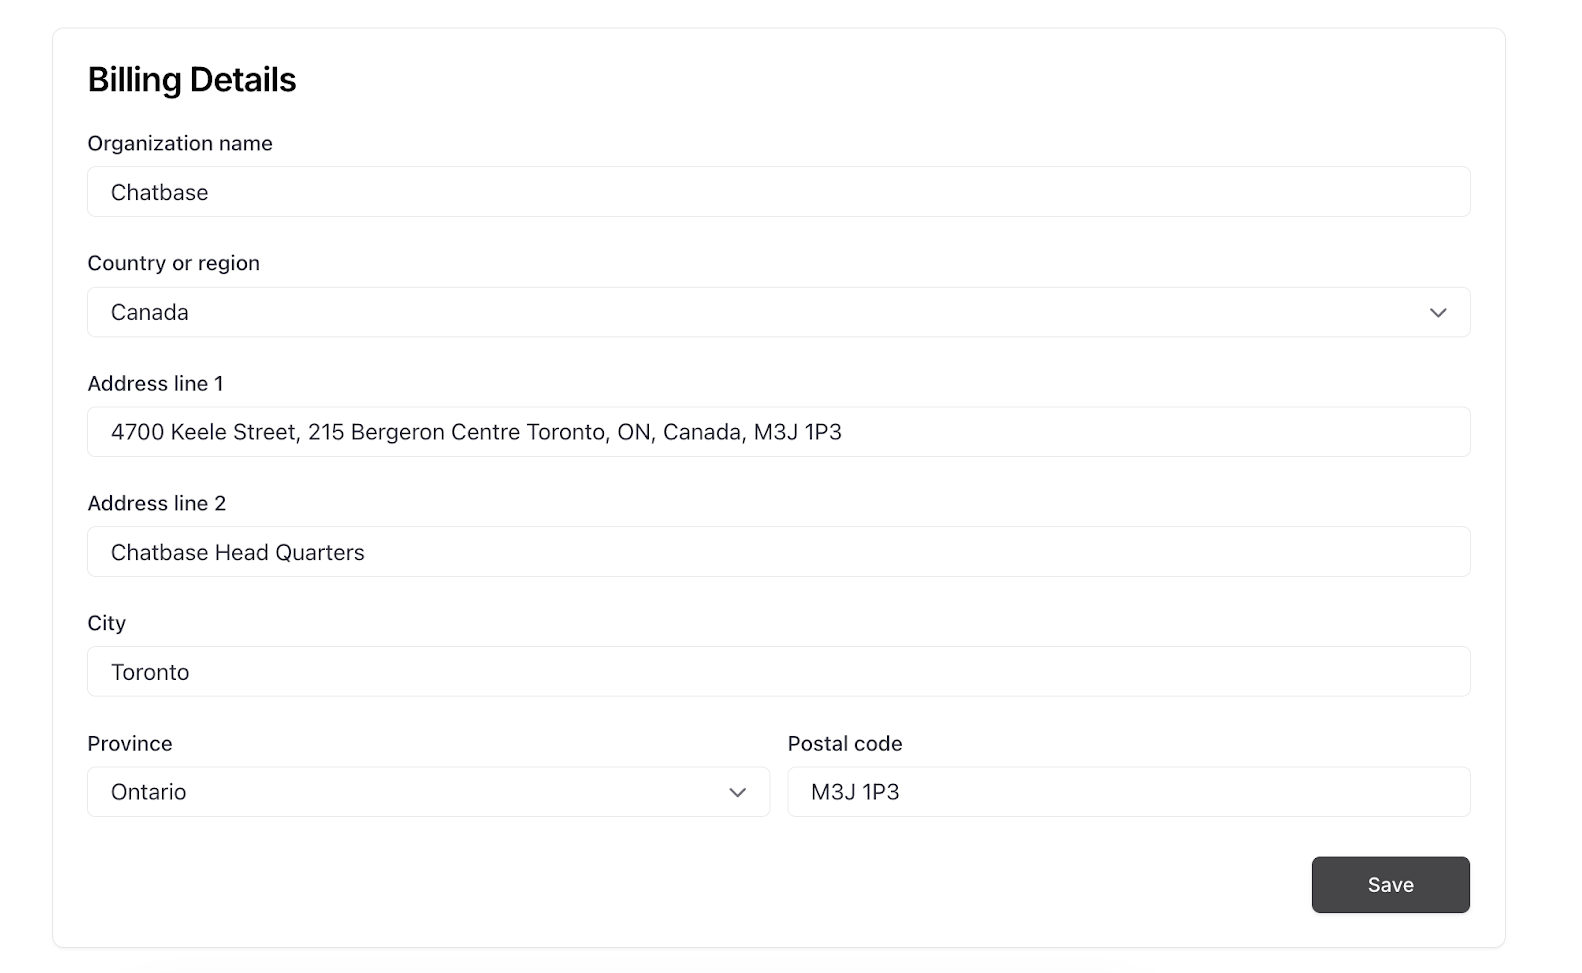
### Billing Details
This section displays your billing information, this information will appear on your invoices. You can edit it as needed and click "Save" to update the details.
Free users must subscribe to a base plan before adding any add-ons.
#### Auto recharge credits
When your credits fall below the threshold you set, we'll automatically add credits that don't expire to your account, ensuring uninterrupted service.
#### Extra AI agents
You can add extra AI agents to help you scale your service by managing multiple agents simultaneously.
#### Custom Domains
Use your own custom domains for the embed script, iframe, and AI agent link, offering a personalized and branded experience for your users.\
Note that this add-on is available only for the Enterprise plan.
Custom Domains add-on is only available on the Enterprise plan.
Custom Domains add-on is only available on the Enterprise plan.
#### Remove 'Powered By Chatbase'
Remove the Chatbase branding from the iframe and widget for a cleaner, custom experience.
Add-ons can be subscribed to on a monthly or yearly basis. \
\
The billing interval must be consistent: monthly plans can only include monthly add-ons, and yearly plans can only include yearly add-ons.
Cancelling an addon will remove it immediately and credit your account for the remaining days of your billing period.
## Billing
This section displays your billing details, including the email addresses receiving invoice copies, the data on the invoices, the payment methods used, and all past invoices.
### Billing Details
This section displays your billing information, this information will appear on your invoices. You can edit it as needed and click "Save" to update the details.
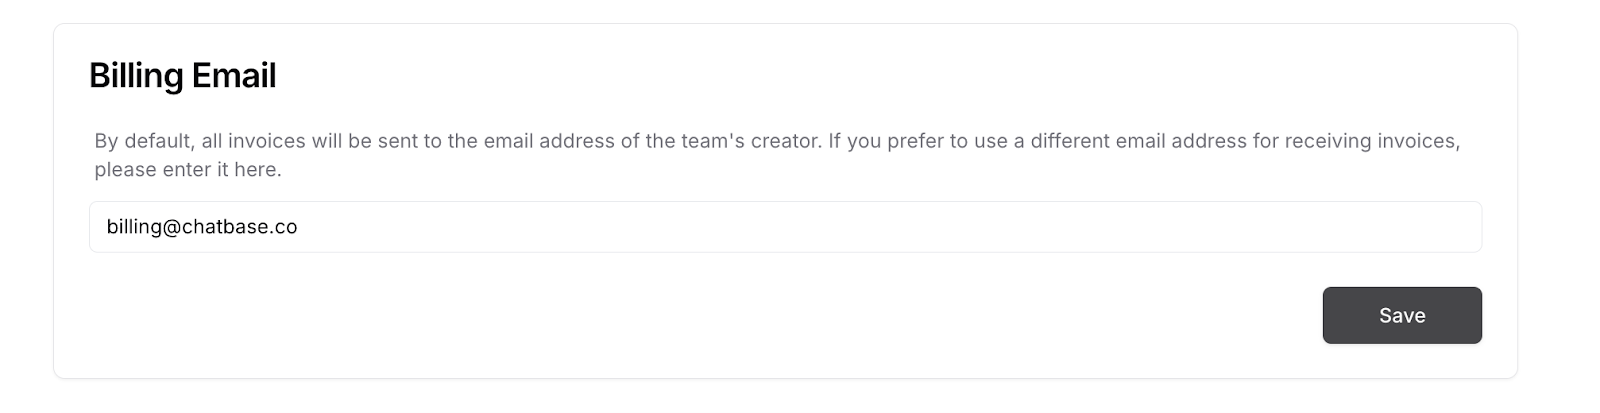
 ### Billing Email
This section shows the email address that will receive automated copies of all invoices for this workspace.
### Billing Email
This section shows the email address that will receive automated copies of all invoices for this workspace.
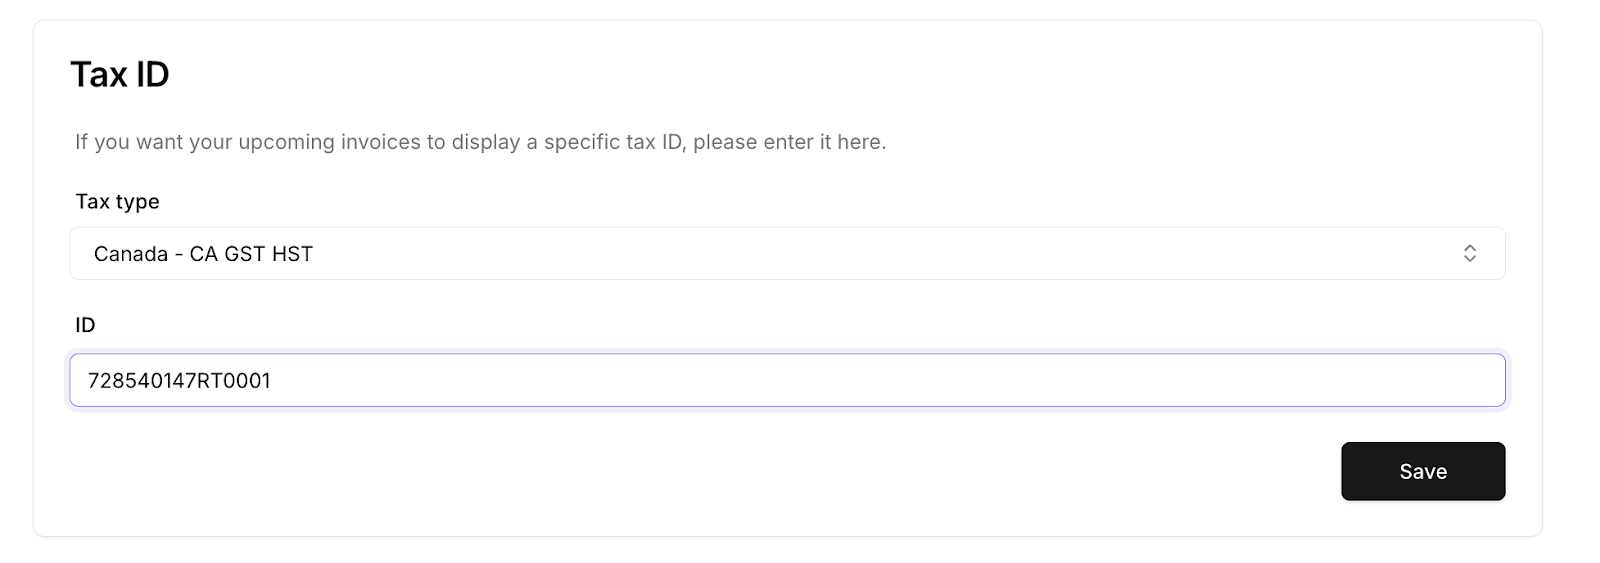
 ### Tax ID
In this section, you can add a tax ID to be displayed on the invoice if needed.
### Tax ID
In this section, you can add a tax ID to be displayed on the invoice if needed.
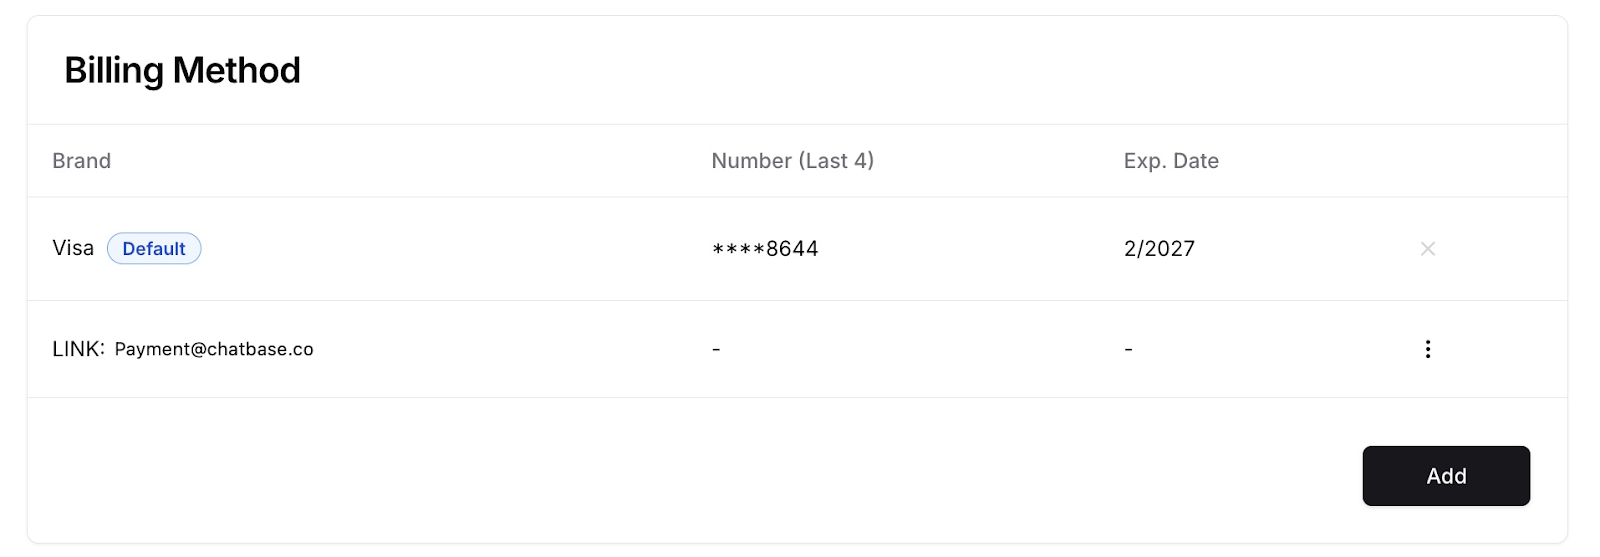
 ### Billing Method
In this section, you can add payment methods and set one as your default. You can also delete payment methods, provided they are not set as the default.
### Billing Method
In this section, you can add payment methods and set one as your default. You can also delete payment methods, provided they are not set as the default.
 ### Billing History
In this section, you can view all your past invoices along with their statuses. Click on an invoice to view it, and you'll also have the option to download it.
### Billing History
In this section, you can view all your past invoices along with their statuses. Click on an invoice to view it, and you'll also have the option to download it.
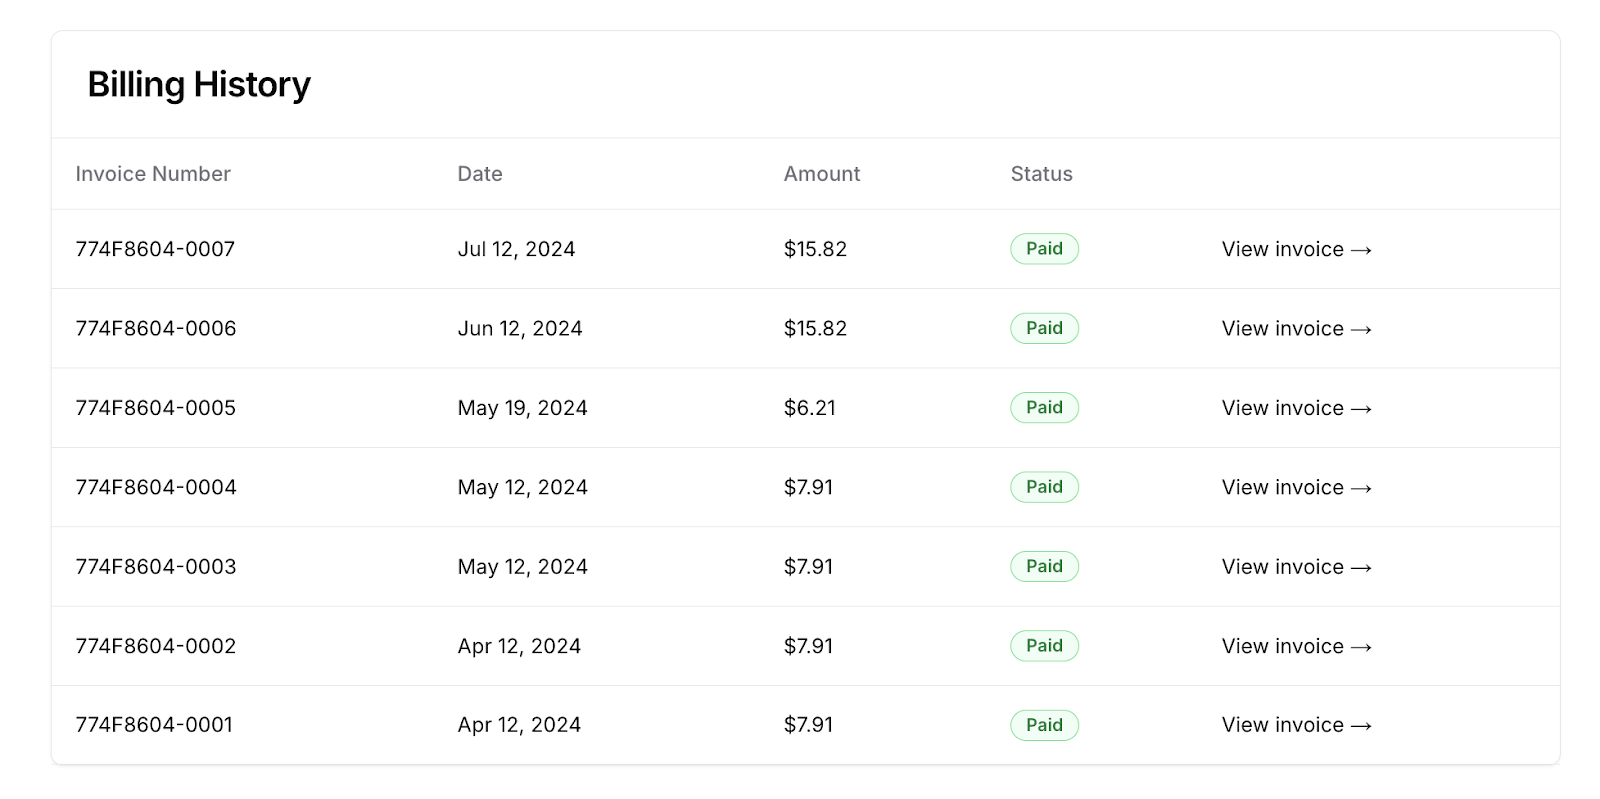 Starting the 5th of January 2026, new users (or users with only one existing plan) will receive a single consolidated invoice instead of separate invoices for each subscription.
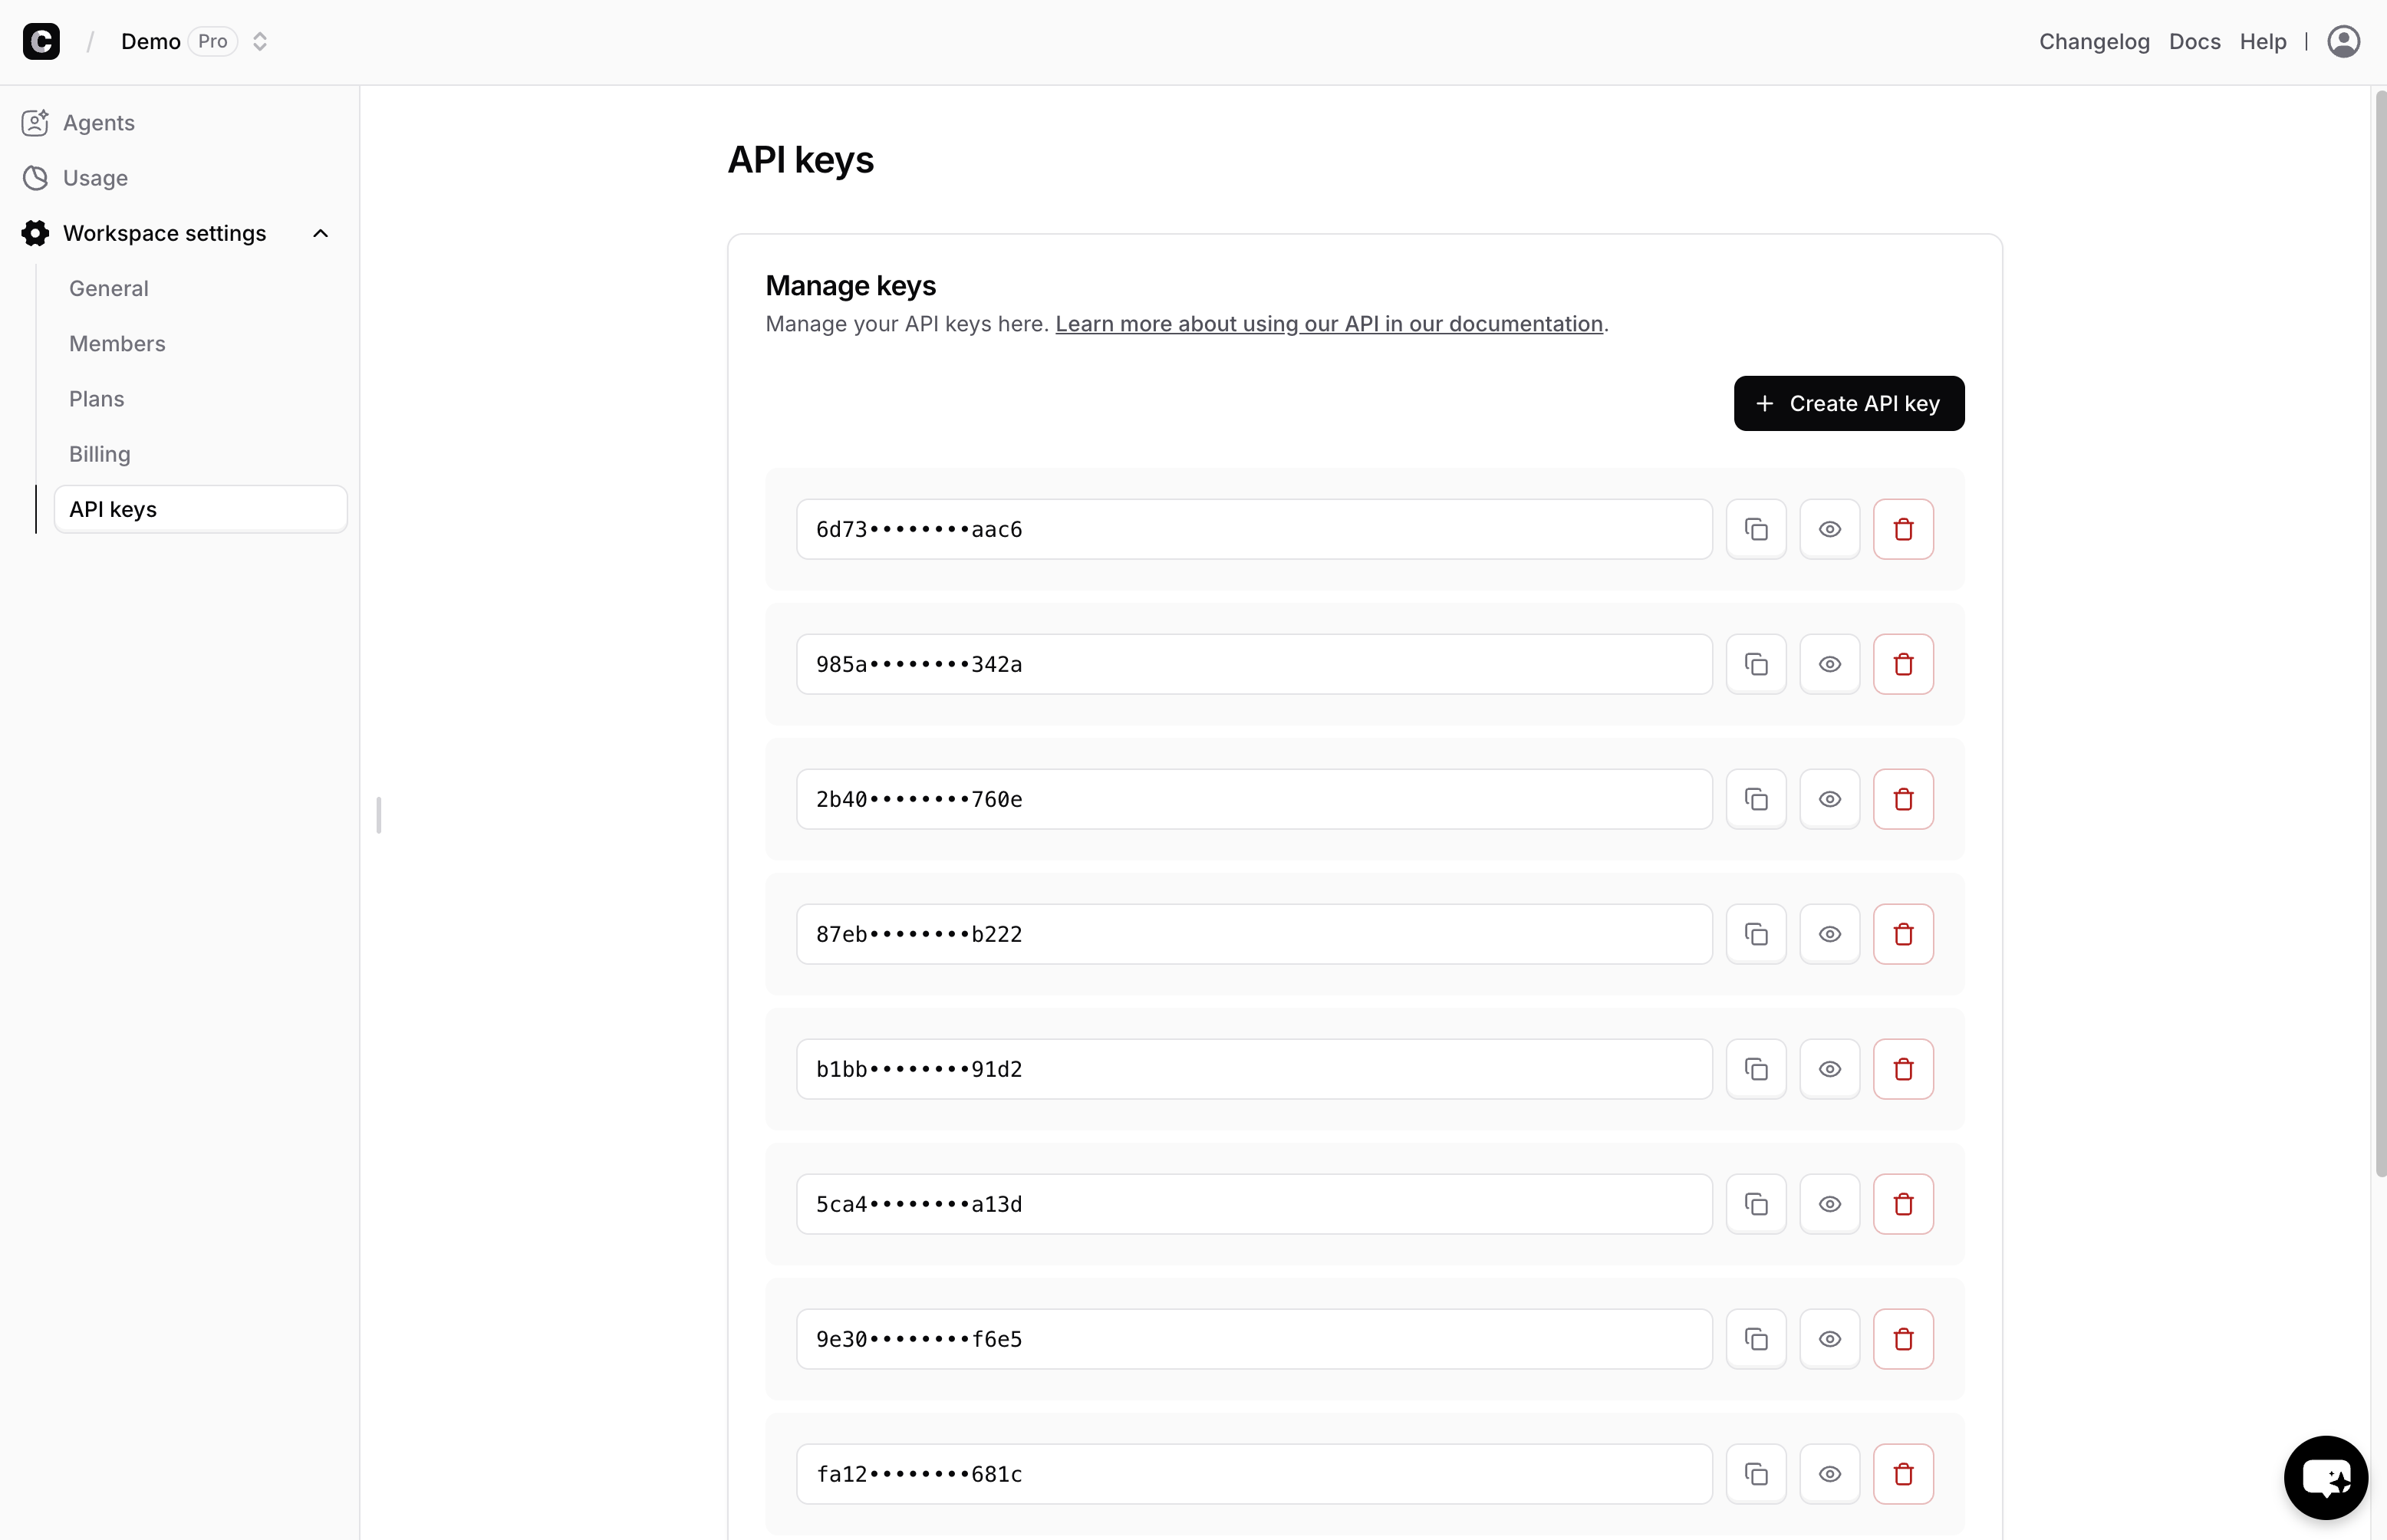
## API Keys
On this page, you'll find your Chatbase API keys, which allow you to interact with your agent using API calls.
***Note :*** This page is not available on all plans. If your plan doesn't include API access, you won't be able to view this page.
Starting the 5th of January 2026, new users (or users with only one existing plan) will receive a single consolidated invoice instead of separate invoices for each subscription.
## API Keys
On this page, you'll find your Chatbase API keys, which allow you to interact with your agent using API calls.
***Note :*** This page is not available on all plans. If your plan doesn't include API access, you won't be able to view this page.
 ## Audit Logs
This section allows you to monitor activity across your workspace, including who made changes and what was modified on the dashboard.
Audit Logs provide a chronological record of configuration updates to help teams maintain visibility, accountability, and operational control.
Audit Logs are only available on the Enterprise plan.
### Activity Overview
In this section, you can view all recorded workspace activity, including:
* Agent updates
* Source creation and deletion
* Action creation and deletion
* Integration creation and deletion
Each log entry displays:
* The event type (Created, Updated, Deleted)
* The object type (Agent, Source, Action, etc.)
* The object name or ID
* The user who performed the action
* The timestamp of the change
## Audit Logs
This section allows you to monitor activity across your workspace, including who made changes and what was modified on the dashboard.
Audit Logs provide a chronological record of configuration updates to help teams maintain visibility, accountability, and operational control.
Audit Logs are only available on the Enterprise plan.
### Activity Overview
In this section, you can view all recorded workspace activity, including:
* Agent updates
* Source creation and deletion
* Action creation and deletion
* Integration creation and deletion
Each log entry displays:
* The event type (Created, Updated, Deleted)
* The object type (Agent, Source, Action, etc.)
* The object name or ID
* The user who performed the action
* The timestamp of the change
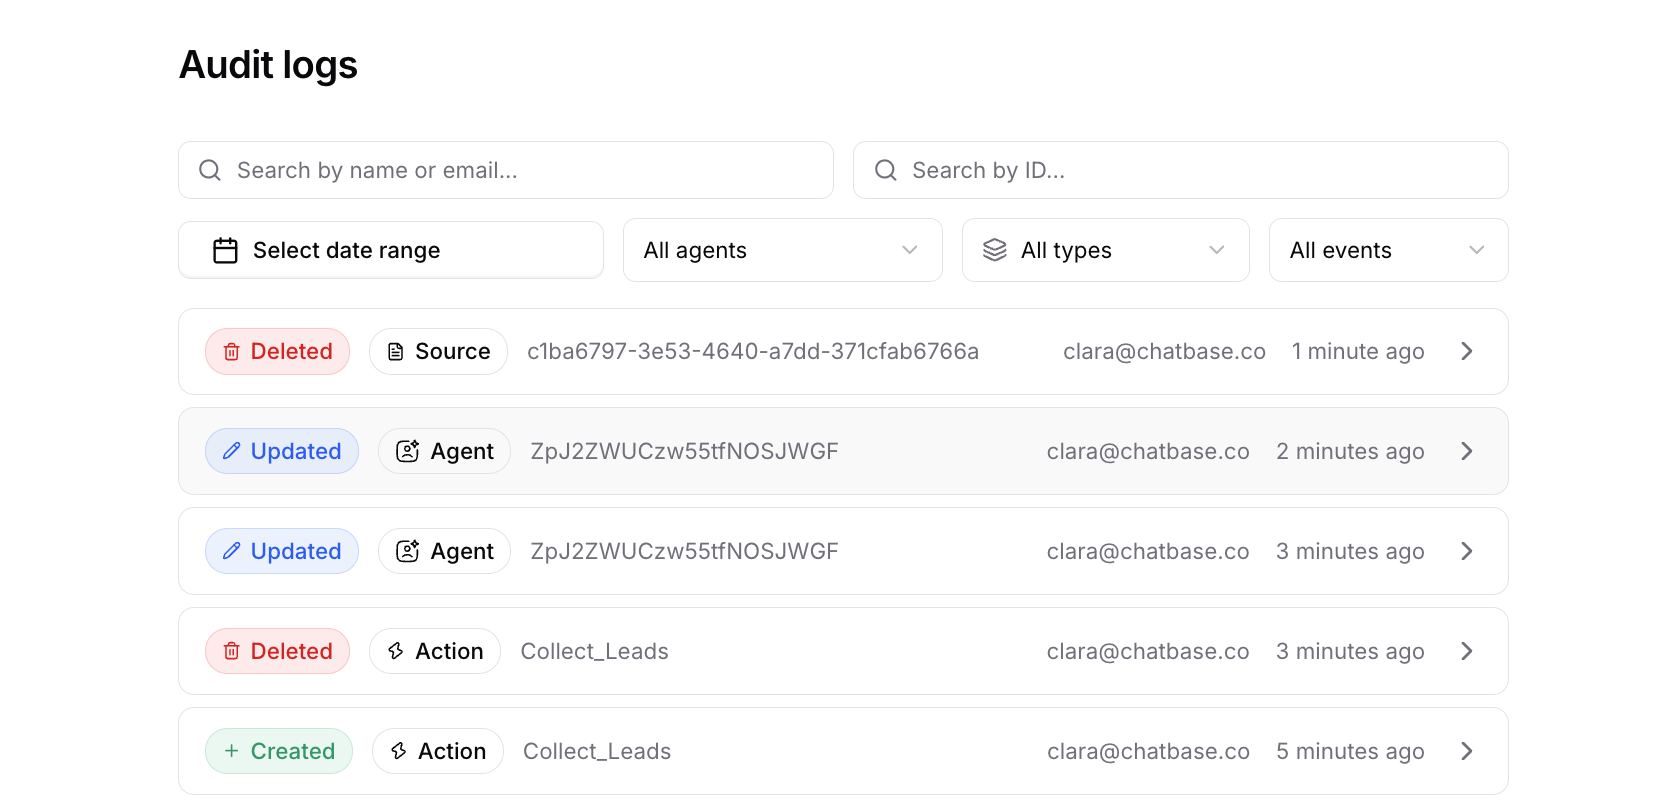
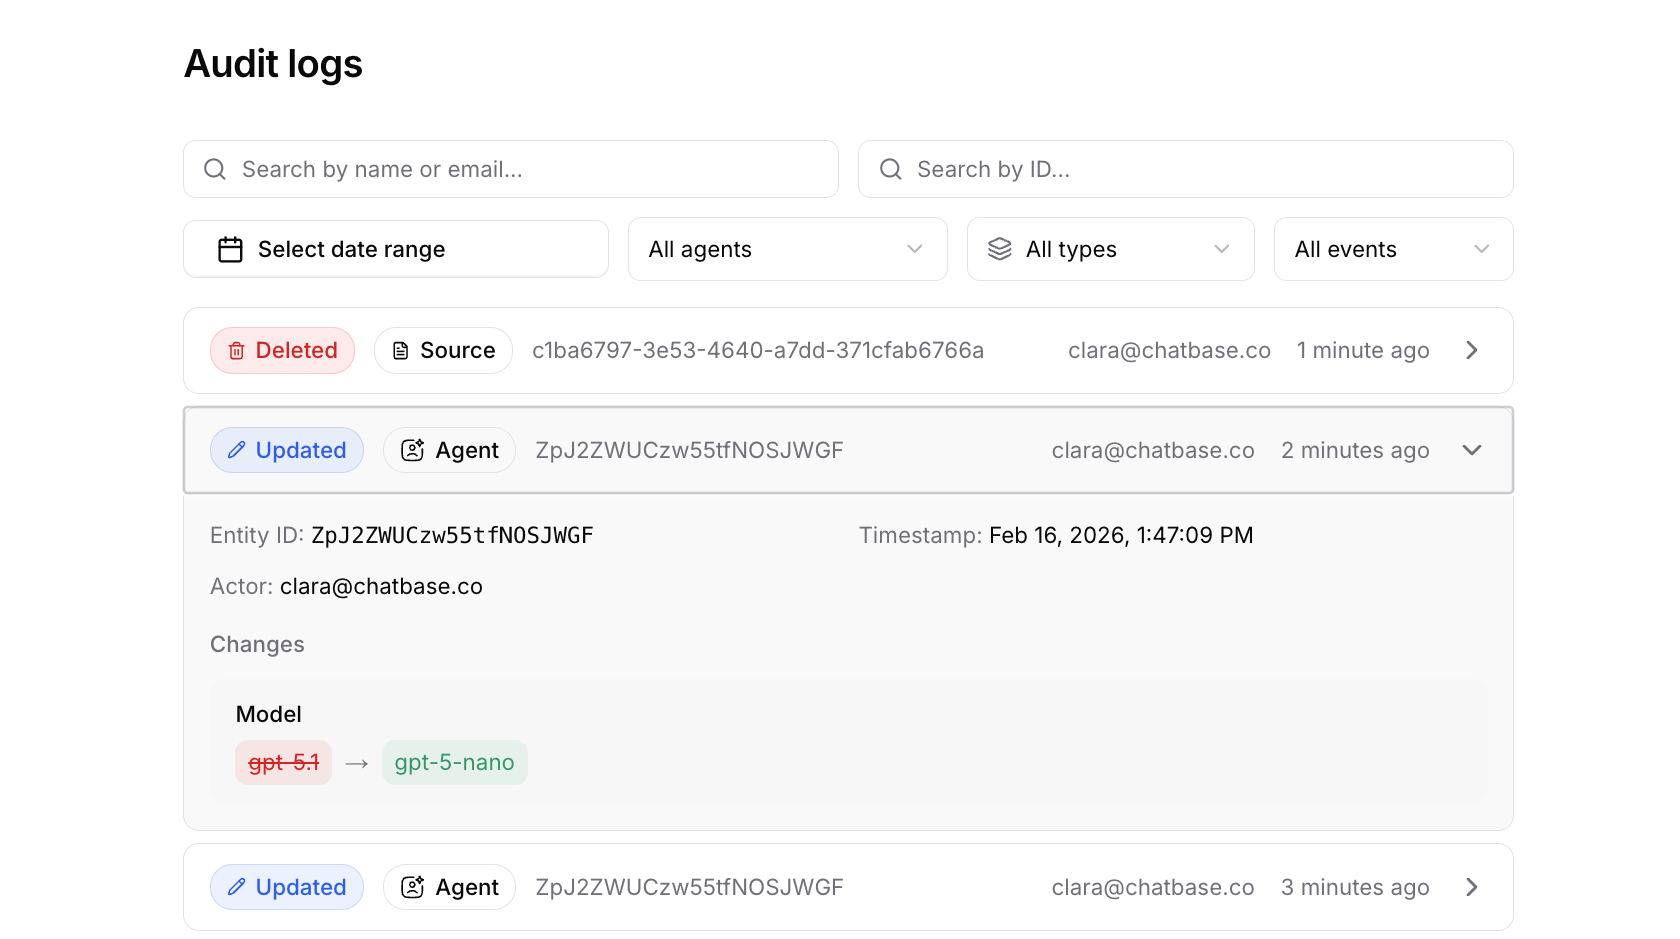 ### Filters & Search
You can filter audit logs to quickly find specific changes using:
* Date range selector
* Agent filter
* Event type filter
* Search by user name or object ID
This makes it easier to investigate unexpected behavior or review activity within a specific timeframe.
### Filters & Search
You can filter audit logs to quickly find specific changes using:
* Date range selector
* Agent filter
* Event type filter
* Search by user name or object ID
This makes it easier to investigate unexpected behavior or review activity within a specific timeframe.