> ## Documentation Index
> Fetch the complete documentation index at: https://chatbase.co/docs/llms.txt
> Use this file to discover all available pages before exploring further.
# WhatsApp Campaigns
> Send outbound WhatsApp campaigns to your contacts using pre-approved Meta message templates. Step-by-step guide for creating, sending, and tracking WhatsApp campaigns.
WhatsApp campaigns let you send bulk messages to your contacts using pre-approved message templates from Meta. This is the primary way to proactively reach out to customers on WhatsApp outside the 24-hour conversation window.
WhatsApp requires all outbound messages to use **pre-approved templates**. You cannot send free-form text as a campaign — templates must be created in Meta and approved before use. See the [WhatsApp Templates guide](/user-guides/integrations/whatsapp-templates) for how to create and manage templates.
## Prerequisites
* A connected WhatsApp integration ([setup guide](/user-guides/integrations/whatsapp))
* At least one approved message template in Meta ([WhatsApp Templates guide](/user-guides/integrations/whatsapp-templates))
* Contacts with phone numbers in your contact list ([Contacts guide](/user-guides/chatbot/contacts/contacts-overview))
* A payment method configured in your [Meta billing settings](https://business.facebook.com/billing_hub)
Meta charges fees for each template message sent. Fees vary by country and template category. See [Meta's WhatsApp pricing](https://developers.facebook.com/docs/whatsapp/pricing) for current rates.
## Creating a WhatsApp Campaign
1\. Navigate to the **Campaigns** section in the dashboard sidebar and click **+ New campaign**.
 The new campaign page has two tabs: **Configuration** and **Audience**.
### Configuration
The new campaign page has two tabs: **Configuration** and **Audience**.
### Configuration
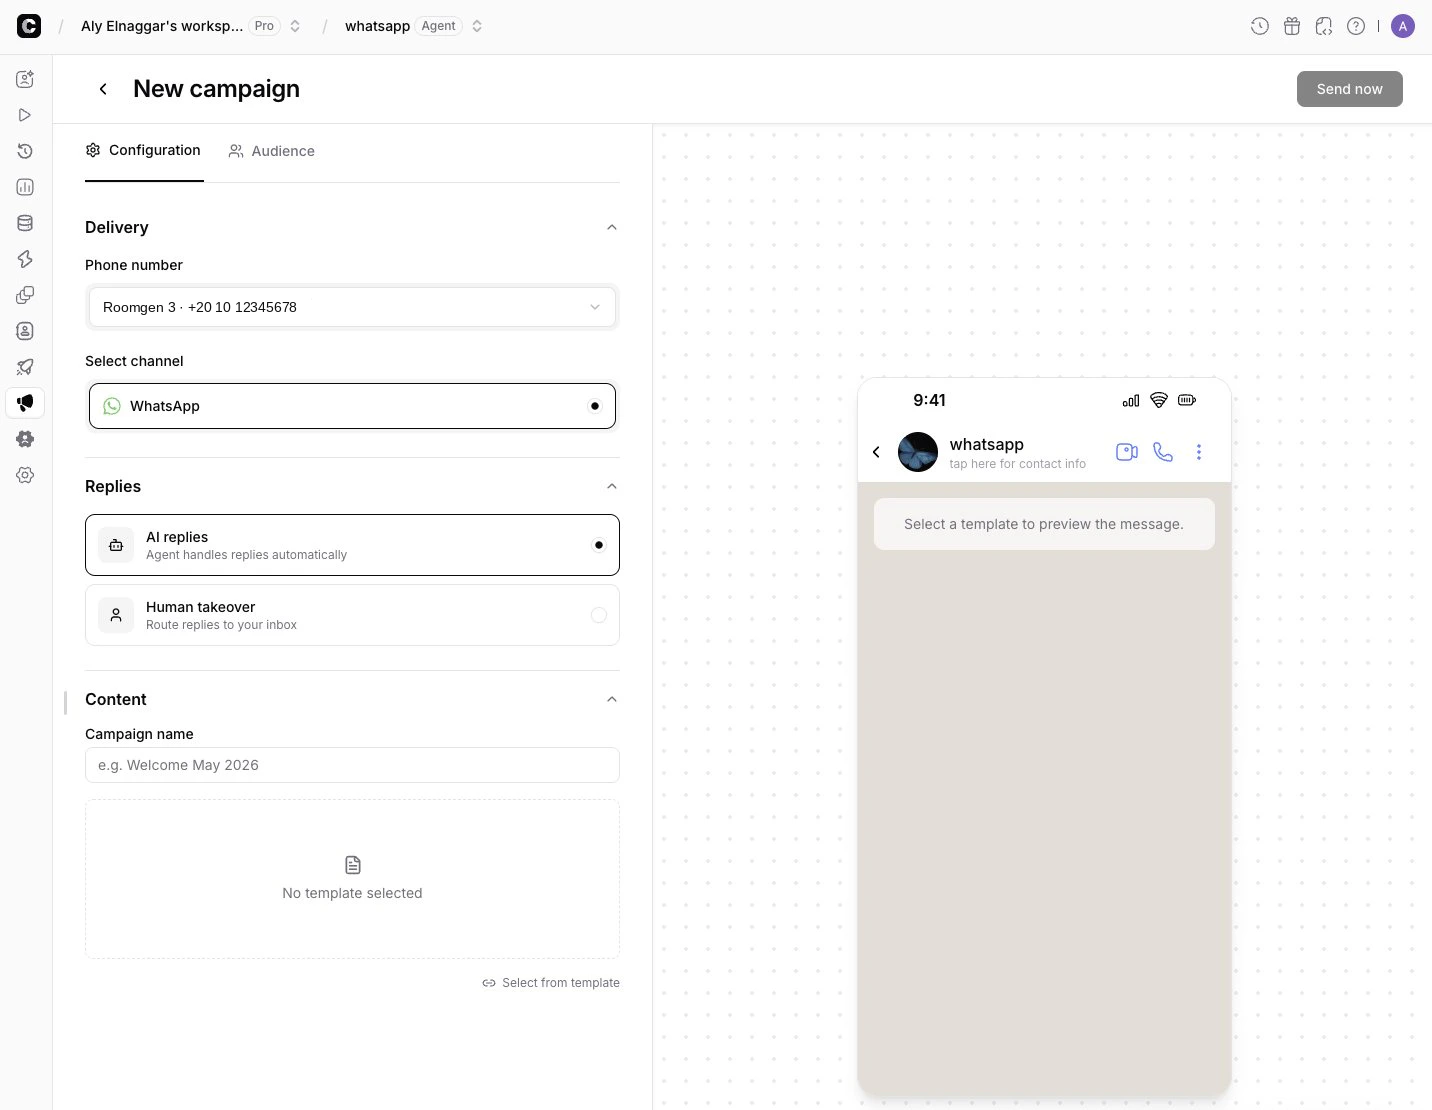 **Delivery** — Select **WhatsApp** as your channel and choose the phone number to send from. The selected number displays its verified business name.
**Replies** — Choose how your team handles replies from campaign recipients:
* **AI replies** (default) — Your AI agent responds to replies automatically. The conversation continues like any normal inbound chat.
* **Human takeover** — When a recipient replies, a helpdesk ticket is created automatically. Your team picks up the conversation from there.
**Content** — Enter a campaign name, then click **Select from template** to browse your approved templates from Meta. A preview of the message appears on the right as you configure it.
All template categories are supported: **Marketing**, **Utility**, and **Authentication**. Templates with headers (image, video, or document) display a media preview.
**Delivery** — Select **WhatsApp** as your channel and choose the phone number to send from. The selected number displays its verified business name.
**Replies** — Choose how your team handles replies from campaign recipients:
* **AI replies** (default) — Your AI agent responds to replies automatically. The conversation continues like any normal inbound chat.
* **Human takeover** — When a recipient replies, a helpdesk ticket is created automatically. Your team picks up the conversation from there.
**Content** — Enter a campaign name, then click **Select from template** to browse your approved templates from Meta. A preview of the message appears on the right as you configure it.
All template categories are supported: **Marketing**, **Utility**, and **Authentication**. Templates with headers (image, video, or document) display a media preview.
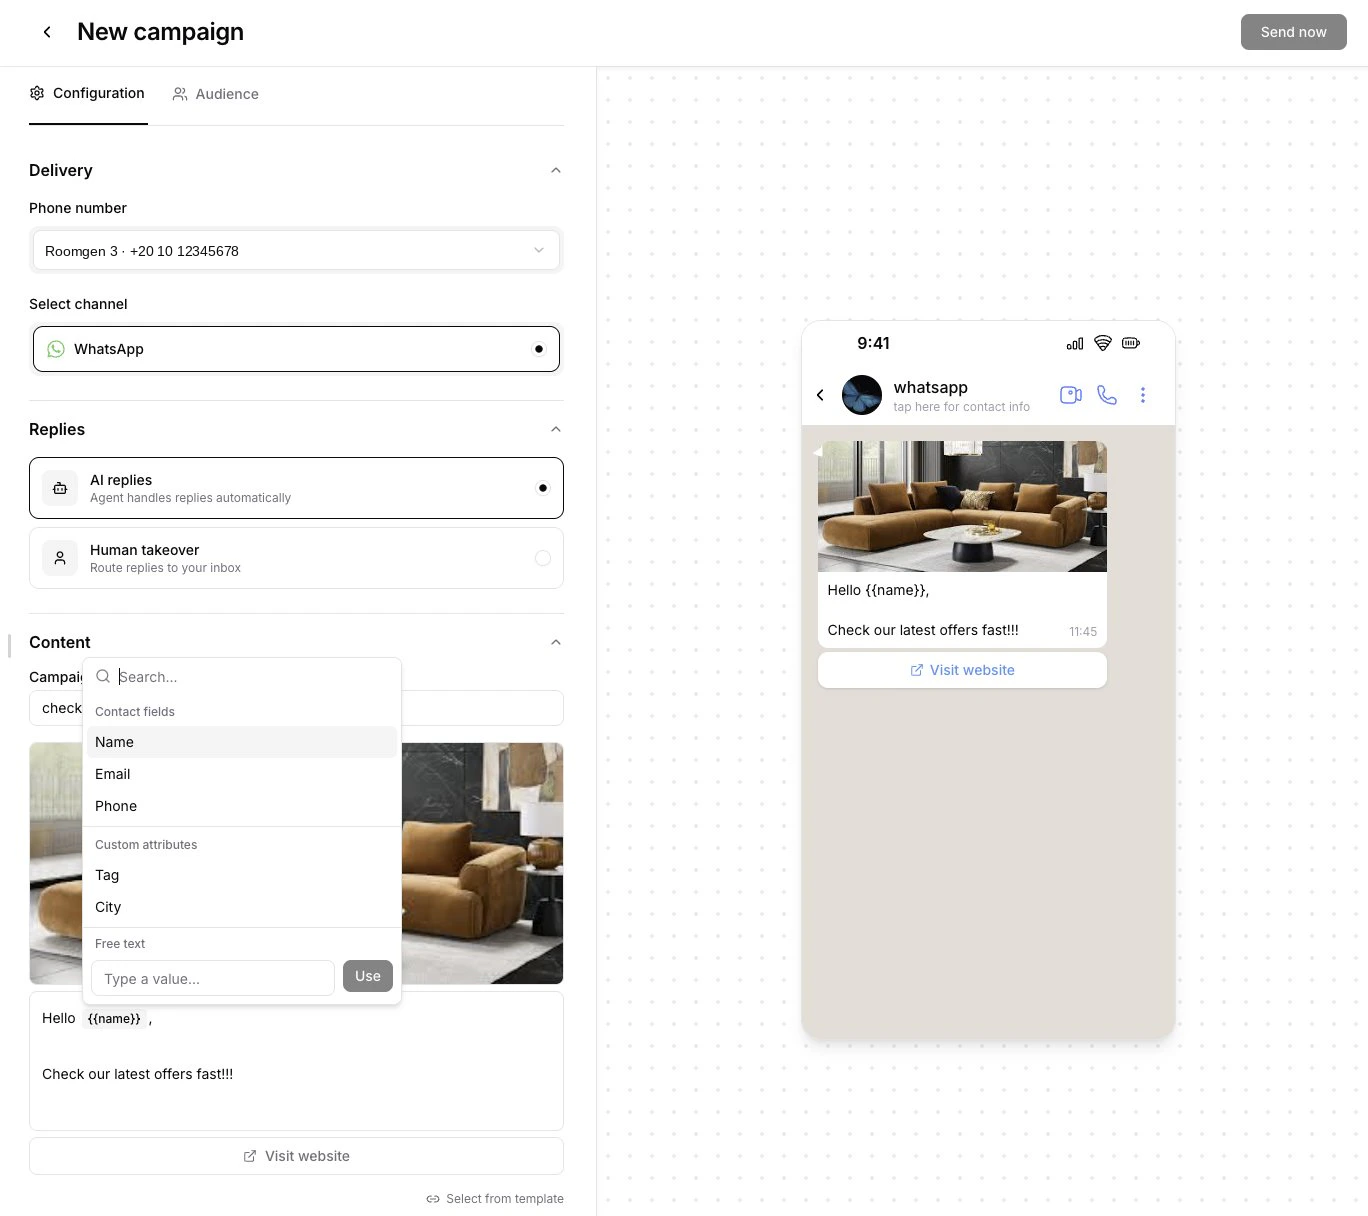
 If your template includes variables (e.g., `{{name}}`), map each one to a data source:
* **Contact field** — Pulls from the recipient's contact data (name, email, phone number, or custom attributes). Each recipient gets a personalized value.
* **Static value** — Enter fixed text that will be the same for all recipients.
Click on a variable in the template body to open the mapping dropdown.
If your template includes variables (e.g., `{{name}}`), map each one to a data source:
* **Contact field** — Pulls from the recipient's contact data (name, email, phone number, or custom attributes). Each recipient gets a personalized value.
* **Static value** — Enter fixed text that will be the same for all recipients.
Click on a variable in the template body to open the mapping dropdown.
 ### Audience
Switch to the **Audience** tab to choose recipients.
### Audience
Switch to the **Audience** tab to choose recipients.
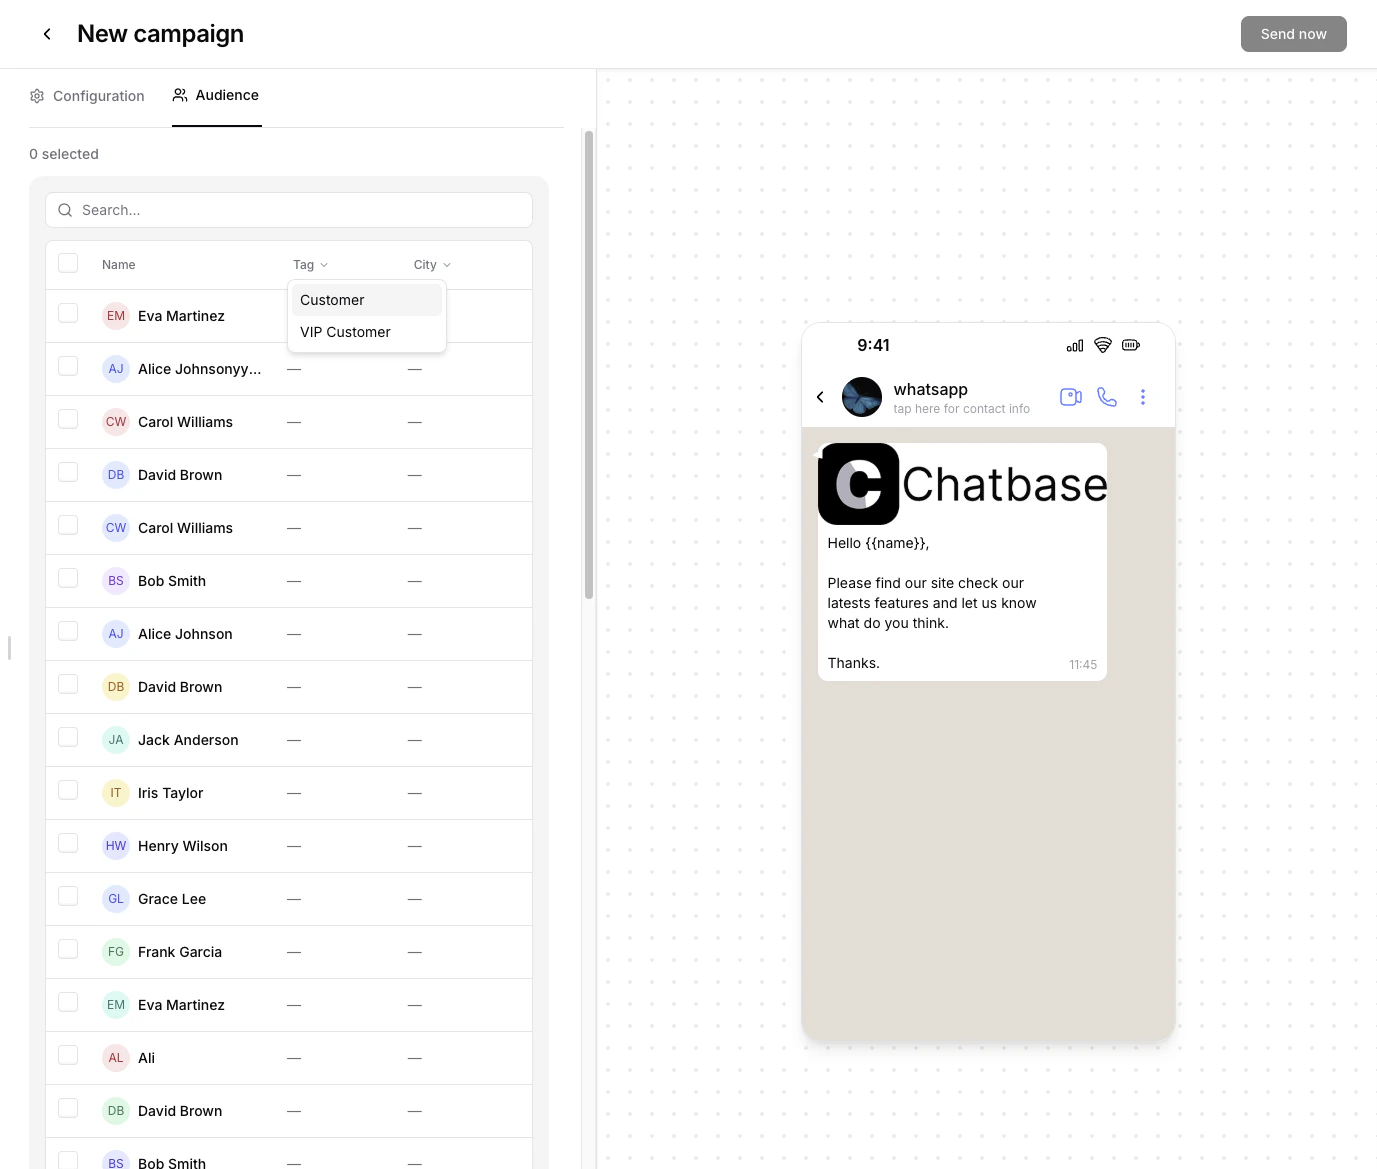
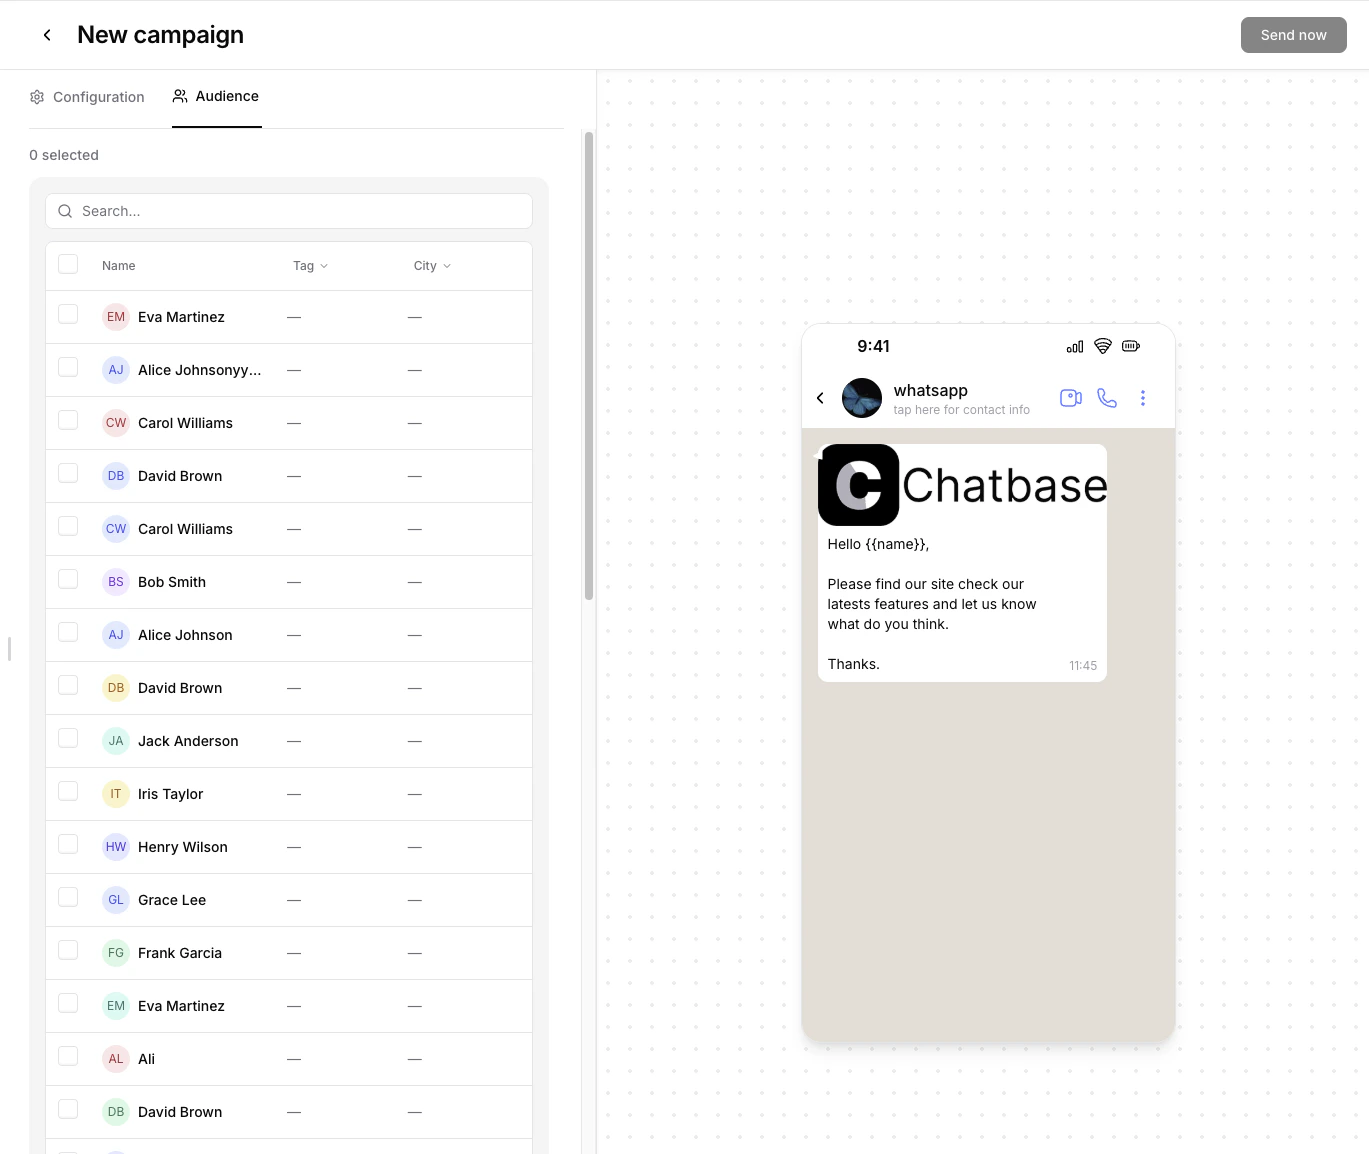 Browse your contact list and select who should receive the campaign. You can:
* **Search** contacts by name or phone number
* **Filter** by custom attributes — click a column header like **Tag** or **City** to filter by specific values
Browse your contact list and select who should receive the campaign. You can:
* **Search** contacts by name or phone number
* **Filter** by custom attributes — click a column header like **Tag** or **City** to filter by specific values
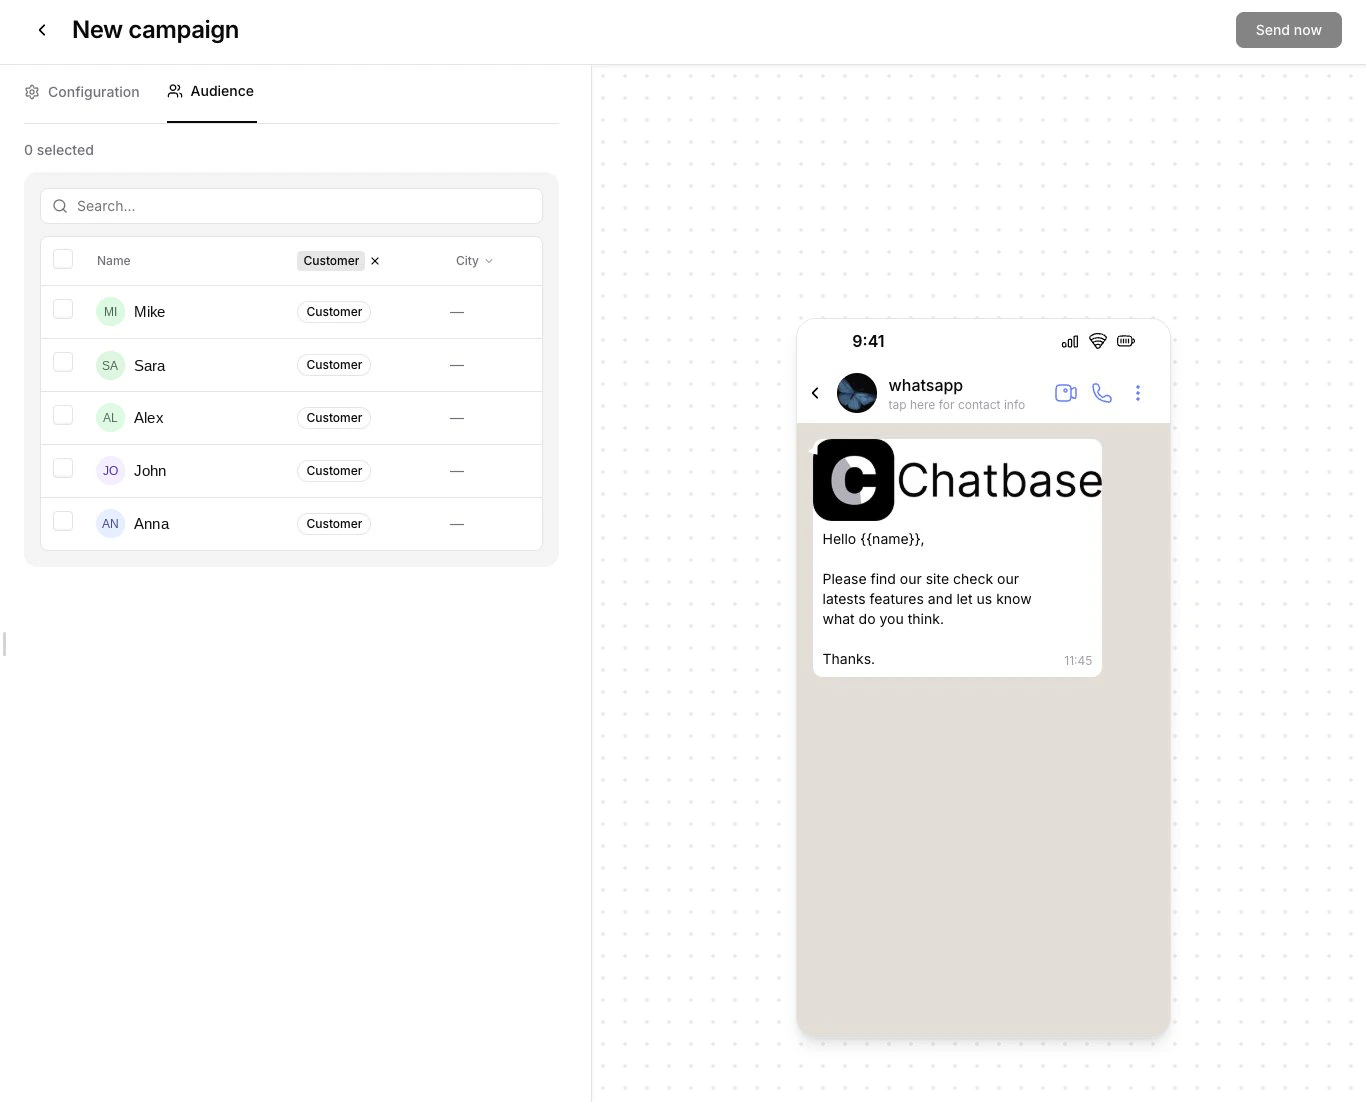 You can combine search and filters to narrow down your audience further.
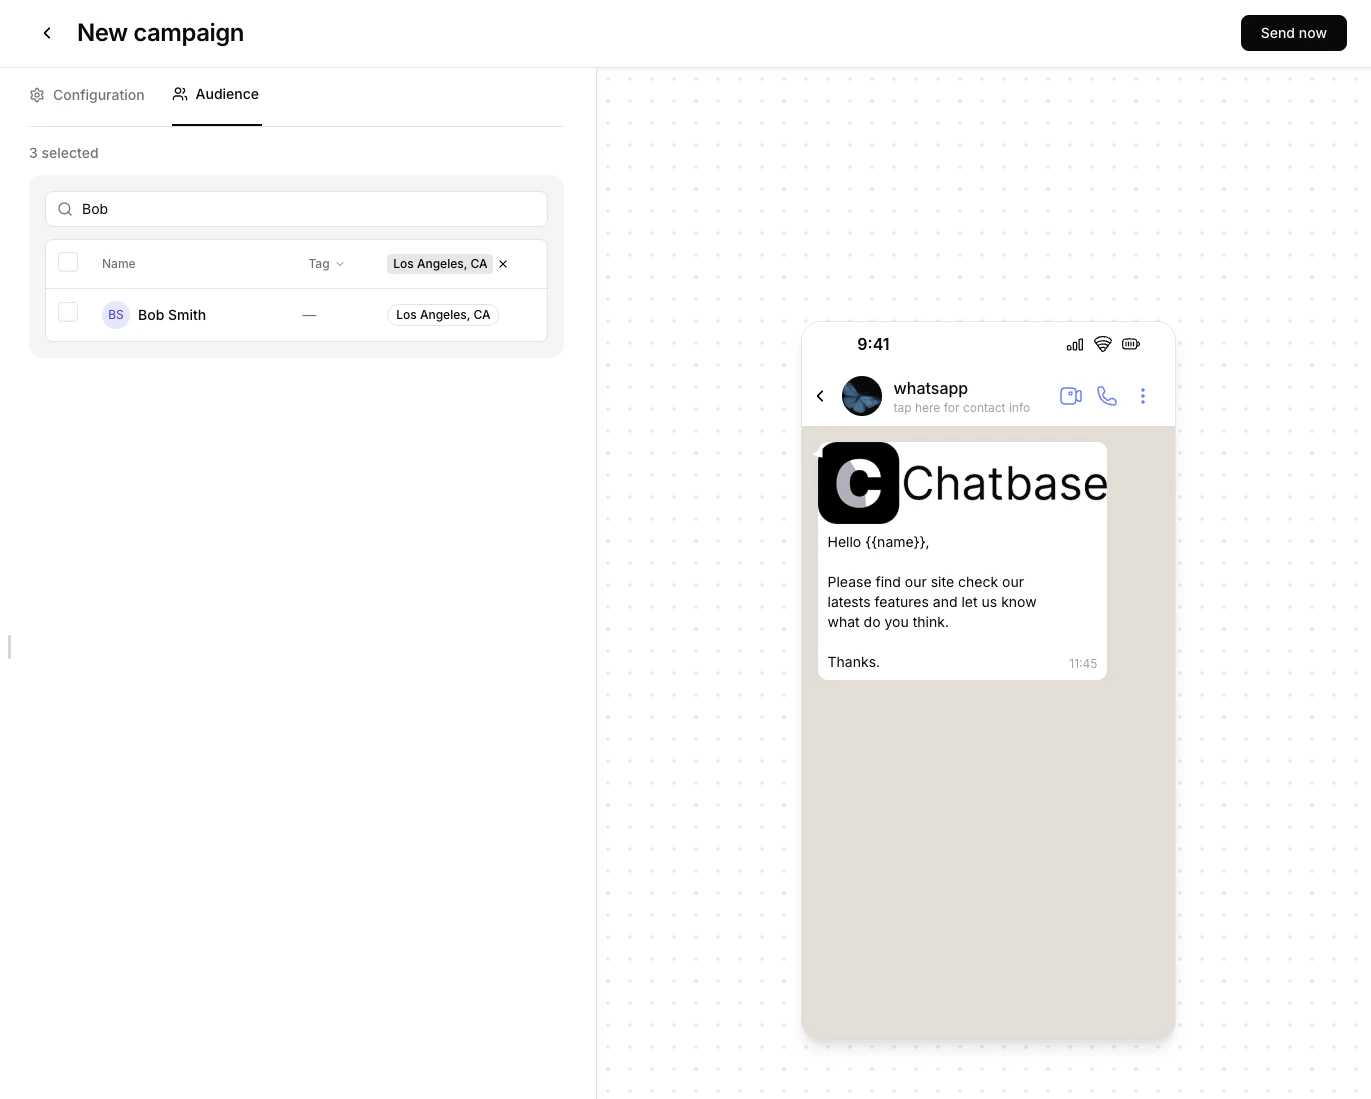 The selected contact count appears at the top of the tab. At least one contact is required to send.
Only contacts with a valid phone number can receive WhatsApp campaign messages. If a contact doesn't appear in the list, make sure their phone number is set in their [contact profile](/user-guides/chatbot/contacts/contacts-overview).
## Sending Your Campaign
Once you've configured delivery, content, and audience, click **Send now** in the top right. You'll be redirected to the campaign detail page where you can monitor delivery in real time.
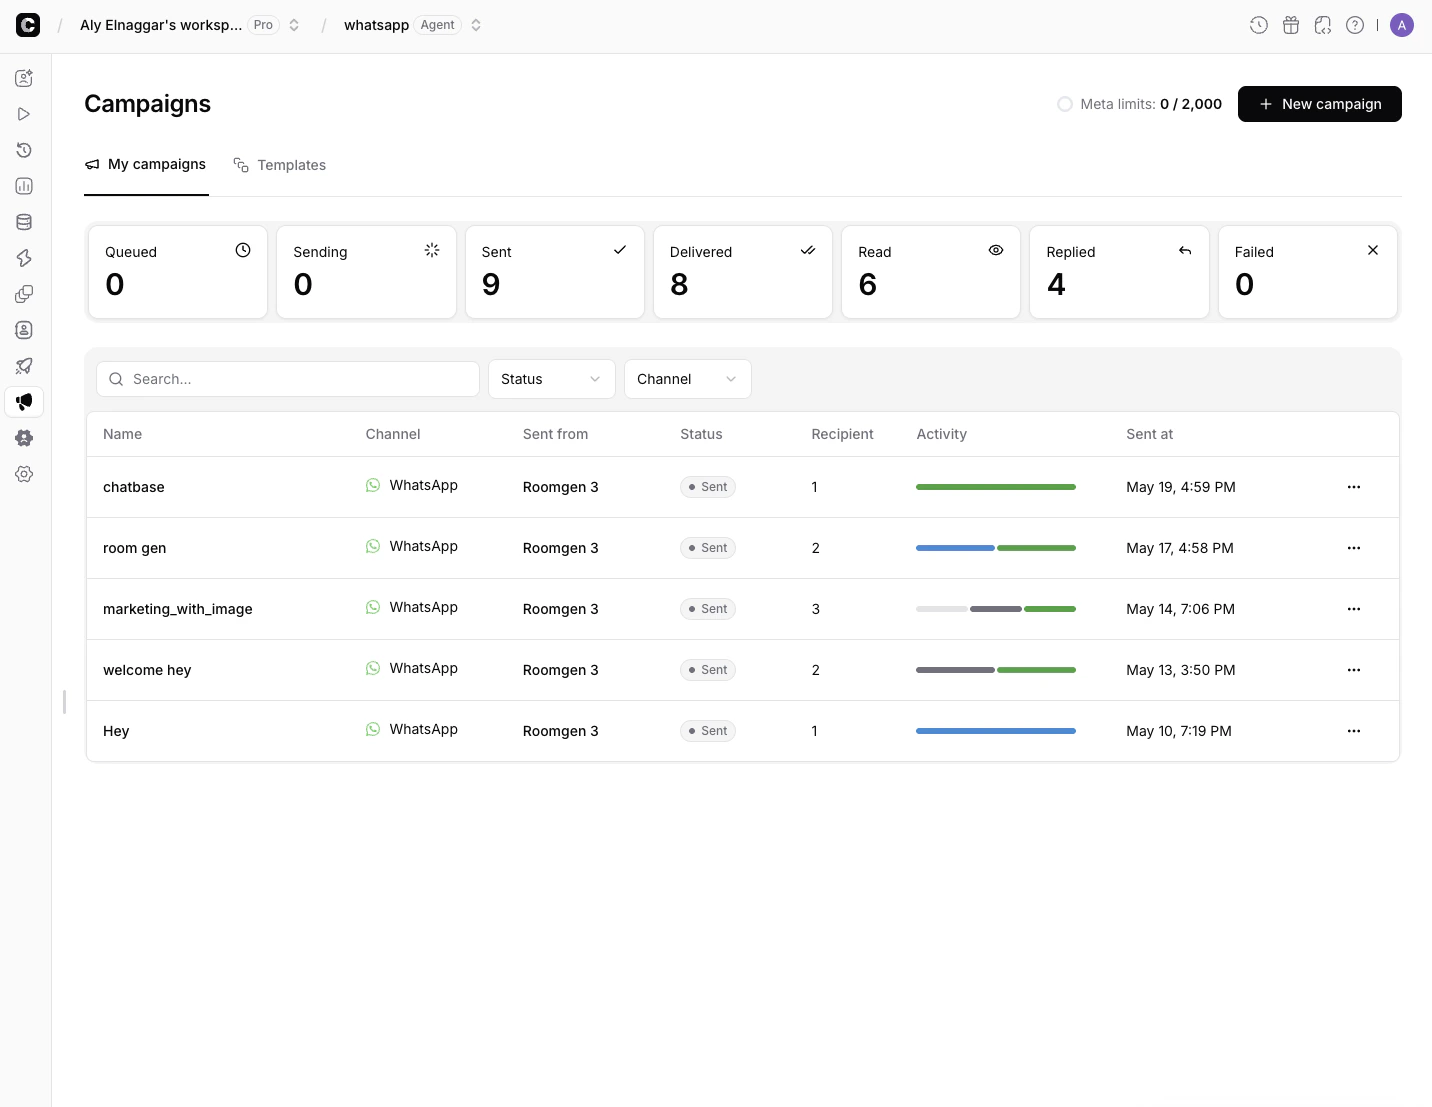
## Monitoring Delivery
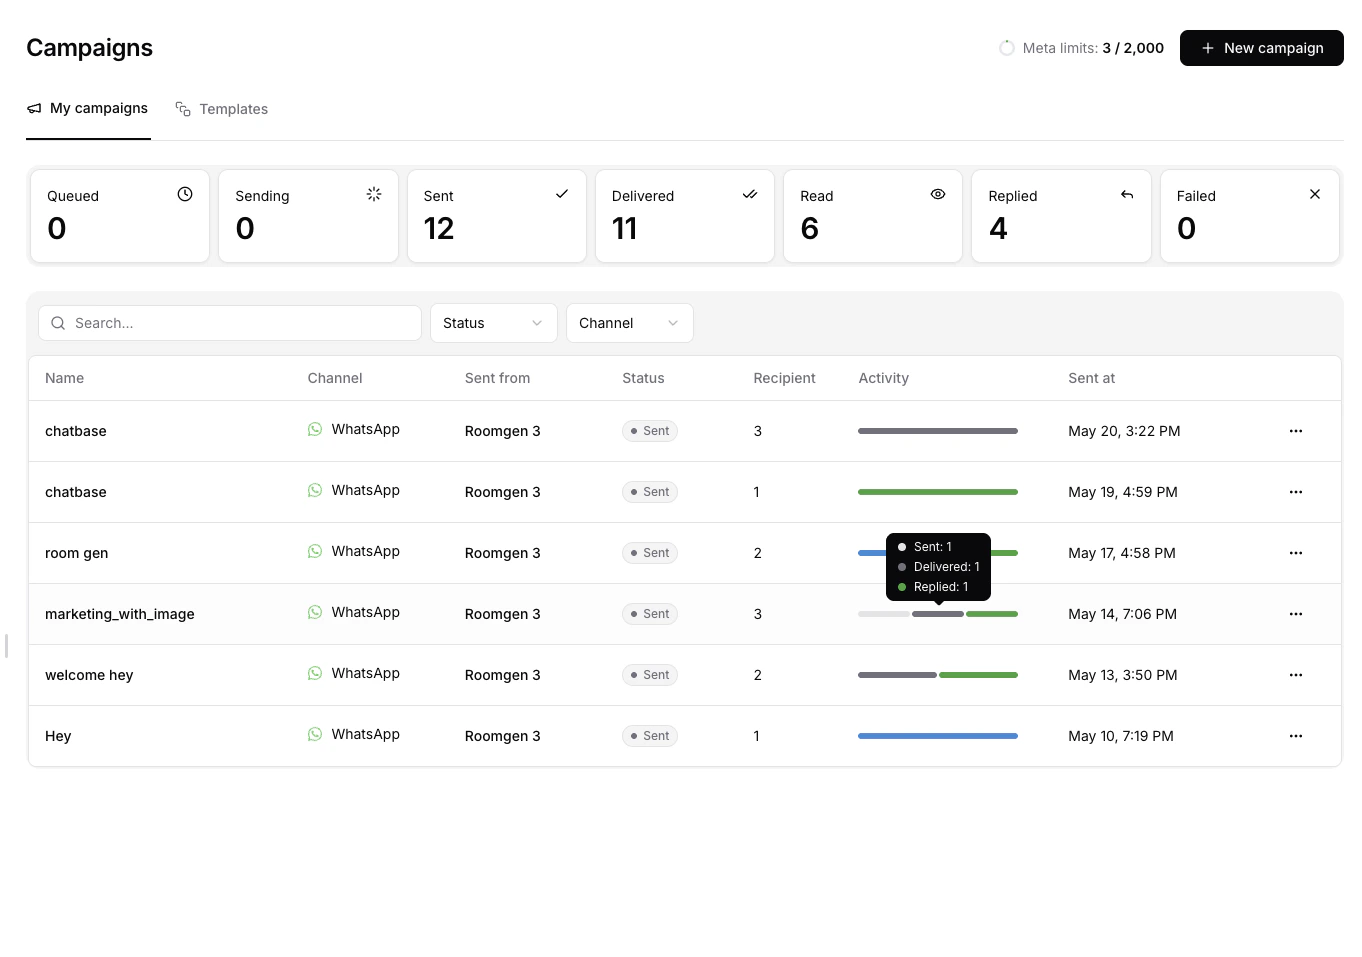
After sending, the campaigns list shows the status and activity for each campaign at a glance. Hover over the activity bar to see a breakdown of delivery stages.
The selected contact count appears at the top of the tab. At least one contact is required to send.
Only contacts with a valid phone number can receive WhatsApp campaign messages. If a contact doesn't appear in the list, make sure their phone number is set in their [contact profile](/user-guides/chatbot/contacts/contacts-overview).
## Sending Your Campaign
Once you've configured delivery, content, and audience, click **Send now** in the top right. You'll be redirected to the campaign detail page where you can monitor delivery in real time.
## Monitoring Delivery
After sending, the campaigns list shows the status and activity for each campaign at a glance. Hover over the activity bar to see a breakdown of delivery stages.
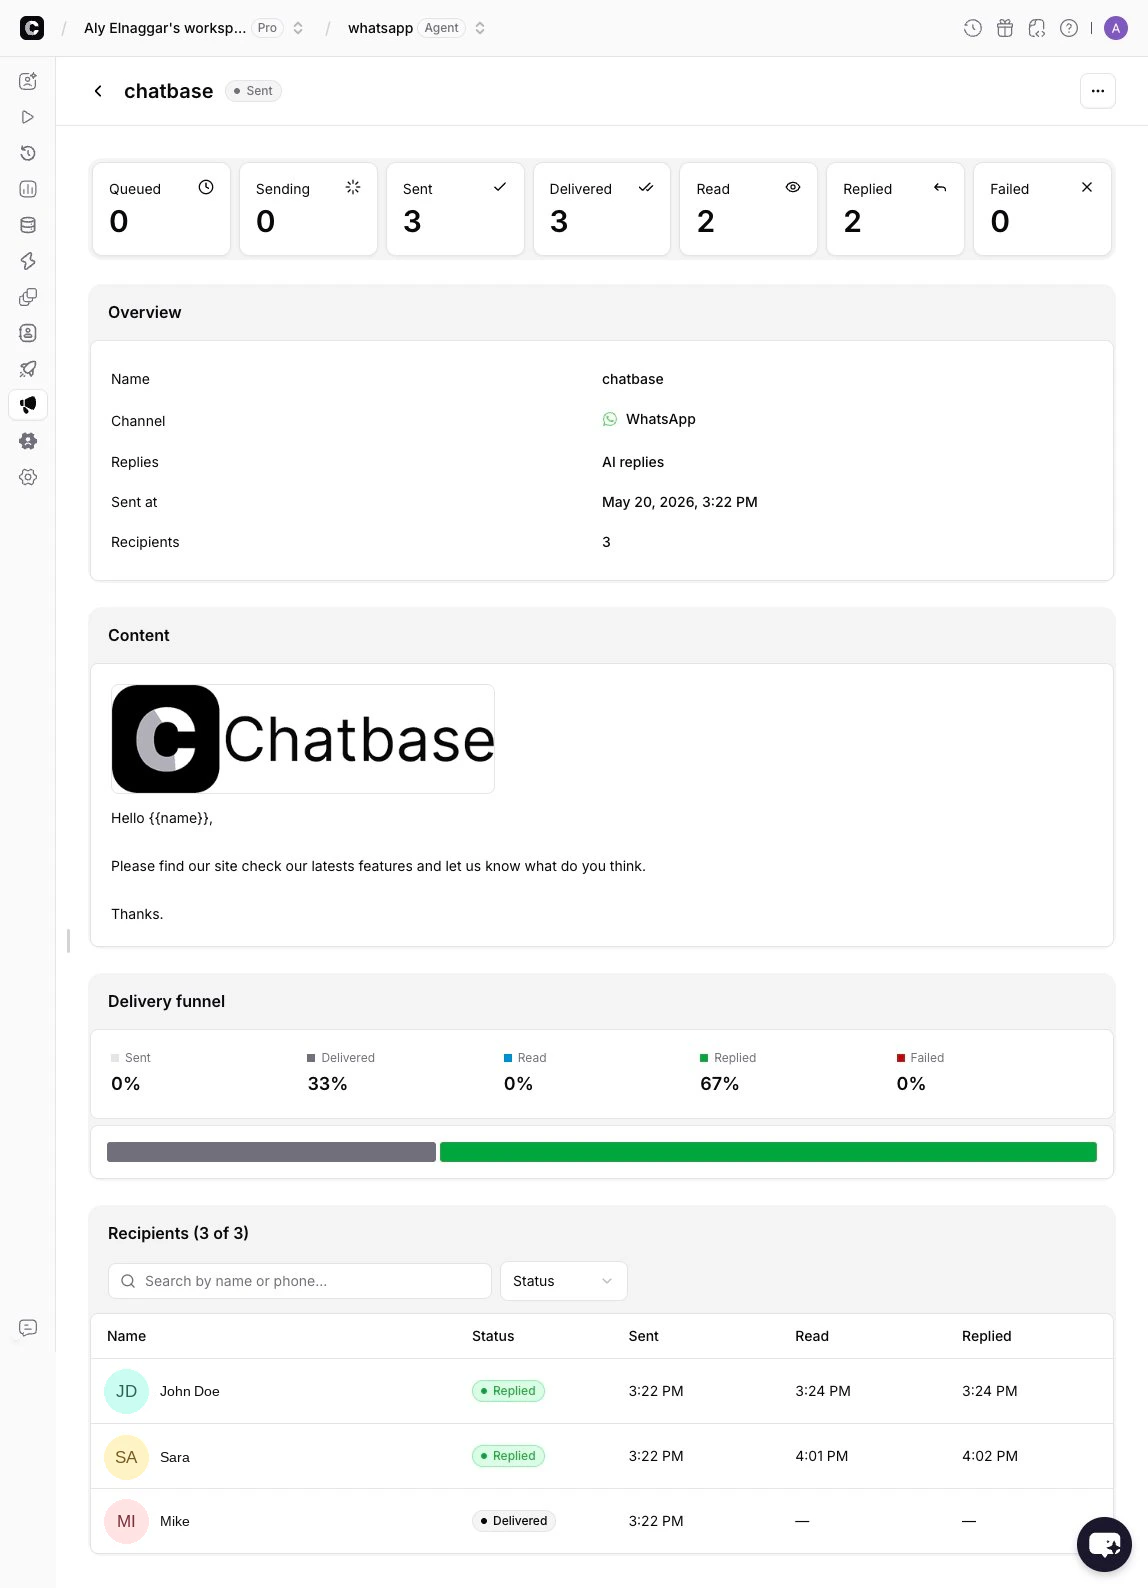
 Click a campaign to open the detail page with full delivery visibility:
* **Status counters** — Queued, Sending, Sent, Delivered, Read, Replied, and Failed counts at the top.
* **Overview** — Campaign name, channel, reply mode, send time, and recipient count.
* **Content** — The template message that was sent.
* **Delivery funnel** — A visual breakdown showing the percentage of recipients at each stage. Helps you see drop-off between Sent → Delivered → Read → Replied.
* **Recipients table** — A searchable, filterable list of every recipient with their delivery status and timestamps.
Click a campaign to open the detail page with full delivery visibility:
* **Status counters** — Queued, Sending, Sent, Delivered, Read, Replied, and Failed counts at the top.
* **Overview** — Campaign name, channel, reply mode, send time, and recipient count.
* **Content** — The template message that was sent.
* **Delivery funnel** — A visual breakdown showing the percentage of recipients at each stage. Helps you see drop-off between Sent → Delivered → Read → Replied.
* **Recipients table** — A searchable, filterable list of every recipient with their delivery status and timestamps.
 **Understanding messaging tiers:** Meta assigns a messaging tier to your WhatsApp Business Account based on quality and volume. Your tier determines how many unique contacts you can message per day. The current usage is shown as **Meta limits** in the top right of the campaigns page.
## Reply Handling
When contacts reply to your campaign, the behavior depends on the mode you selected during creation:
**AI Replies** — Your AI agent handles the reply automatically. The conversation continues like a normal inbound chat. This works well for product inquiries, support questions, and automated follow-ups.
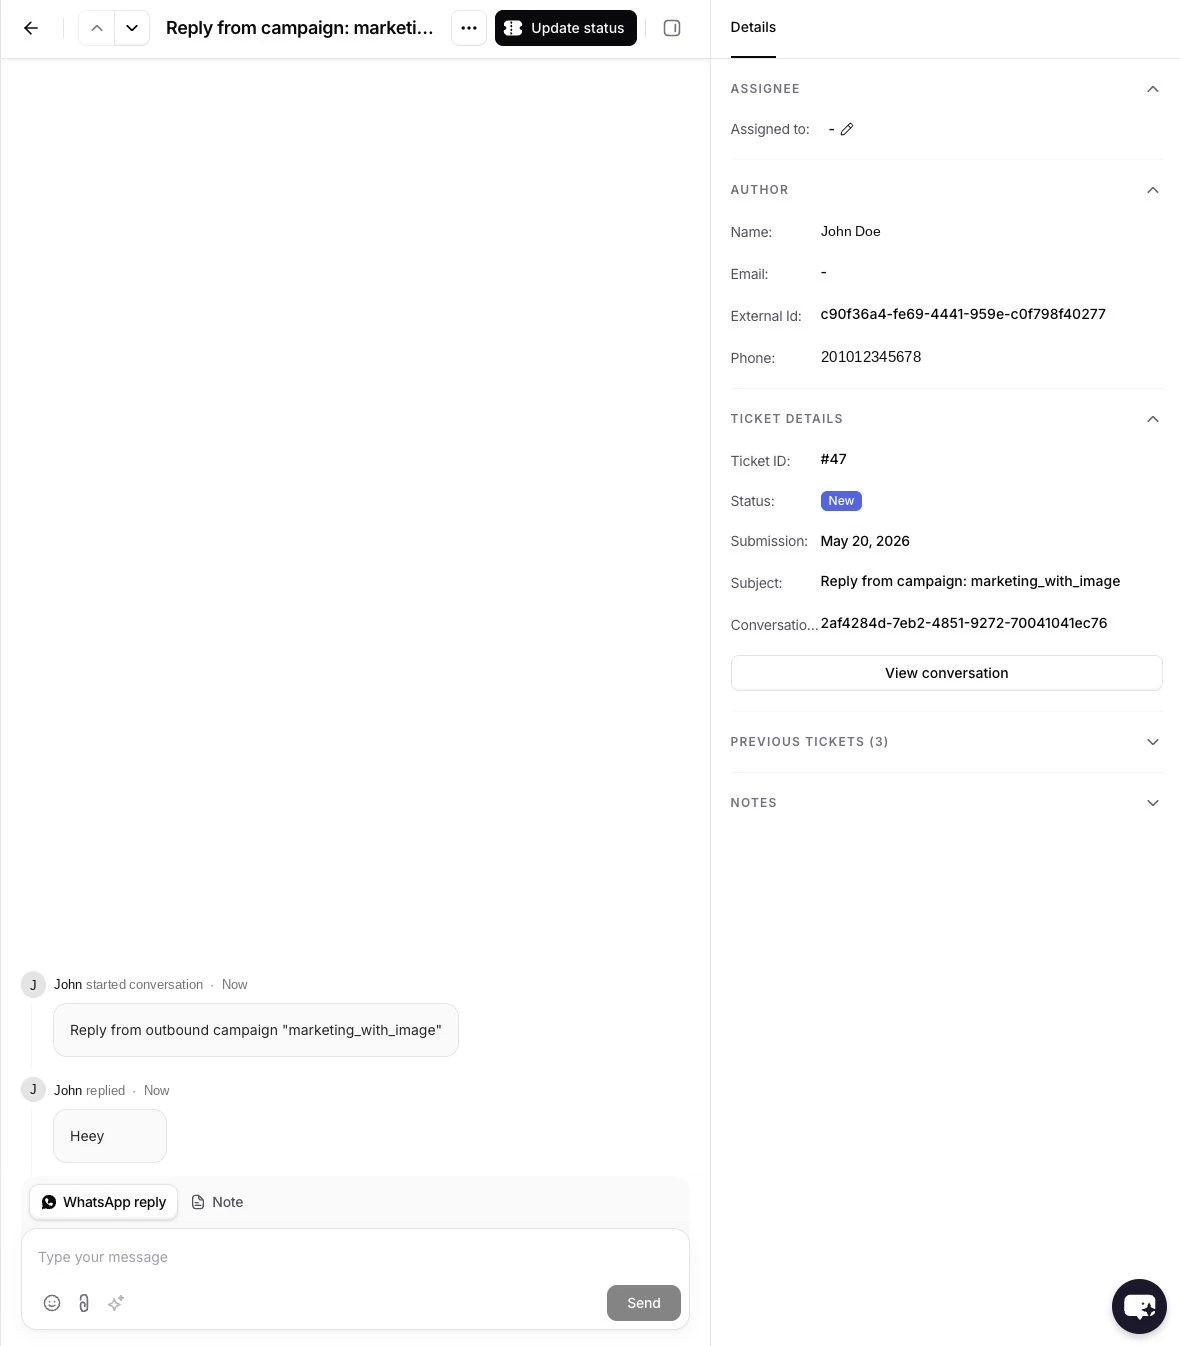
**Human Takeover** — The reply creates a helpdesk ticket tagged with the campaign name. Your team picks up the conversation and responds manually from the helpdesk inbox.
**Understanding messaging tiers:** Meta assigns a messaging tier to your WhatsApp Business Account based on quality and volume. Your tier determines how many unique contacts you can message per day. The current usage is shown as **Meta limits** in the top right of the campaigns page.
## Reply Handling
When contacts reply to your campaign, the behavior depends on the mode you selected during creation:
**AI Replies** — Your AI agent handles the reply automatically. The conversation continues like a normal inbound chat. This works well for product inquiries, support questions, and automated follow-ups.
**Human Takeover** — The reply creates a helpdesk ticket tagged with the campaign name. Your team picks up the conversation and responds manually from the helpdesk inbox.
 Replies are attributed to your campaign for **72 hours** after sending. After that window, incoming messages from the same contact are treated as regular inbound conversations.
## Troubleshooting
* **Campaign stuck in "Sending"?** Large campaigns are processed in batches and may take a few minutes. If there's no progress after 10 minutes, check that your [WhatsApp integration](/user-guides/integrations/whatsapp) is still connected.
* **Recipients showing "Failed"?** Common causes include an invalid phone number, Meta rate limits being reached, or a missing payment method in your [Meta billing settings](https://business.facebook.com/billing_hub).
* **Template not appearing?** Make sure the template has been approved in Meta. Only approved templates appear in the campaign template picker.
* **Replies not creating tickets?** Verify that reply behavior is set to **Human Takeover** and that the reply arrived within the 72-hour attribution window.
* **Hitting rate limits?** Your Meta messaging tier determines daily send limits. Check your tier on the campaigns page. To increase your tier, maintain high message quality and gradually increase volume.
Replies are attributed to your campaign for **72 hours** after sending. After that window, incoming messages from the same contact are treated as regular inbound conversations.
## Troubleshooting
* **Campaign stuck in "Sending"?** Large campaigns are processed in batches and may take a few minutes. If there's no progress after 10 minutes, check that your [WhatsApp integration](/user-guides/integrations/whatsapp) is still connected.
* **Recipients showing "Failed"?** Common causes include an invalid phone number, Meta rate limits being reached, or a missing payment method in your [Meta billing settings](https://business.facebook.com/billing_hub).
* **Template not appearing?** Make sure the template has been approved in Meta. Only approved templates appear in the campaign template picker.
* **Replies not creating tickets?** Verify that reply behavior is set to **Human Takeover** and that the reply arrived within the 72-hour attribution window.
* **Hitting rate limits?** Your Meta messaging tier determines daily send limits. Check your tier on the campaigns page. To increase your tier, maintain high message quality and gradually increase volume.