> ## Documentation Index
> Fetch the complete documentation index at: https://chatbase.co/docs/llms.txt
> Use this file to discover all available pages before exploring further.
# Overview
> Manage customer support tickets from a centralized dashboard.
## Introduction
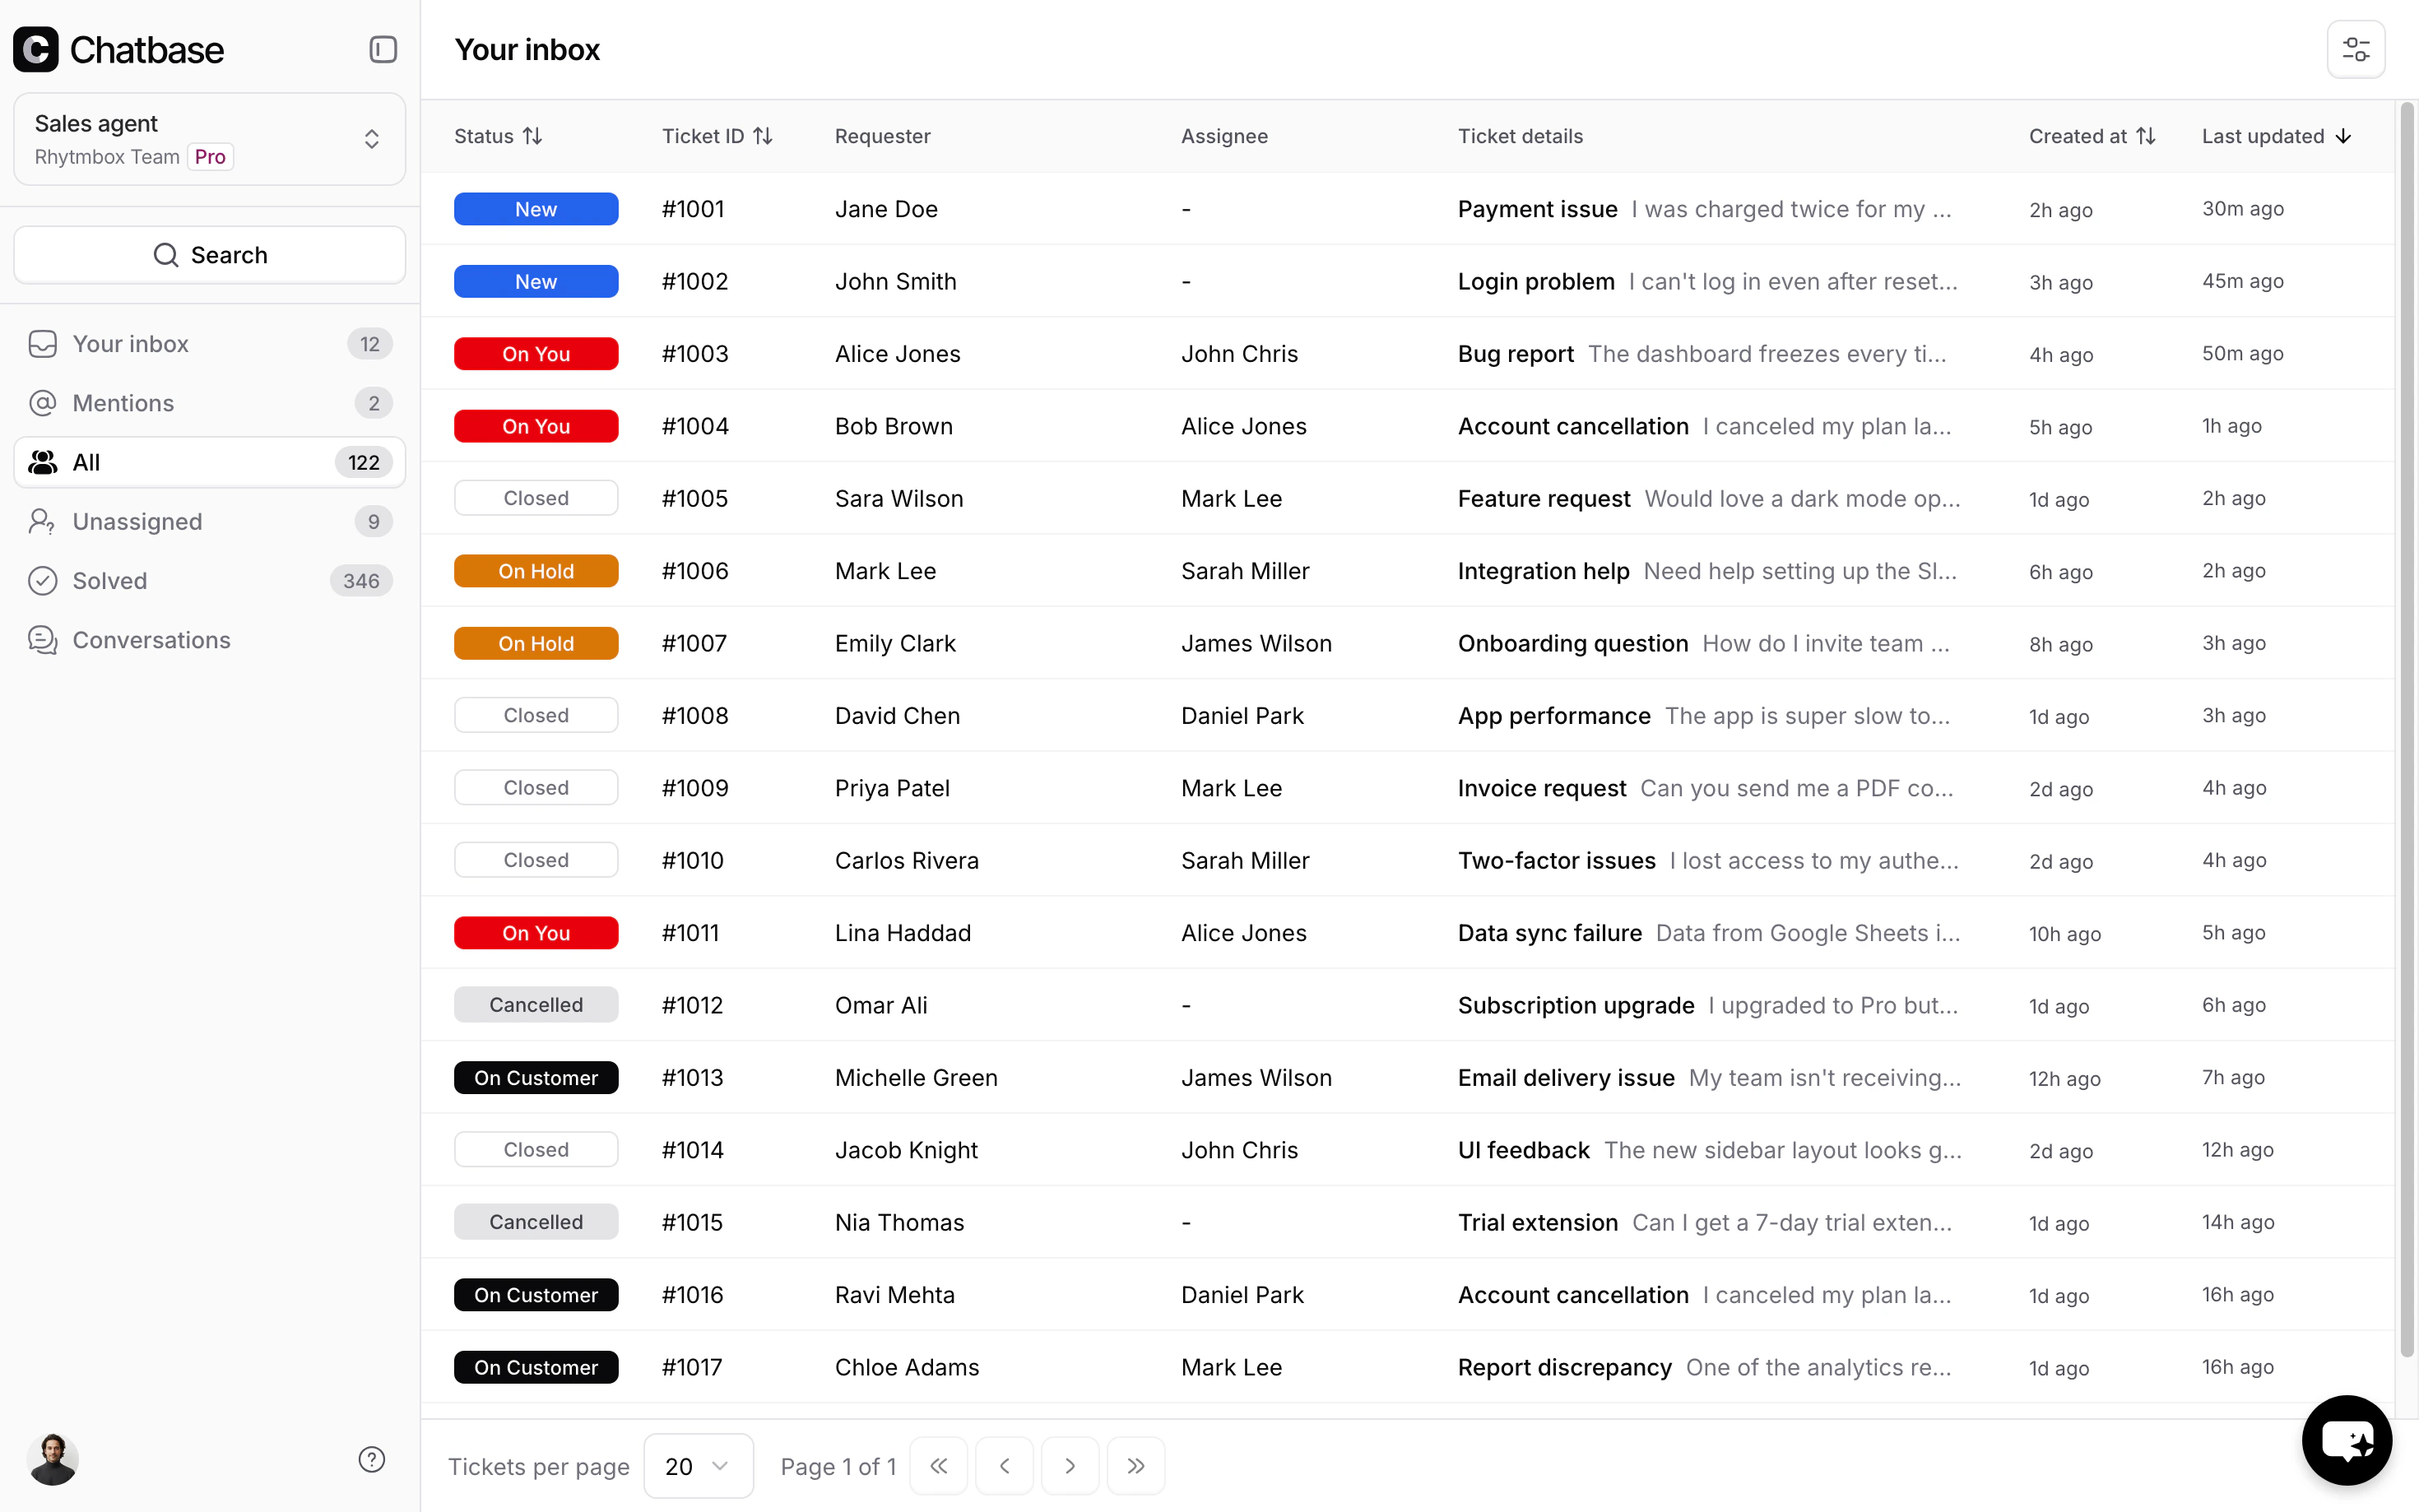
The Helpdesk is a centralized support dashboard where your team can manage customer tickets across every channel - widget, email, WhatsApp, and API - in one place. Agents can triage, assign, and resolve tickets without switching between tools, keeping response times low and customer satisfaction high.
 ### Sidebar
The sidebar is your primary navigation. It can be collapsed into icon-only mode for more screen space.
* **Your Inbox** - tickets assigned to you
* **Mentions** - tickets where you have been @mentioned in an internal note. The badge count shows how many unread mentions you have.
* **All** - every ticket across agents
* **Unassigned** - tickets with no agent assigned
* **Solved** - resolved tickets
* **Conversations** - all AI agent conversations, including those that have not been escalated to tickets
Each view displays a badge count when there are items requiring attention.
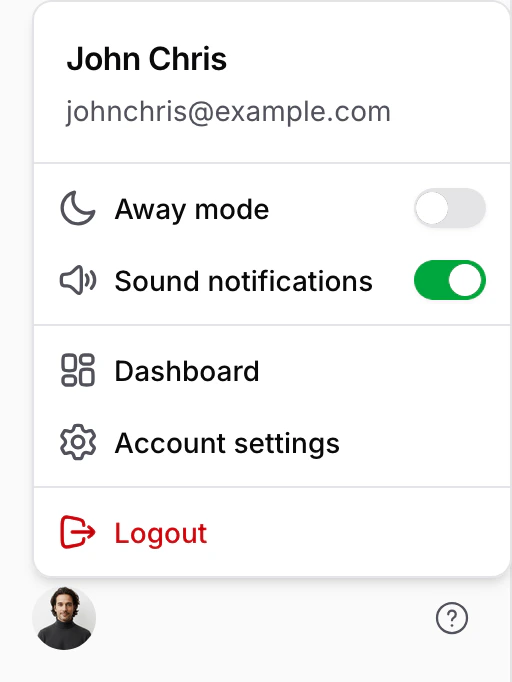
### User Profile
Click your avatar at the bottom of the sidebar to open the profile menu:
* **Away mode** - toggle to mark yourself as unavailable for auto-assignment
* **Sound notifications** - toggle notification sounds on or off
* **Dashboard** - navigate to the main Chatbase dashboard
* **Account settings** - manage your account
* **Logout** - sign out of the helpdesk
### Sidebar
The sidebar is your primary navigation. It can be collapsed into icon-only mode for more screen space.
* **Your Inbox** - tickets assigned to you
* **Mentions** - tickets where you have been @mentioned in an internal note. The badge count shows how many unread mentions you have.
* **All** - every ticket across agents
* **Unassigned** - tickets with no agent assigned
* **Solved** - resolved tickets
* **Conversations** - all AI agent conversations, including those that have not been escalated to tickets
Each view displays a badge count when there are items requiring attention.
### User Profile
Click your avatar at the bottom of the sidebar to open the profile menu:
* **Away mode** - toggle to mark yourself as unavailable for auto-assignment
* **Sound notifications** - toggle notification sounds on or off
* **Dashboard** - navigate to the main Chatbase dashboard
* **Account settings** - manage your account
* **Logout** - sign out of the helpdesk
 ### Notifications
When you have a specific ticket open, new events on that ticket trigger two notifications:
* **Sound** - a notification sound plays (if sound notifications are enabled in your profile menu)
* **Tab badge** - the browser tab title updates to show the unread count, e.g. `(2) Helpdesk`
This helps agents stay aware of new activity on the ticket they are working on, even when the tab is not in focus. Notifications only apply to the currently open ticket - you will not receive browser notifications for other tickets.
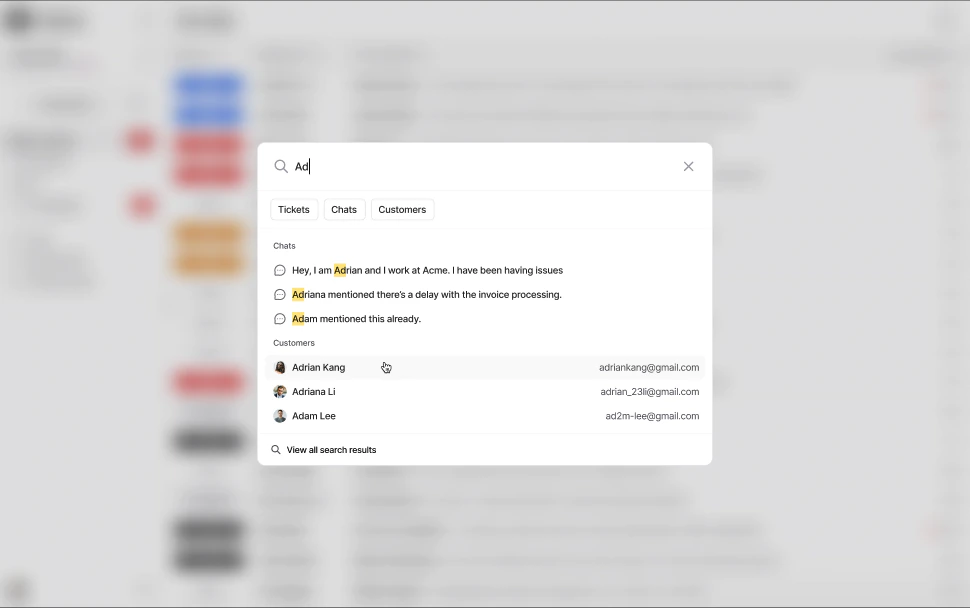
### Search
Click the search button to open a search modal with two tabs: **Tickets** and **Customers**. Results update in real time as you type, and you can click through to the full search results page.
### Notifications
When you have a specific ticket open, new events on that ticket trigger two notifications:
* **Sound** - a notification sound plays (if sound notifications are enabled in your profile menu)
* **Tab badge** - the browser tab title updates to show the unread count, e.g. `(2) Helpdesk`
This helps agents stay aware of new activity on the ticket they are working on, even when the tab is not in focus. Notifications only apply to the currently open ticket - you will not receive browser notifications for other tickets.
### Search
Click the search button to open a search modal with two tabs: **Tickets** and **Customers**. Results update in real time as you type, and you can click through to the full search results page.
 ## Tickets Inbox
### Table Columns
The ticket list displays the following columns:
| Column | Description |
| -------------- | --------------------------------------------------------------- |
| Status | Color-coded badge indicating the ticket's current state |
| Ticket ID | Unique identifier, formatted as `#123` |
| Requester | The customer who submitted the ticket (name or email) |
| Assignee | The agent responsible for the ticket, or `–` if unassigned |
| Ticket Details | Subject line and a preview of the last message |
| Created At | When the ticket was created (relative time, e.g. "2 hours ago") |
| Last Updated | When the most recent message was sent (relative time) |
Click any row to open the ticket.
### Filters
Click the **Filter** button in the top right, above the ticket list, to narrow the results within the current view without changing it. Add one or more conditions, each made of a field, an operator, and a value. A badge next to the button shows how many conditions are active; **Clear all** resets them and **Apply** confirms your selection. Filters here are temporary, scoped to your session, and do not modify the underlying view.
To make a filter combination permanent, save it as a [saved view](/user-guides/chatbot/help-desk/saved-views), which persists conditions alongside a sort order, columns, and visibility. The full list of fields, operators, and values is documented in the [Filters reference](/user-guides/chatbot/help-desk/filters).
## Ticket Statuses
Every ticket has a status that reflects where it is in the support lifecycle. Statuses are grouped into **active** (New, On You, On Customer, On Hold) and **closed** (Closed, Cancelled).
A freshly created ticket that hasn't been picked up by any agent yet. New tickets appear in the **Unassigned** view until an agent claims them.
The ticket requires action from the assigned agent. This is the default status when an agent picks up a ticket or when a customer replies.
The agent has replied and is waiting for the customer to respond. Use this status after sending a reply so your team knows no agent action is needed right now.
The ticket is paused because of an external dependency - for example, waiting on a third-party service or an internal escalation. Use this sparingly and add a note explaining the reason.
The issue has been resolved. Closed tickets move out of the active queue.
The ticket was spam, a duplicate, or opened in error. Cancelled tickets are removed from the active queue.
## Requester and Assignee
* **Requester** - the end user who submitted the ticket. Their profile can include a name, email, external ID, and phone number.
* **Assignee** - the agent responsible for handling the ticket. Tickets can be assigned manually or through auto-assignment.
Configure auto-assignment rules in your helpdesk settings to automatically route new tickets to available agents.
## Viewing a Ticket
When you open a ticket, the view splits into a **conversation thread** on the left and a **details panel** on the right.
### Conversation Thread
The conversation thread displays three types of entries:
* **Replies** - customer-visible messages from either the customer or an agent
* **Notes** - internal-only messages visible to your team (shown with an amber background)
* **Events** - system-generated entries for status changes and assignment updates
## Tickets Inbox
### Table Columns
The ticket list displays the following columns:
| Column | Description |
| -------------- | --------------------------------------------------------------- |
| Status | Color-coded badge indicating the ticket's current state |
| Ticket ID | Unique identifier, formatted as `#123` |
| Requester | The customer who submitted the ticket (name or email) |
| Assignee | The agent responsible for the ticket, or `–` if unassigned |
| Ticket Details | Subject line and a preview of the last message |
| Created At | When the ticket was created (relative time, e.g. "2 hours ago") |
| Last Updated | When the most recent message was sent (relative time) |
Click any row to open the ticket.
### Filters
Click the **Filter** button in the top right, above the ticket list, to narrow the results within the current view without changing it. Add one or more conditions, each made of a field, an operator, and a value. A badge next to the button shows how many conditions are active; **Clear all** resets them and **Apply** confirms your selection. Filters here are temporary, scoped to your session, and do not modify the underlying view.
To make a filter combination permanent, save it as a [saved view](/user-guides/chatbot/help-desk/saved-views), which persists conditions alongside a sort order, columns, and visibility. The full list of fields, operators, and values is documented in the [Filters reference](/user-guides/chatbot/help-desk/filters).
## Ticket Statuses
Every ticket has a status that reflects where it is in the support lifecycle. Statuses are grouped into **active** (New, On You, On Customer, On Hold) and **closed** (Closed, Cancelled).
A freshly created ticket that hasn't been picked up by any agent yet. New tickets appear in the **Unassigned** view until an agent claims them.
The ticket requires action from the assigned agent. This is the default status when an agent picks up a ticket or when a customer replies.
The agent has replied and is waiting for the customer to respond. Use this status after sending a reply so your team knows no agent action is needed right now.
The ticket is paused because of an external dependency - for example, waiting on a third-party service or an internal escalation. Use this sparingly and add a note explaining the reason.
The issue has been resolved. Closed tickets move out of the active queue.
The ticket was spam, a duplicate, or opened in error. Cancelled tickets are removed from the active queue.
## Requester and Assignee
* **Requester** - the end user who submitted the ticket. Their profile can include a name, email, external ID, and phone number.
* **Assignee** - the agent responsible for handling the ticket. Tickets can be assigned manually or through auto-assignment.
Configure auto-assignment rules in your helpdesk settings to automatically route new tickets to available agents.
## Viewing a Ticket
When you open a ticket, the view splits into a **conversation thread** on the left and a **details panel** on the right.
### Conversation Thread
The conversation thread displays three types of entries:
* **Replies** - customer-visible messages from either the customer or an agent
* **Notes** - internal-only messages visible to your team (shown with an amber background)
* **Events** - system-generated entries for status changes and assignment updates
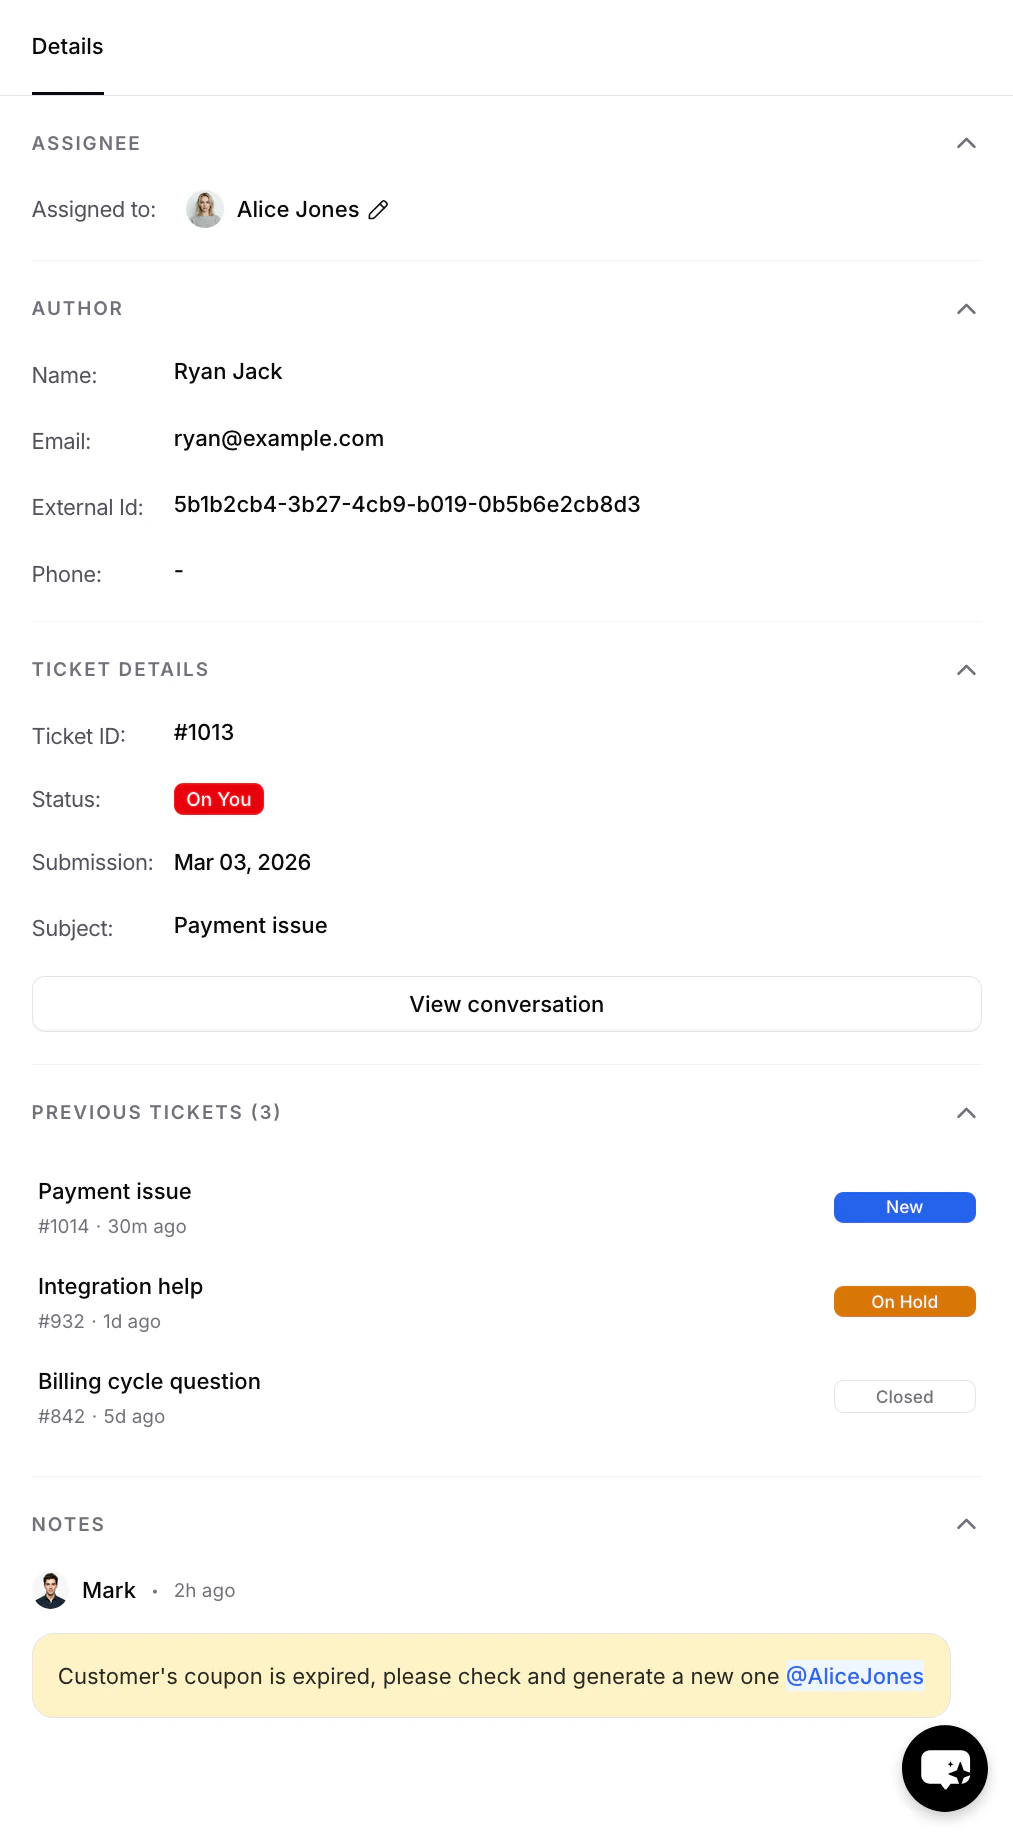
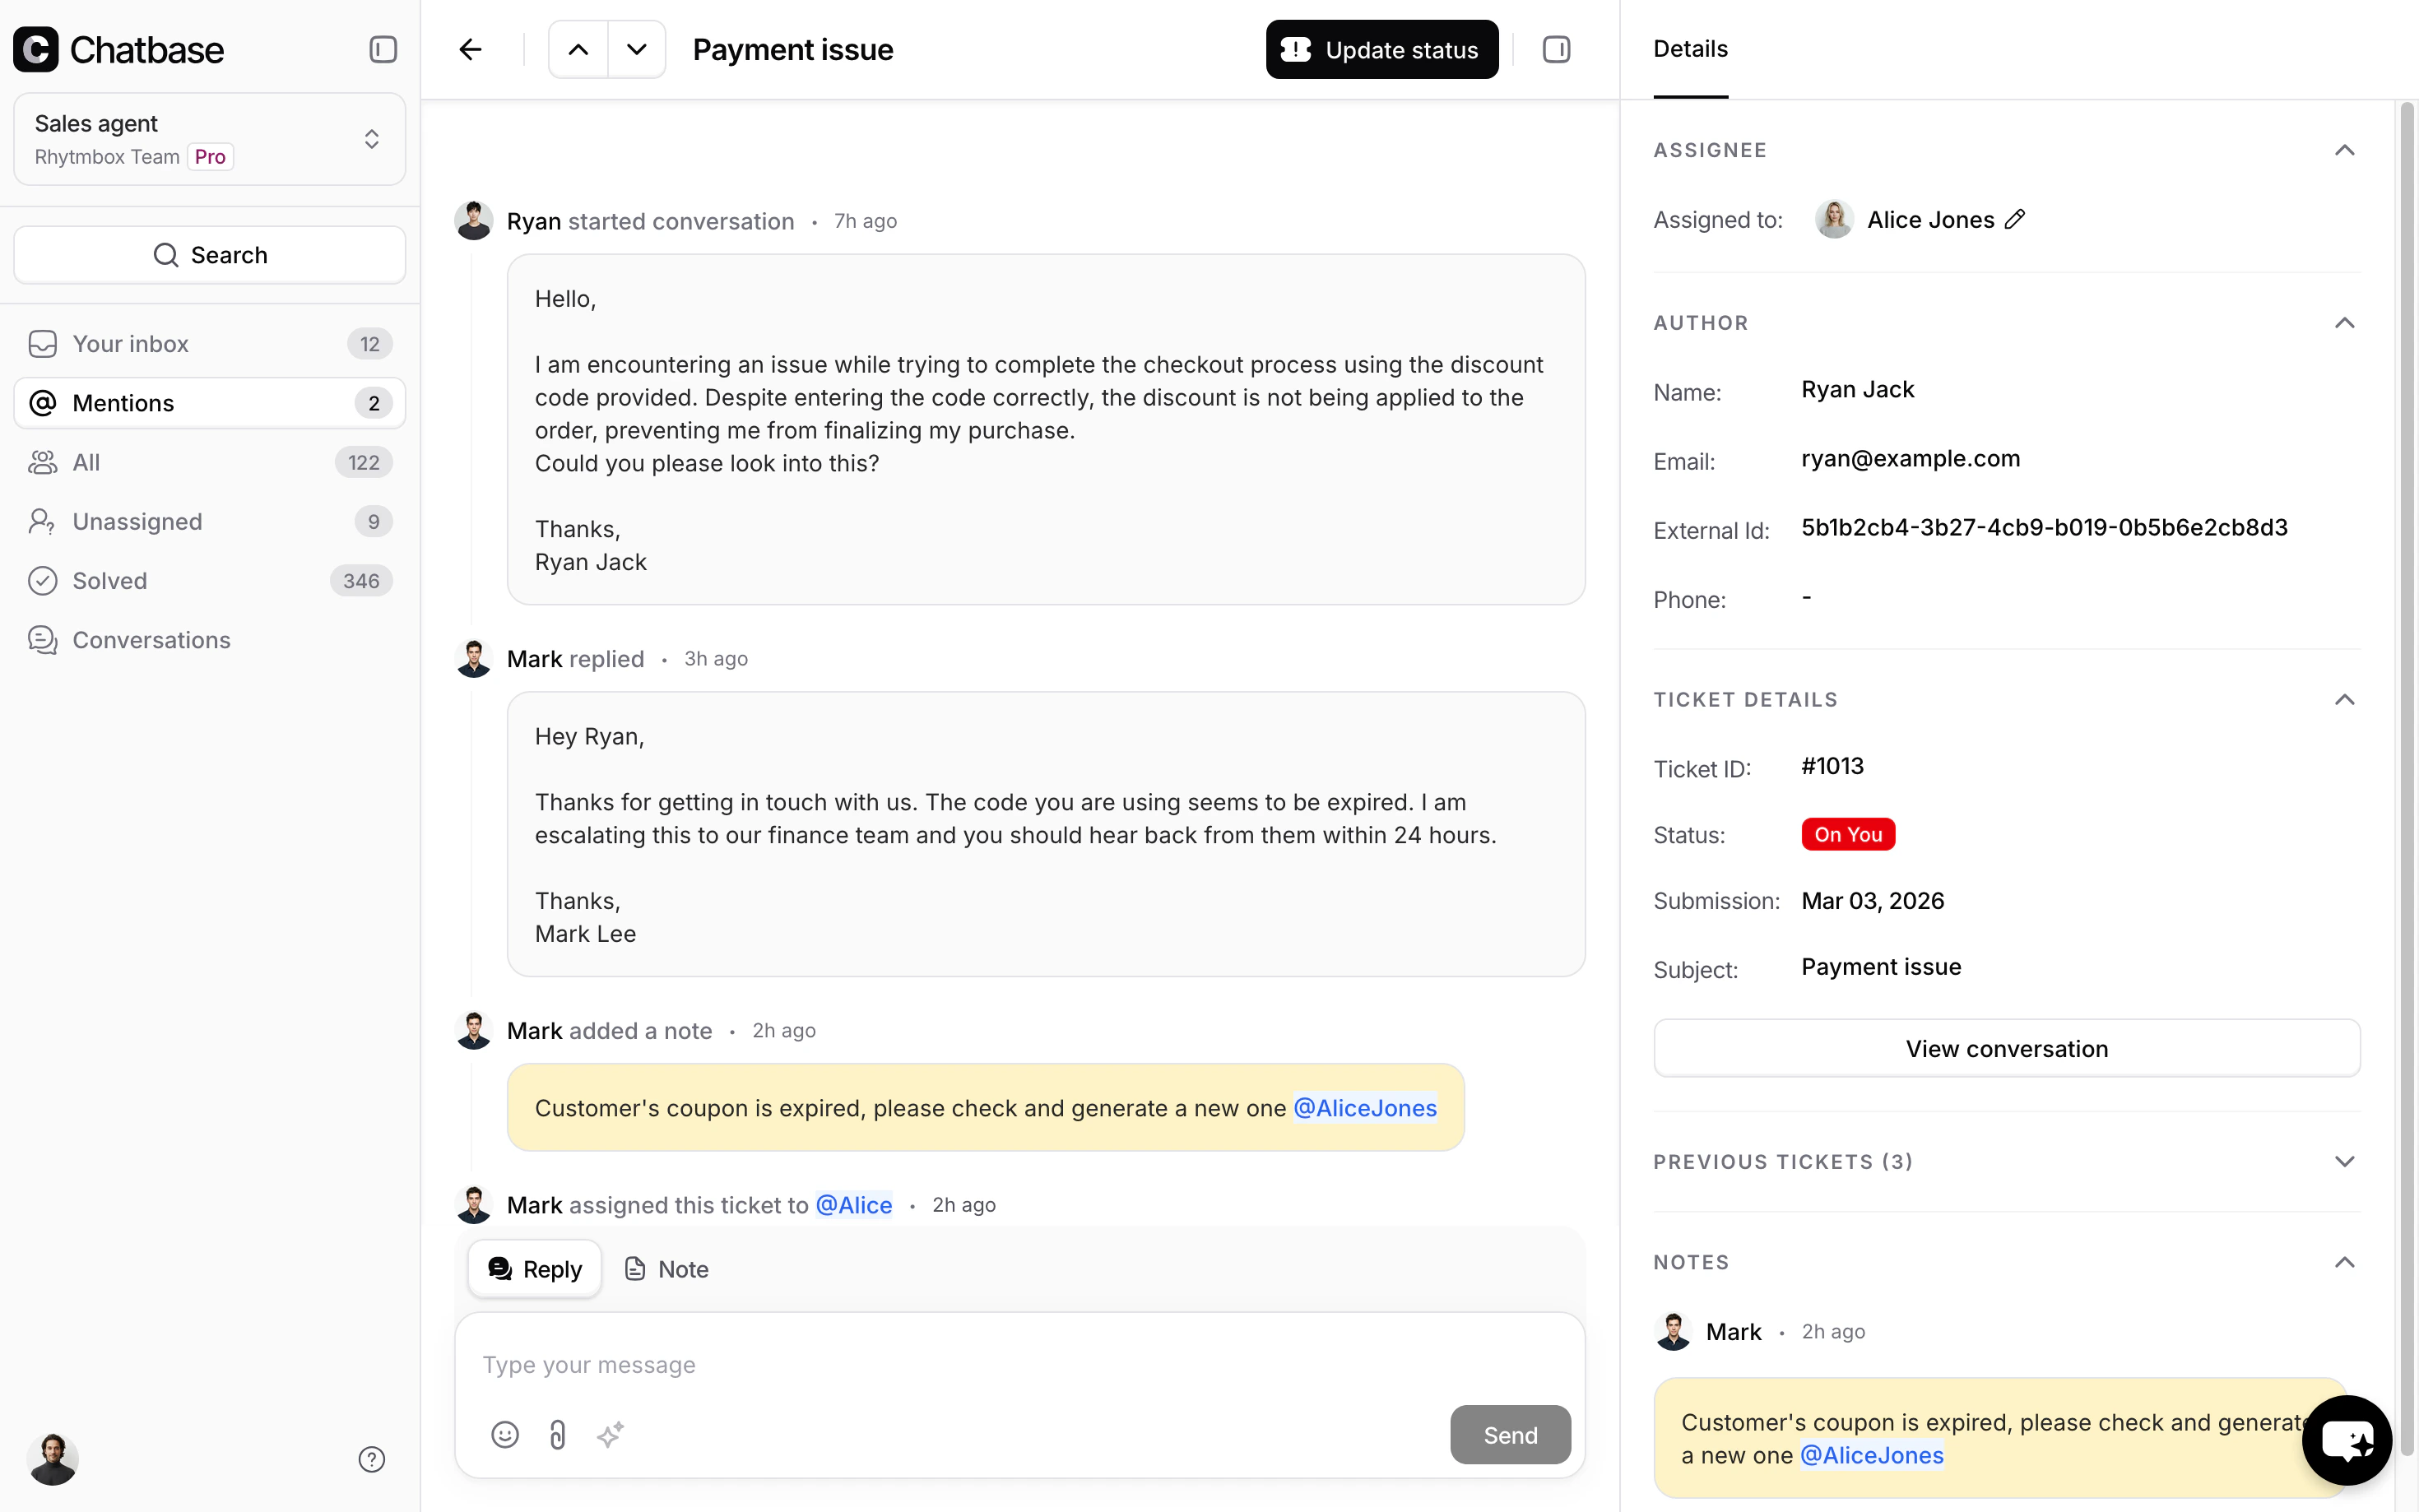 ### Ticket Details Panel
The right sidebar contains five collapsible sections:
1. **Assignee** - view or change the assigned agent. Click the edit icon to reassign to another agent or unassign the ticket entirely.
2. **Author** - the requester's information: name, email, external ID, and phone number.
3. **Ticket Details** - ticket ID, status badge, submission date, subject, and a **View conversation** button that links to the original AI agent conversation that created the ticket.
4. **Previous Tickets** - a list of other tickets from the same customer, showing subject, ticket ID, time, and status badge. This gives agents quick context on the customer's support history.
5. **Notes** - a list of internal notes attached to the ticket, including any @mentions.
### Ticket Details Panel
The right sidebar contains five collapsible sections:
1. **Assignee** - view or change the assigned agent. Click the edit icon to reassign to another agent or unassign the ticket entirely.
2. **Author** - the requester's information: name, email, external ID, and phone number.
3. **Ticket Details** - ticket ID, status badge, submission date, subject, and a **View conversation** button that links to the original AI agent conversation that created the ticket.
4. **Previous Tickets** - a list of other tickets from the same customer, showing subject, ticket ID, time, and status badge. This gives agents quick context on the customer's support history.
5. **Notes** - a list of internal notes attached to the ticket, including any @mentions.
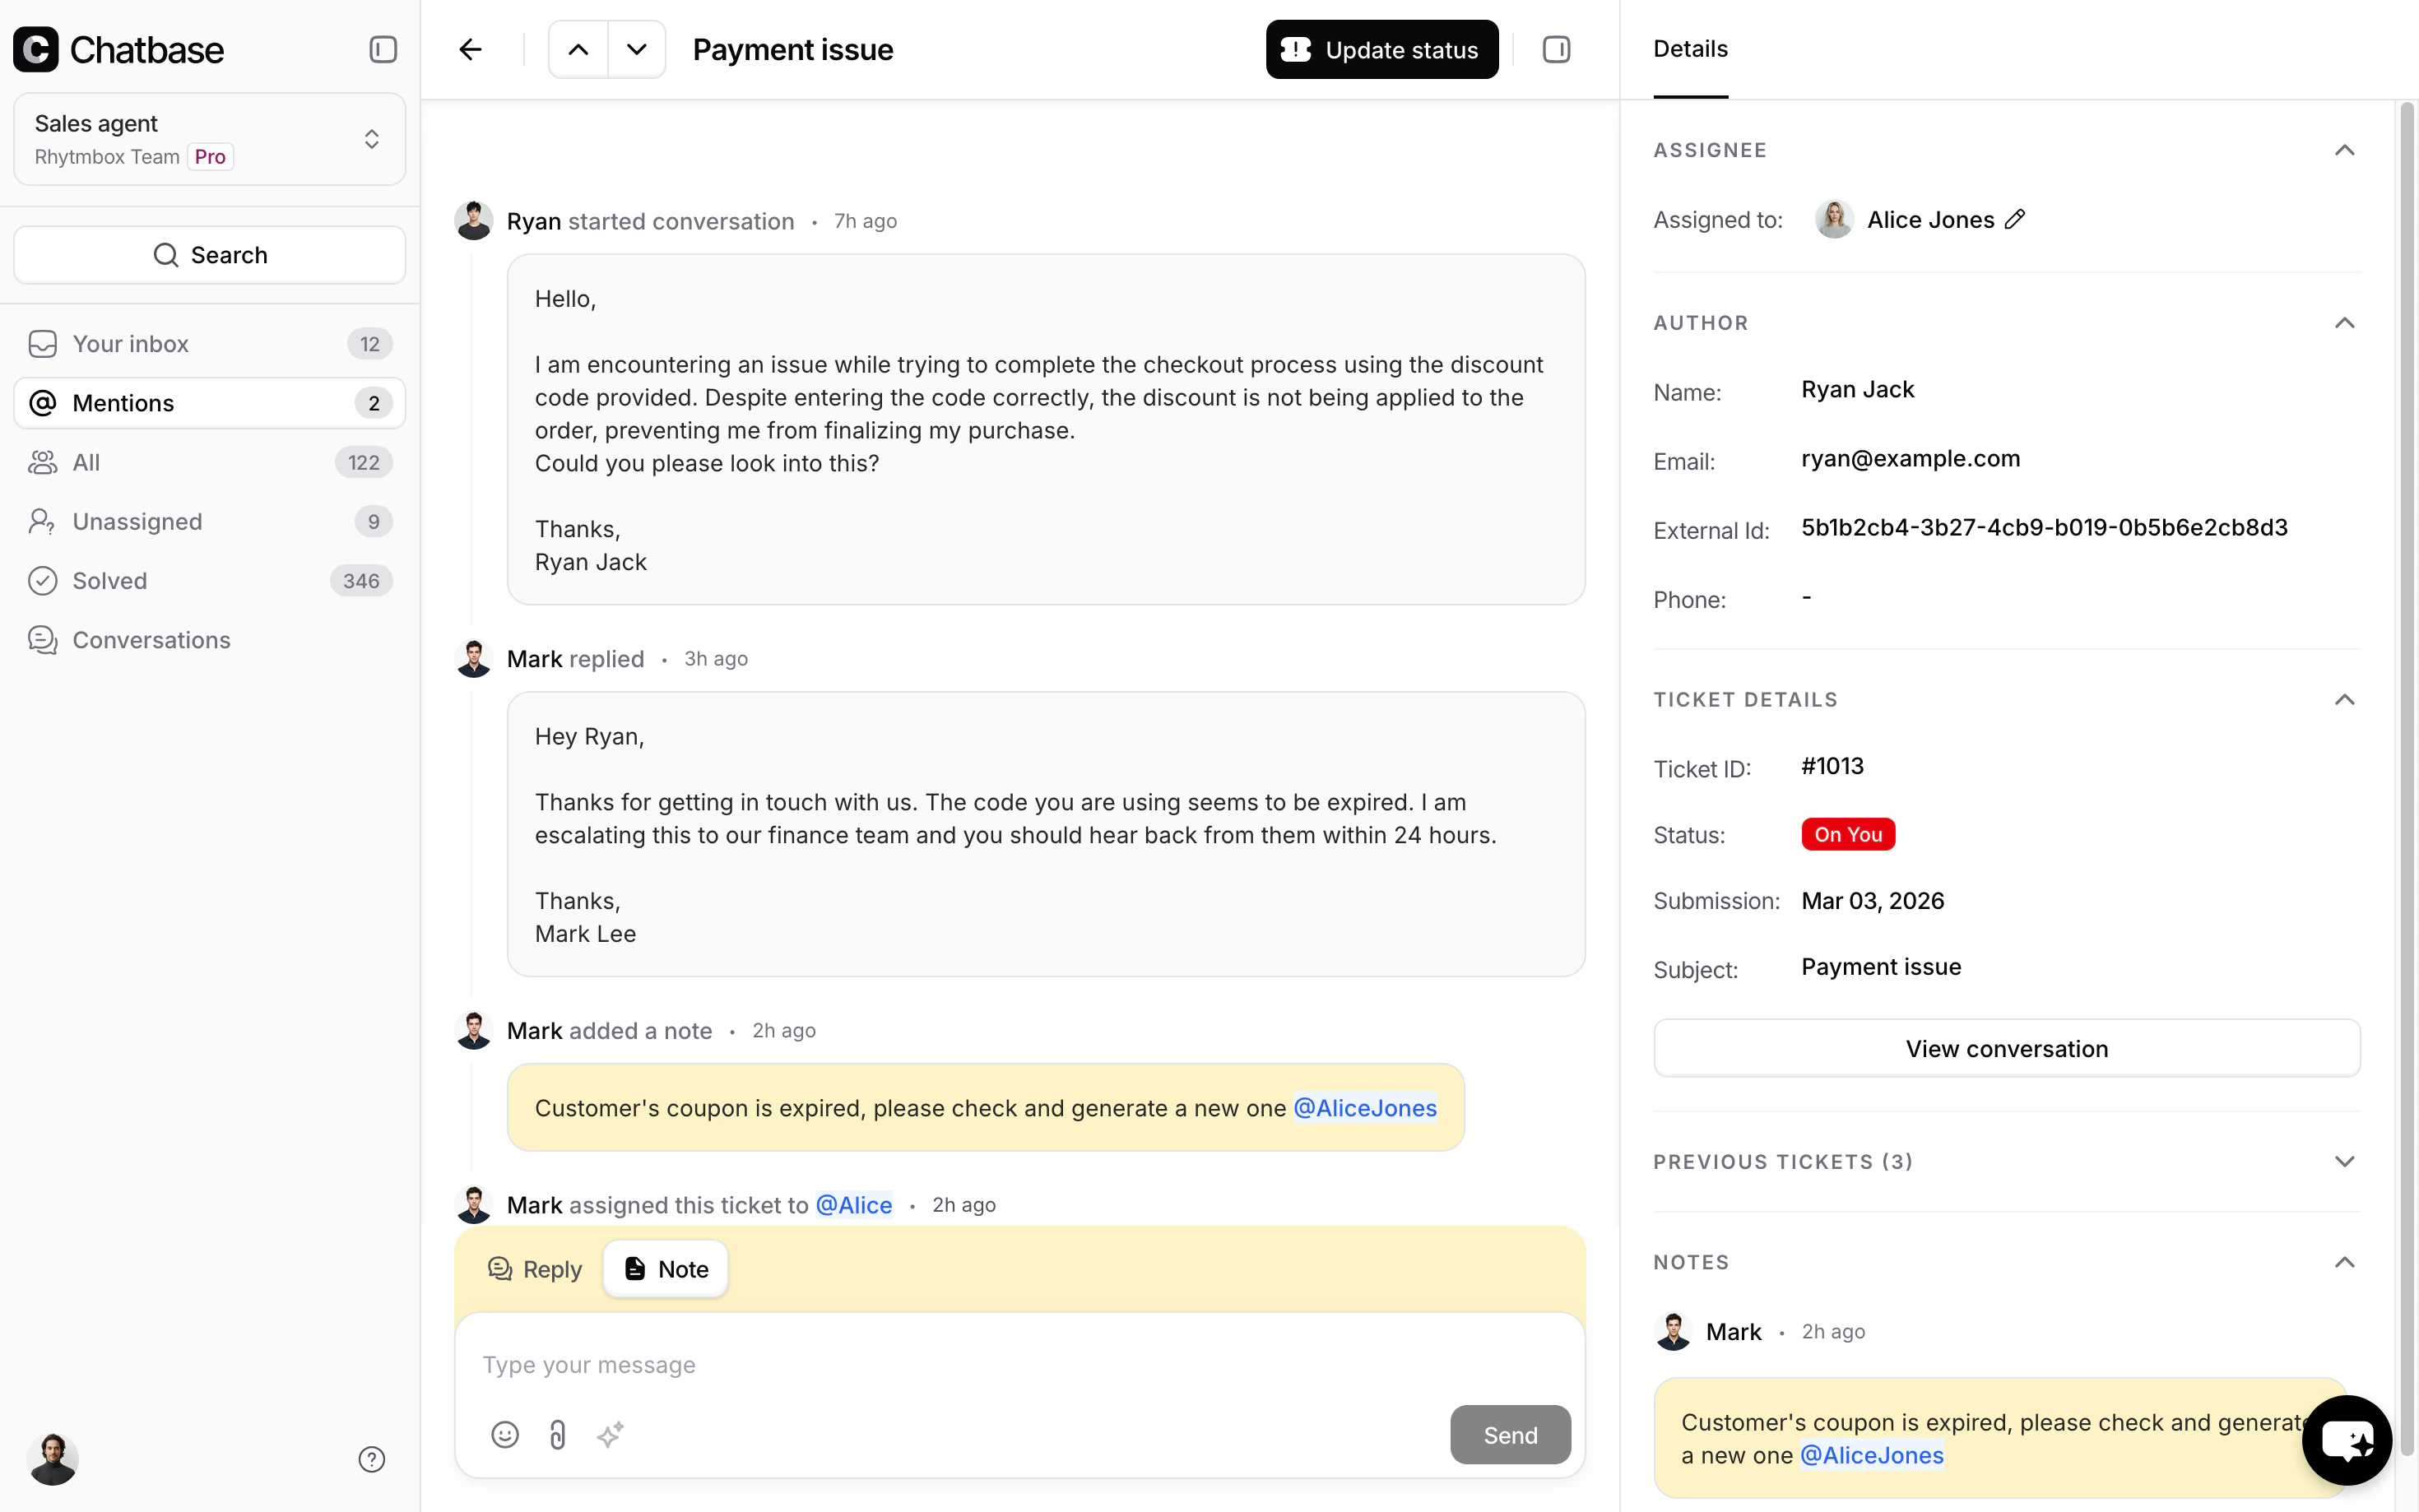
 ## Replying to Tickets
### Reply vs Note
The message composer at the bottom of the conversation thread has two tabs:
* **Reply** - sends a public message to the customer through the same channel they used to contact you.
* **Note** - saves an internal-only message (shown with an amber background) that only your team can see.
Always double-check which tab is selected before sending. Notes are internal-only, but replies go directly to the customer.
### @Mentions
Type `@` in the note composer to mention a team member. A dropdown appears listing available agents along with a colored dot indicating their current availability status. Select an agent to insert the mention into your note.
## Replying to Tickets
### Reply vs Note
The message composer at the bottom of the conversation thread has two tabs:
* **Reply** - sends a public message to the customer through the same channel they used to contact you.
* **Note** - saves an internal-only message (shown with an amber background) that only your team can see.
Always double-check which tab is selected before sending. Notes are internal-only, but replies go directly to the customer.
### @Mentions
Type `@` in the note composer to mention a team member. A dropdown appears listing available agents along with a colored dot indicating their current availability status. Select an agent to insert the mention into your note.
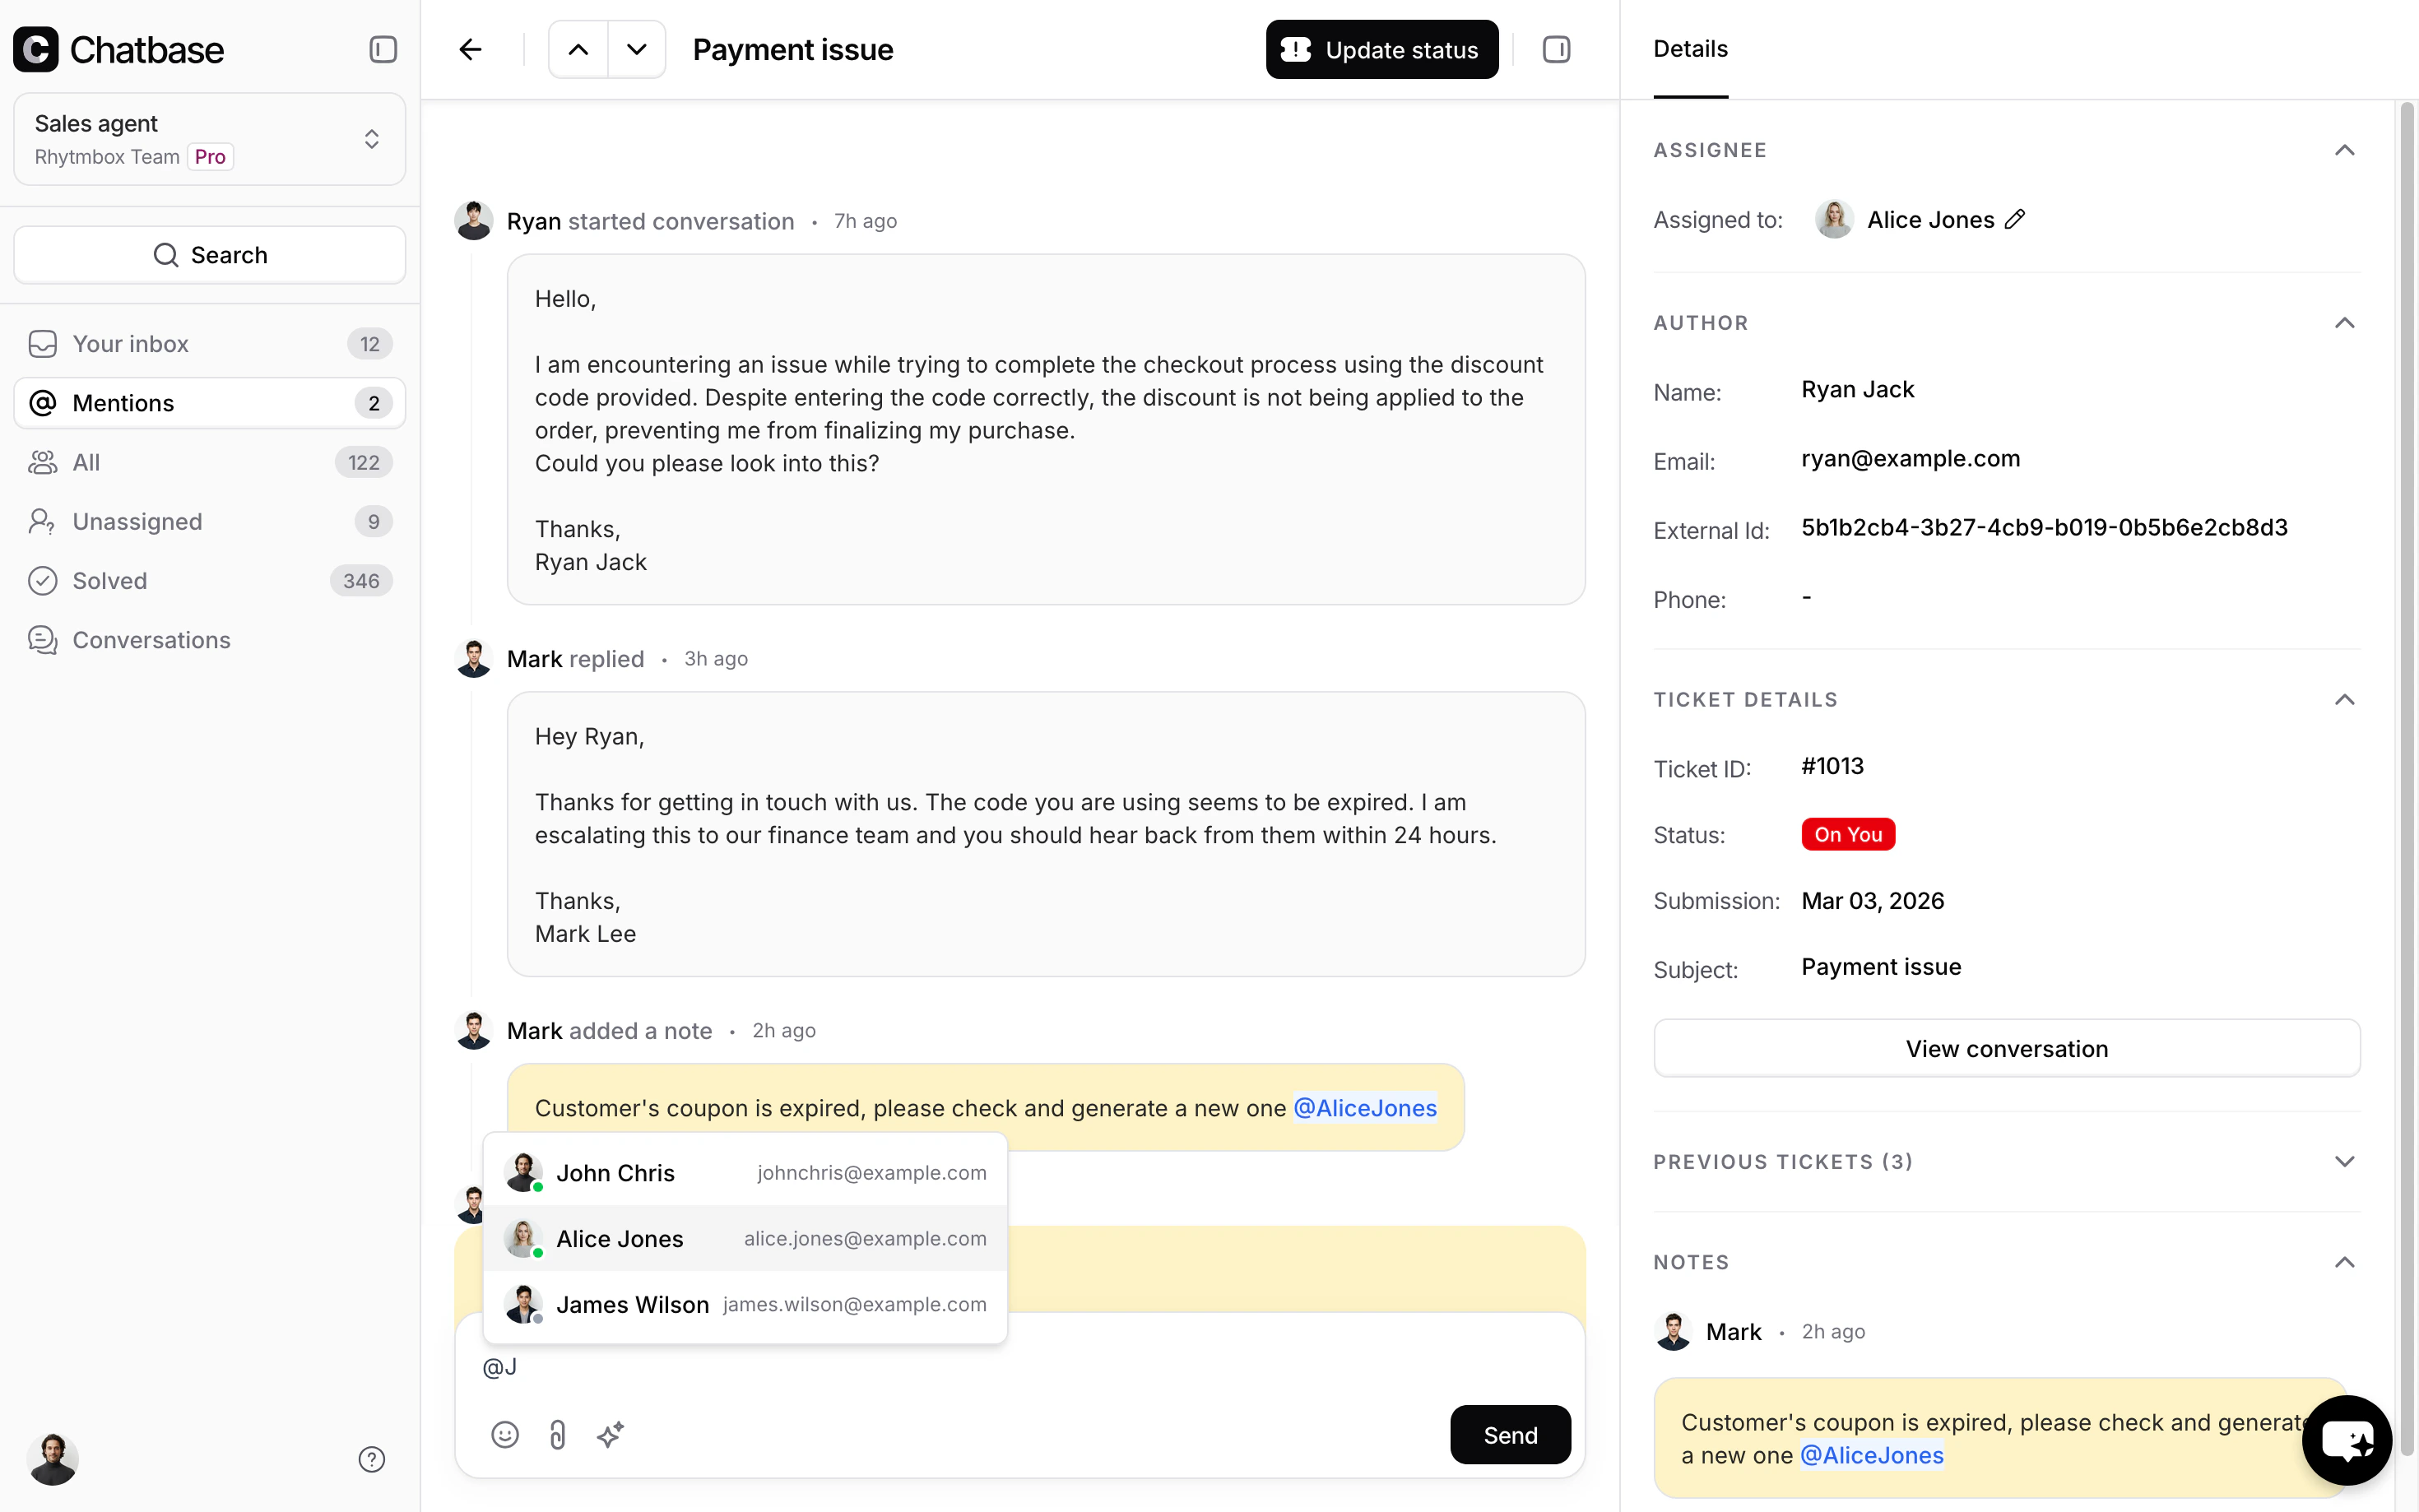 When you @mention someone:
* The mentioned agent receives a notification
* The ticket appears in their **Mentions** sidebar view
* The mention is rendered as a clickable link in the note
Use @mentions to loop in colleagues, escalate to another agent, or flag a ticket for someone's attention without reassigning it.
When you @mention someone:
* The mentioned agent receives a notification
* The ticket appears in their **Mentions** sidebar view
* The mention is rendered as a clickable link in the note
Use @mentions to loop in colleagues, escalate to another agent, or flag a ticket for someone's attention without reassigning it.
 @mentions are only available in **Notes** (internal messages). They are not supported in customer-facing replies.
### Attachments
Click the **paperclip** icon to attach files to a reply or note. Supported file types include images, text files, PDFs, audio, and video. Each attachment can be removed before sending.
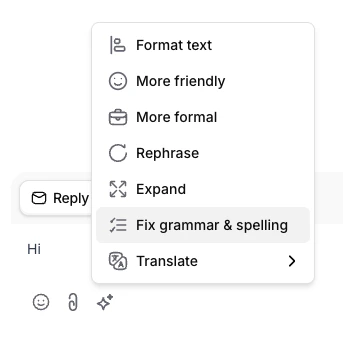
### AI Compose
Click the **sparkle** icon in the composer toolbar to open the AI writing assistant. It offers the following options:
| Option | Description |
| ---------------------- | ----------------------------------------------------------------- |
| Format text | Cleans up formatting and structure |
| More friendly | Adjusts the tone to be warmer and more approachable |
| More formal | Adjusts the tone to be more professional |
| Rephrase | Rewords the text while keeping the same meaning |
| Expand | Adds more detail and length |
| Fix grammar & spelling | Corrects grammar and spelling errors |
| Translate | Translates the text to another language (opens a language picker) |
You need to have text in the editor for AI Compose to be available.
@mentions are only available in **Notes** (internal messages). They are not supported in customer-facing replies.
### Attachments
Click the **paperclip** icon to attach files to a reply or note. Supported file types include images, text files, PDFs, audio, and video. Each attachment can be removed before sending.
### AI Compose
Click the **sparkle** icon in the composer toolbar to open the AI writing assistant. It offers the following options:
| Option | Description |
| ---------------------- | ----------------------------------------------------------------- |
| Format text | Cleans up formatting and structure |
| More friendly | Adjusts the tone to be warmer and more approachable |
| More formal | Adjusts the tone to be more professional |
| Rephrase | Rewords the text while keeping the same meaning |
| Expand | Adds more detail and length |
| Fix grammar & spelling | Corrects grammar and spelling errors |
| Translate | Translates the text to another language (opens a language picker) |
You need to have text in the editor for AI Compose to be available.
 ## Recommended Ticket Workflow
A typical ticket lifecycle follows these steps:
1. A customer submits a request → ticket is created as **New**
2. An agent picks up the ticket → status changes to **On You**
3. The agent sends a reply → agent sets status to **On Customer**
4. The customer responds → status returns to **On You**
5. An external blocker is identified → agent sets status to **On Hold**
6. The issue is resolved → agent sets status to **Closed**
7. The ticket is spam or a duplicate → agent sets status to **Cancelled**
**Best practices:**
* Set the status to **On Customer** after every reply so your team knows you're waiting for a response.
* Use **On Hold** sparingly - add a Note explaining what you're waiting on.
* Add **Notes** to document your investigation steps, so other agents can pick up where you left off.
## Ticket Channels
Tickets can arrive from multiple channels. The channel is shown on each ticket so agents know where the conversation originated:
* **Email** - received via email forwarding
* Using "Escalations" Action:
* **Chat Widget** - submitted through the AI agent on your website
* **WhatsApp** - from a WhatsApp conversation
* **Facebook Messenger** - from Facebook Messenger direct message.
* **Instagram** - from Instagram direct message.
* **API** - created programmatically through the API
When you reply to a ticket created from the chat widget, the customer receives your reply in two places: their email **and** the chat widget itself. To see it in the chat widget, the customer opens the three-dot menu (•••) and selects **View tickets**.
## Recommended Ticket Workflow
A typical ticket lifecycle follows these steps:
1. A customer submits a request → ticket is created as **New**
2. An agent picks up the ticket → status changes to **On You**
3. The agent sends a reply → agent sets status to **On Customer**
4. The customer responds → status returns to **On You**
5. An external blocker is identified → agent sets status to **On Hold**
6. The issue is resolved → agent sets status to **Closed**
7. The ticket is spam or a duplicate → agent sets status to **Cancelled**
**Best practices:**
* Set the status to **On Customer** after every reply so your team knows you're waiting for a response.
* Use **On Hold** sparingly - add a Note explaining what you're waiting on.
* Add **Notes** to document your investigation steps, so other agents can pick up where you left off.
## Ticket Channels
Tickets can arrive from multiple channels. The channel is shown on each ticket so agents know where the conversation originated:
* **Email** - received via email forwarding
* Using "Escalations" Action:
* **Chat Widget** - submitted through the AI agent on your website
* **WhatsApp** - from a WhatsApp conversation
* **Facebook Messenger** - from Facebook Messenger direct message.
* **Instagram** - from Instagram direct message.
* **API** - created programmatically through the API
When you reply to a ticket created from the chat widget, the customer receives your reply in two places: their email **and** the chat widget itself. To see it in the chat widget, the customer opens the three-dot menu (•••) and selects **View tickets**.