> ## Documentation Index
> Fetch the complete documentation index at: https://chatbase.co/docs/llms.txt
> Use this file to discover all available pages before exploring further.
# Channels
> Make your agent available across web, messaging, phone, and productivity channels, each configured independently
## Overview
The **Channels** tab lets you make your agent available to users across multiple channels, including your website, a standalone help page, and third-party platforms like Slack, Email, Meta apps (WhatsApp, Messenger, Instagram), and Phone.
You can enable one or many channels depending on how you want users to interact with your agent. Each channel is enabled, configured, and managed independently, so the same agent can look and behave differently in each place.
Put one agent everywhere your customers are, and tune its appearance, capabilities, and instructions per channel without touching the others.
Use the **Manage** button on each channel card to configure it. Cards for channels you haven't set up yet show **Setup** instead.
## Available channels
| Channel | What it is |
| -------------------------------------------------- | --------------------------------------------------------------------------- |
| [Chat bubble](#chat-bubble) | A floating chat bubble embedded on your website |
| [Help page](#help-page) | A standalone help page hosted by Chatbase |
| [Center Stage](#center-stage) | A full-focus chat experience that opens centered over your website |
| [iOS SDK](/docs/ios-sdk/overview) | Build your agent into native iOS and macOS apps with the Swift SDK |
| [Android SDK](/docs/android-sdk/overview) | Build your agent into native Android apps with the Kotlin SDK |
| [Email](/docs/user-guides/integrations/email) | Let your agent respond to emails |
| [Phone](#phone) | Let your agent handle inbound phone calls, via Twilio or your own SIP trunk |
| [Slack](/docs/user-guides/integrations/slack) | Use your agent inside Slack |
| [Zapier](/docs/user-guides/integrations/zapier) | Connect your agent to thousands of apps |
| [WordPress](/docs/user-guides/integrations/wordpress) | Official WordPress plugin |
| [WhatsApp](/docs/user-guides/integrations/whatsapp) | Respond to WhatsApp messages |
| [Messenger](/docs/user-guides/integrations/messenger) | Connect your agent to Facebook Messenger |
| [Instagram](/docs/user-guides/integrations/instagram) | Let your agent respond to Instagram messages |
| [Zendesk](/docs/user-guides/integrations/zendesk) | Respond to Zendesk support tickets |
| [Salesforce](/docs/user-guides/integrations/salesforce) | Connect your agent to Salesforce to assist with CRM workflows |
| [Shopify](/docs/user-guides/integrations/shopify) | Connect your agent to your Shopify store |
***
## Chat bubble
The **Chat bubble** embeds a floating chat window on your website so visitors can interact with your agent directly.
### Enable the chat bubble
Go to **Channels** and click **Manage** on the **Chat bubble** card.
Click **Deploy** and choose **Website widget**.
Click **Enable chat bubble**.
### The chat bubble menu
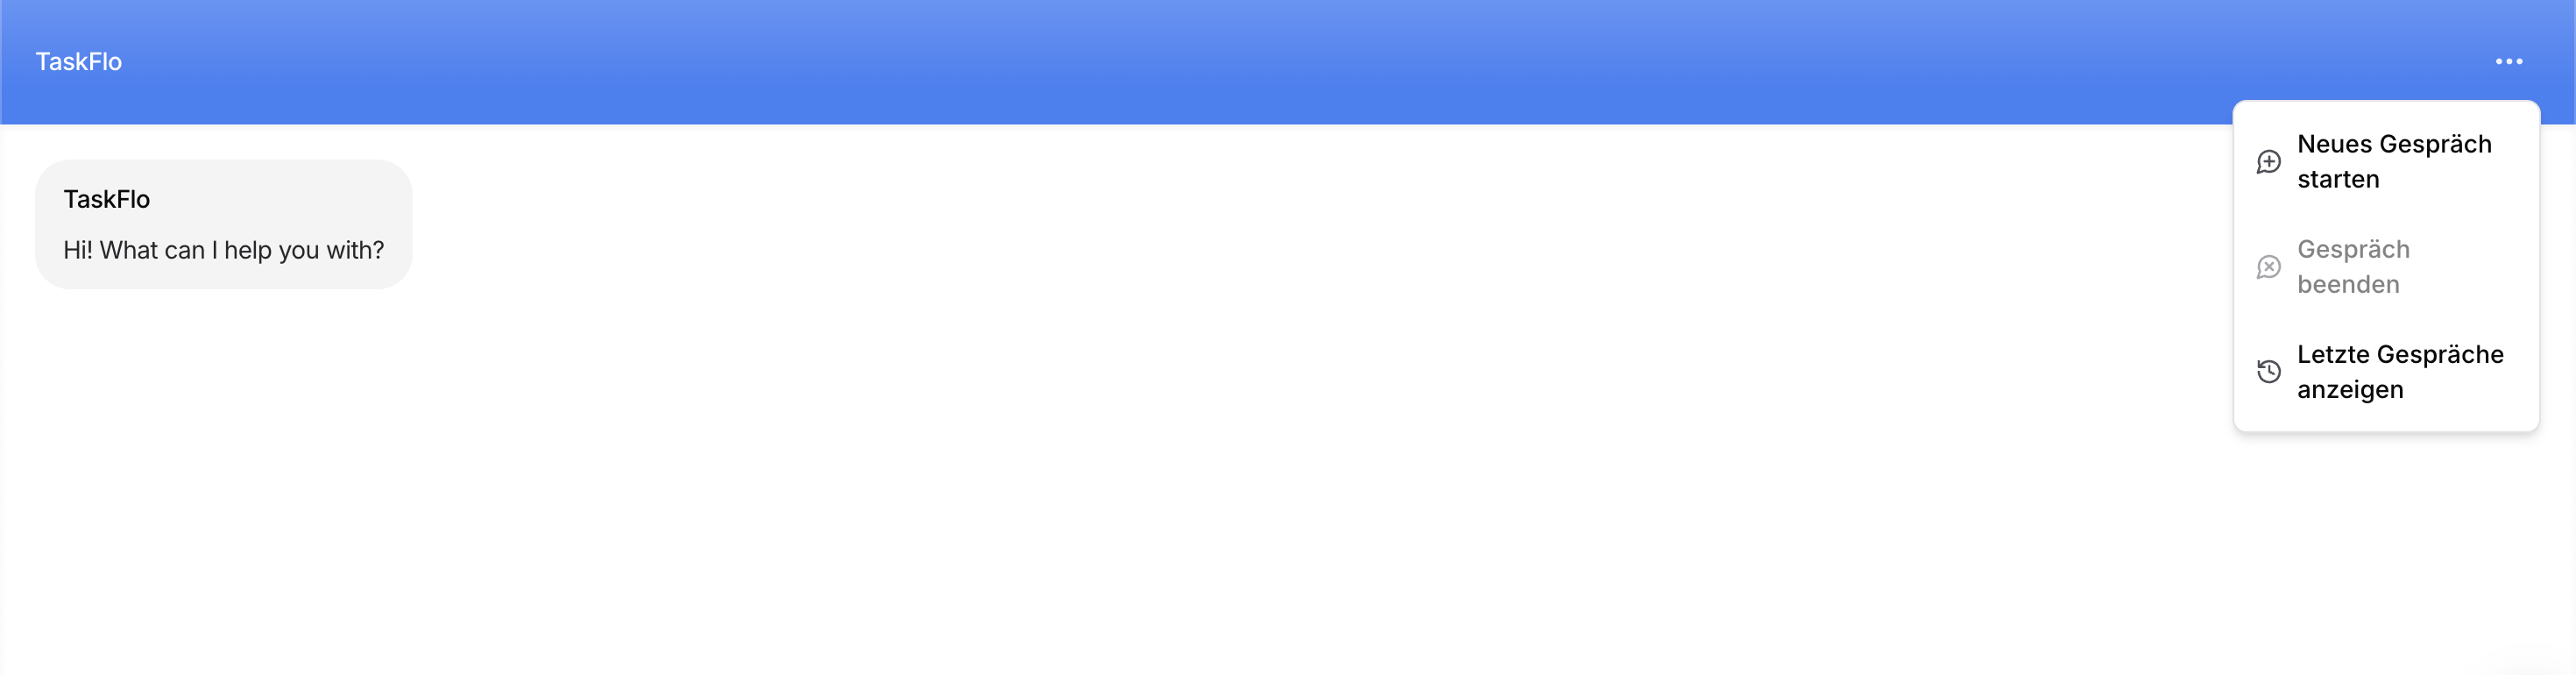
Visitors open the menu from the three dots in the top-right corner of the chat header. It holds the following items:
| Menu item | What it does |
| --------------------- | ----------------------------------------------------------------------------------------------------------------------------------------------------------------------------------------- |
| **Start a new chat** | Opens a fresh conversation, leaving the current one in the visitor's recent chats |
| **End chat** | Closes the conversation the visitor is in. An ended conversation can't be picked back up, so continuing means starting a new chat. Greyed out until there's an active conversation to end |
| **View recent chats** | Lists the visitor's earlier conversations on this site. They can reopen one and carry on, as long as it wasn't ended |
#### Why ending a chat matters
A conversation that is never ended stays open indefinitely, and anything measured per conversation is distorted by it. **End chat** draws a boundary around the conversation, which is what the rest depends on:
* **Analytics stay accurate.** Figures derived from a finished conversation, such as how long it ran, how many messages it took, and how it concluded, are only meaningful once the conversation is closed. A store full of conversations that never end pulls those numbers off.
* **Resolution rate becomes measurable.** A conversation has to be closed before it can be counted as resolved or unresolved, so the rate is calculated across ended conversations.
* **Conversation end becomes a trigger.** A closed conversation is a clean point to hand the outcome to your own systems. Webhooks that fire when a conversation ends are coming soon.
These menu items are translated automatically for every language you add under [Localization](#localization).
To let visitors delete their own conversations from the recent chats screen, turn on **Delete conversations** under [Capabilities](#capabilities).
### Chat bubble settings
The chat bubble settings are split into four tabs:
| Tab | What it controls |
| ------------ | ----------------------------------------------------------------------------------------------------------------- |
| **Overview** | The model, data sources, actions, instructions, and visibility for this channel |
| **Display** | What users see when the chat starts: content, capabilities, colors, typography, floating bubble, and localization |
| **Voice** | Voice calling for this channel |
| **Actions** | The actions your agent can perform in this channel |
### Overview tab
The **Overview** tab shows your agent's **Model** and **Data sources**, which apply to the whole agent, alongside the **Actions**, **Instructions**, and **Visibility** for this channel.
**Model:** The AI model your agent uses globally across all channels.
**Data sources:** A read-only summary of what the agent is trained on: its training status, total size, and counts of Links, Texts, and Q\&A's.
**Actions:** View the actions enabled for this channel.
**Instructions:** Customize the instructions used by this channel.
**Sync with global instructions:** By default, your agent uses **global instructions**, which define its core behavior across all channels. When this is enabled, the chat bubble uses the same global instructions as the rest of your agent. When disabled, you can define **channel-specific instructions** that apply only to the chat bubble and override the global ones.
**Visibility:** Control whether this channel is active. When disabled, the channel is hidden and messages from it won't be routed to your agent.
### Chat bubble display
Under the **Display** tab, you can control what users see when the chat starts.
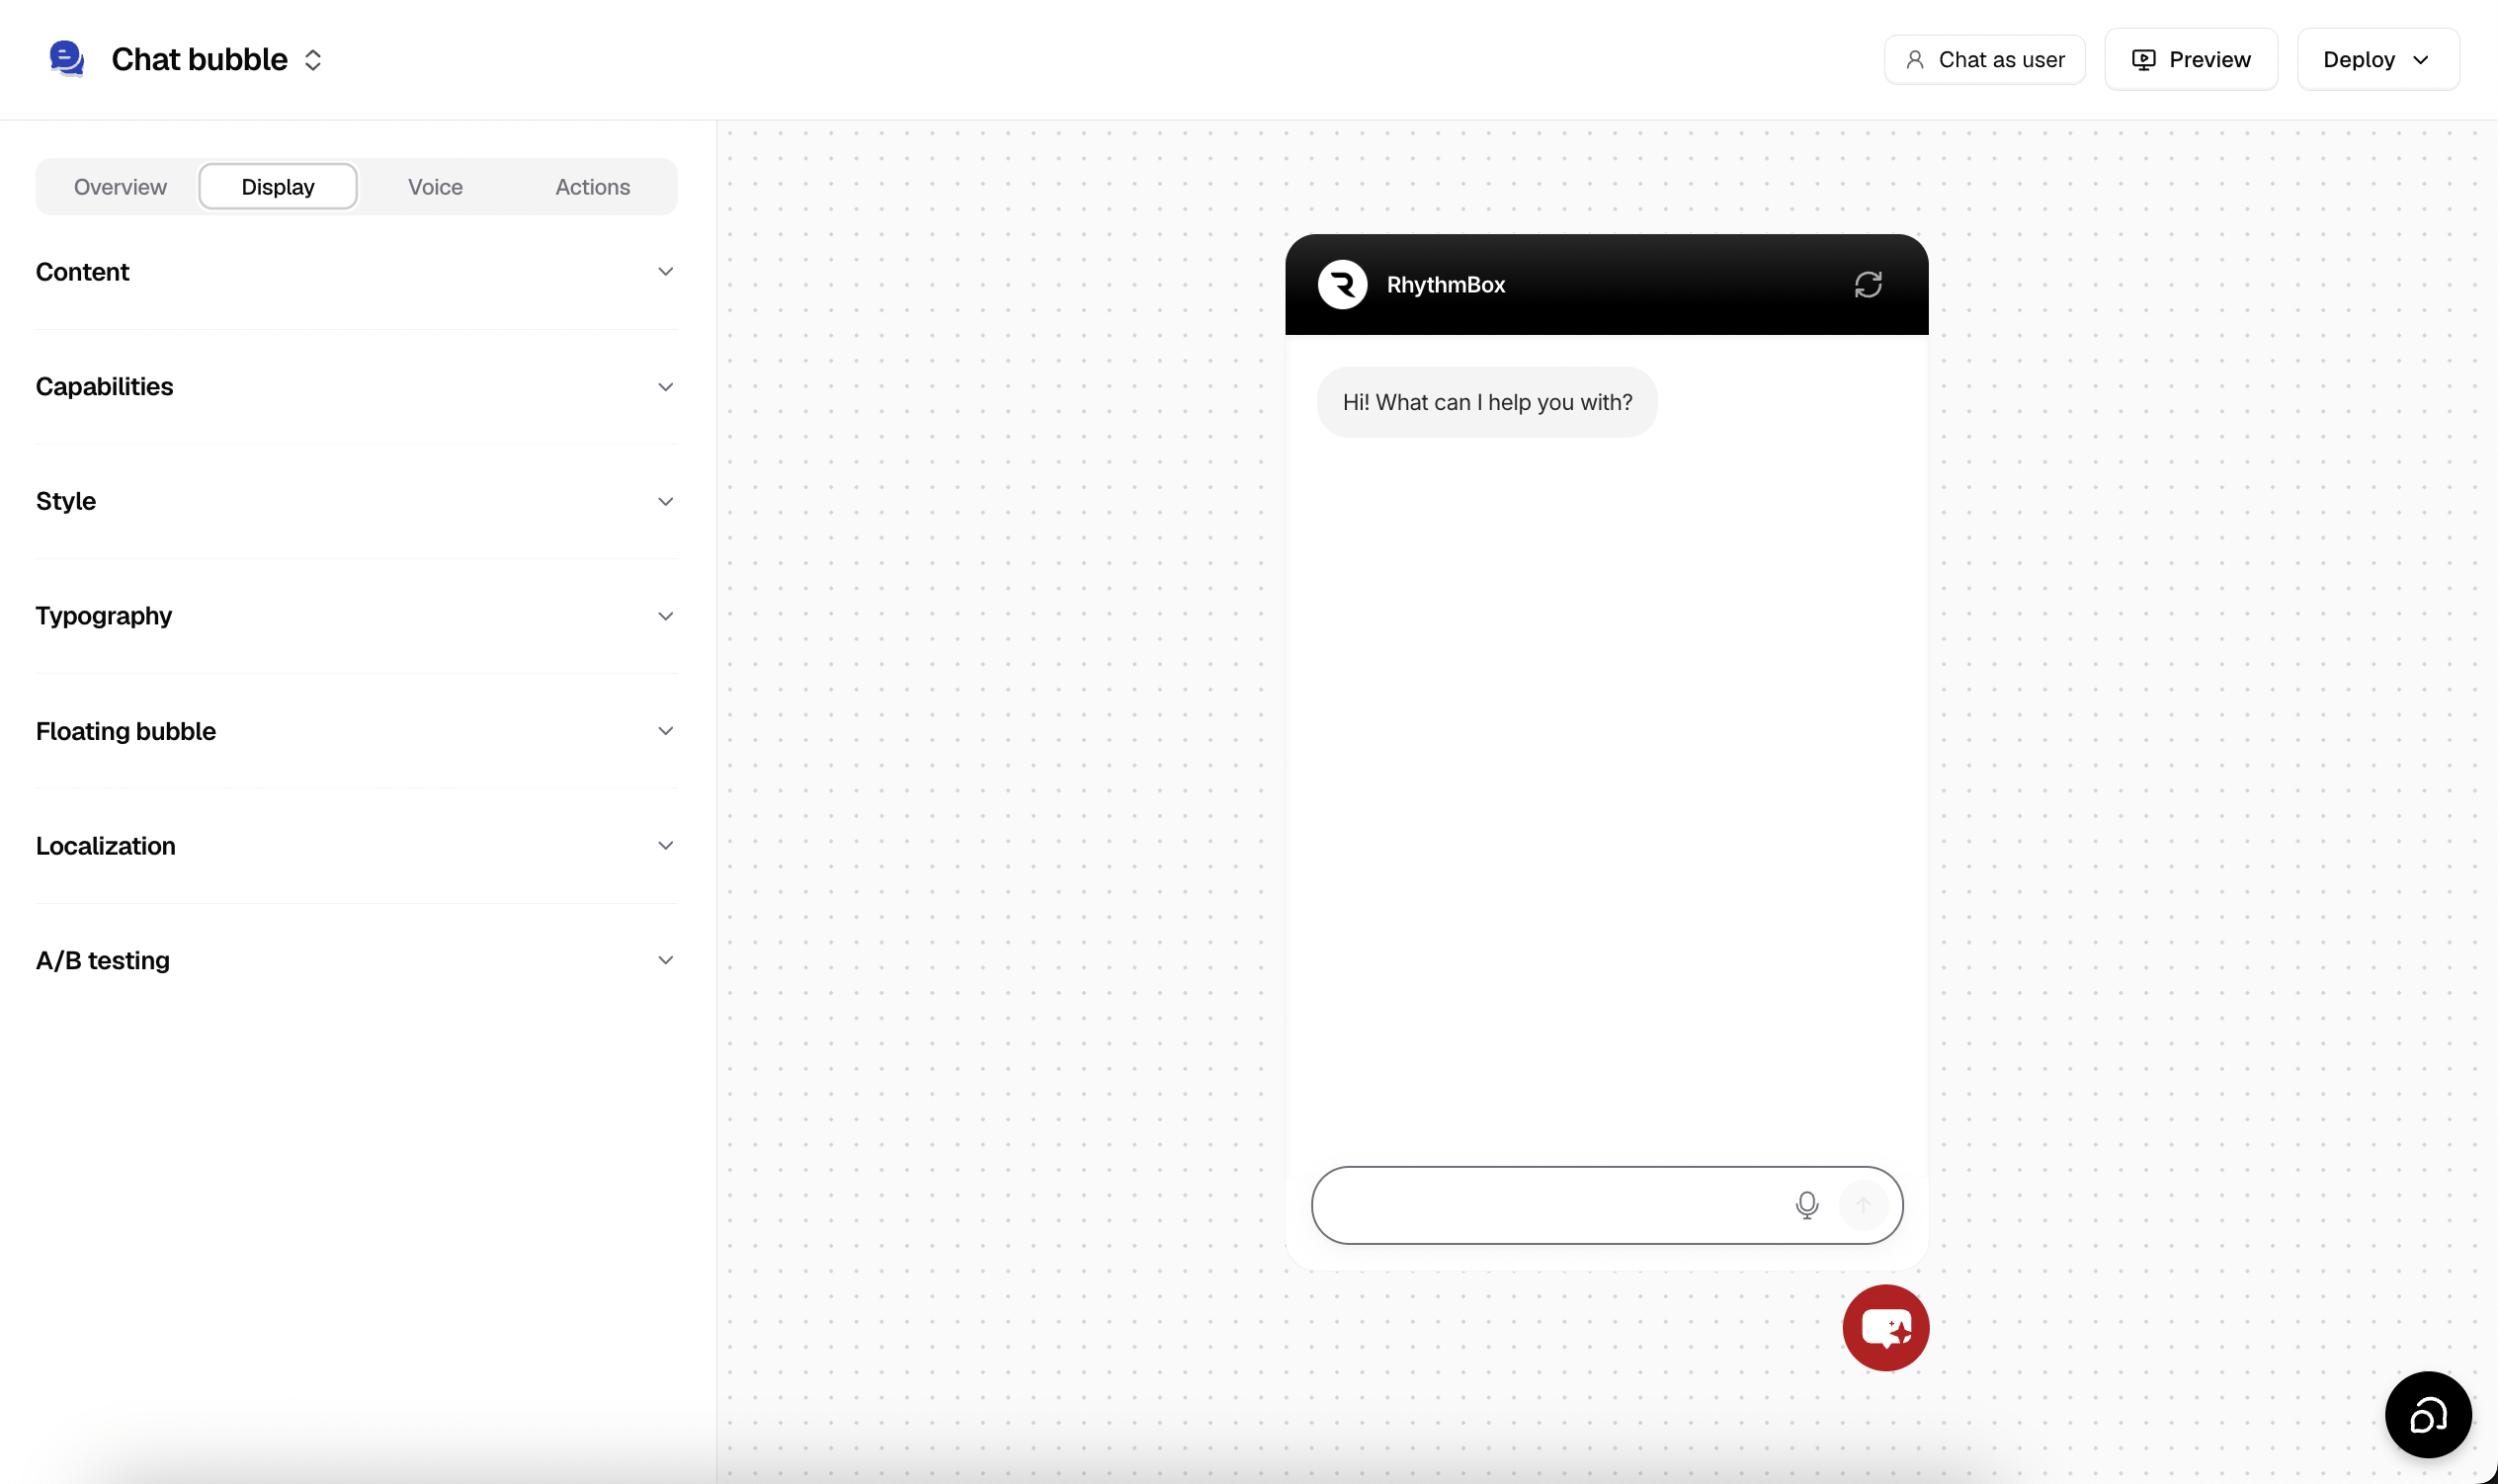 #### Content
* **Agent picture:** Picture of the AI agent when providing answers.
* **Border around profile picture:** Show a border around the AI agent picture.
* **Display name:** The name shown at the top of the chat bubble.
* **Initial message:** The message shown before the user opens the chat bubble, designed to grab attention and encourage interaction, also shown once the user opens the bubble. Enter each message on a new line to send several. You can customize the initial message per user by following [this guide](/docs/developer-guides/custom-initial-messages).
* **Use different message for mobile:** Toggle this on to show a different initial message when users open your website on a mobile device, usually a shorter one.
* **Auto show initial messages pop-ups after set duration:** Set a timer to control when the initial messages pop up.
* **Show auto pop-up on mobile:** Toggle this off to disable the pop-up when users open your website on a mobile device.
* **Use different duration for mobile:** Toggle this on to set a different timer for the pop-up on mobile.
* **Message placeholder:** The text shown in the field where users write their questions.
* **Dismissable notice:** A message shown above the text input area that disappears after the user sends a message. Supports rich text, up to 200 characters.
* **Footer:** A message shown below the text input area, for a disclaimer or a link to your privacy policy. Supports rich text, up to 200 characters.
* **Suggested messages:** Predefined prompts shown when users open the chat, to help them start quickly. These should reflect your most common questions or actions. Click **+ Add message** to add one, and use the type dropdown beside it (default **Basic**) to group related prompts under a main message, so users pick a category first and then a more specific follow-up. Enable **Keep showing suggested messages** to keep them visible after the first reply.
Suggested messages set here are fixed wordings. To have the agent adapt its suggestions as the conversation develops, use the [Suggested Messages action](/docs/user-guides/chatbot/actions/suggested-messages) instead.
If you include links in the footer or a dismissable notice, they must be full URLs starting with `http://` or `https://`, for example `https://www.example.com`, not `www.example.com` or `example.com`.
#### Capabilities
* **Agent chat bubble:** Wrap AI agent messages in a rounded bubble. When off, AI agent messages appear as plain text.
* **Attachments:** Enable or disable sending attachments, allowing your AI agent to process them and respond based on their content.
* **Voice to text (Dictation):** When enabled, a dictation button (microphone) appears in the text input area. Users can speak their message, which is converted to text for them to review and edit before sending.
* **Copy message:** When enabled, a copy button on AI agent messages lets users copy the response.
* **Collect user feedback:** When enabled, thumbs up and thumbs down buttons appear on AI agent messages.
* **Delete conversations:** Allow users to delete their own conversations from the [recent chats screen](#the-chat-bubble-menu).
#### Style
* **Theme:** Choose between **Light** or **Dark** mode.
* **Tinted grayscale:** Add a subtle hue to neutral elements such as the chat background, borders, and agent message bubbles. Leave this disabled to use the default grayscale colors.
* **Hue:** Set the base hue of the tint from `0` to `360` on the color wheel. For example, `0` is red, `120` is green, and `220` is blue.
* **Tint:** Control the intensity of the tint from `0` to `9`. Higher values make the selected hue more noticeable.
* **Shade:** Adjust the lightness or darkness of tinted surfaces from `-4` to `4`. Negative values make them lighter, positive values darker, and `0` keeps the default shade.
* **Accent color:** Apply a custom color to highlighted elements, such as user message bubbles. When disabled, the default accent color is used.
* **Color:** Enter the hex value of your accent color, or use the reset button to restore the default.
* **Use accent color for header:** Apply the accent color to the chat header.
* **Use accent color for send icon:** Apply the accent color to the send button in the text input area.
* **Radius:** Set the corner radius of the chat widget to control how rounded its edges appear.
Tinted grayscale and the accent color are independent. The accent color controls the highlighted elements, while tinted grayscale controls the surfaces around them. Set both to hues that work together for a consistent look.
#### Typography
* **Font family:** Choose the font used throughout the chat bubble.
* **Font size:** Set the base font size for text displayed in the bubble.
#### Floating bubble
* **Position:** Align the bubble to the **Left** or **Right**.
* **Chat bubble icon style:** Select from the built-in icon styles, or upload your own custom icon to match your brand.
* **Chat bubble button color:** Set the color of the floating chat button displayed on your website.
* **Show text in the chat bubble:** Display a short label next to the chat bubble icon, to make it more noticeable and encourage visitors to start a conversation.
#### Localization
The chat bubble supports localization, so you can translate action buttons and interface text into multiple languages.
**Language source**: choose how the chat bubble detects which language to display:
* **Visitor's browser:** Uses the language configured in the visitor's browser. This is the default.
* **Website language:** Uses the language specified in the page's `html lang` attribute. Recommended for multilingual websites with their own language switcher, so the chat bubble matches the language of the page the visitor is viewing.
#### Content
* **Agent picture:** Picture of the AI agent when providing answers.
* **Border around profile picture:** Show a border around the AI agent picture.
* **Display name:** The name shown at the top of the chat bubble.
* **Initial message:** The message shown before the user opens the chat bubble, designed to grab attention and encourage interaction, also shown once the user opens the bubble. Enter each message on a new line to send several. You can customize the initial message per user by following [this guide](/docs/developer-guides/custom-initial-messages).
* **Use different message for mobile:** Toggle this on to show a different initial message when users open your website on a mobile device, usually a shorter one.
* **Auto show initial messages pop-ups after set duration:** Set a timer to control when the initial messages pop up.
* **Show auto pop-up on mobile:** Toggle this off to disable the pop-up when users open your website on a mobile device.
* **Use different duration for mobile:** Toggle this on to set a different timer for the pop-up on mobile.
* **Message placeholder:** The text shown in the field where users write their questions.
* **Dismissable notice:** A message shown above the text input area that disappears after the user sends a message. Supports rich text, up to 200 characters.
* **Footer:** A message shown below the text input area, for a disclaimer or a link to your privacy policy. Supports rich text, up to 200 characters.
* **Suggested messages:** Predefined prompts shown when users open the chat, to help them start quickly. These should reflect your most common questions or actions. Click **+ Add message** to add one, and use the type dropdown beside it (default **Basic**) to group related prompts under a main message, so users pick a category first and then a more specific follow-up. Enable **Keep showing suggested messages** to keep them visible after the first reply.
Suggested messages set here are fixed wordings. To have the agent adapt its suggestions as the conversation develops, use the [Suggested Messages action](/docs/user-guides/chatbot/actions/suggested-messages) instead.
If you include links in the footer or a dismissable notice, they must be full URLs starting with `http://` or `https://`, for example `https://www.example.com`, not `www.example.com` or `example.com`.
#### Capabilities
* **Agent chat bubble:** Wrap AI agent messages in a rounded bubble. When off, AI agent messages appear as plain text.
* **Attachments:** Enable or disable sending attachments, allowing your AI agent to process them and respond based on their content.
* **Voice to text (Dictation):** When enabled, a dictation button (microphone) appears in the text input area. Users can speak their message, which is converted to text for them to review and edit before sending.
* **Copy message:** When enabled, a copy button on AI agent messages lets users copy the response.
* **Collect user feedback:** When enabled, thumbs up and thumbs down buttons appear on AI agent messages.
* **Delete conversations:** Allow users to delete their own conversations from the [recent chats screen](#the-chat-bubble-menu).
#### Style
* **Theme:** Choose between **Light** or **Dark** mode.
* **Tinted grayscale:** Add a subtle hue to neutral elements such as the chat background, borders, and agent message bubbles. Leave this disabled to use the default grayscale colors.
* **Hue:** Set the base hue of the tint from `0` to `360` on the color wheel. For example, `0` is red, `120` is green, and `220` is blue.
* **Tint:** Control the intensity of the tint from `0` to `9`. Higher values make the selected hue more noticeable.
* **Shade:** Adjust the lightness or darkness of tinted surfaces from `-4` to `4`. Negative values make them lighter, positive values darker, and `0` keeps the default shade.
* **Accent color:** Apply a custom color to highlighted elements, such as user message bubbles. When disabled, the default accent color is used.
* **Color:** Enter the hex value of your accent color, or use the reset button to restore the default.
* **Use accent color for header:** Apply the accent color to the chat header.
* **Use accent color for send icon:** Apply the accent color to the send button in the text input area.
* **Radius:** Set the corner radius of the chat widget to control how rounded its edges appear.
Tinted grayscale and the accent color are independent. The accent color controls the highlighted elements, while tinted grayscale controls the surfaces around them. Set both to hues that work together for a consistent look.
#### Typography
* **Font family:** Choose the font used throughout the chat bubble.
* **Font size:** Set the base font size for text displayed in the bubble.
#### Floating bubble
* **Position:** Align the bubble to the **Left** or **Right**.
* **Chat bubble icon style:** Select from the built-in icon styles, or upload your own custom icon to match your brand.
* **Chat bubble button color:** Set the color of the floating chat button displayed on your website.
* **Show text in the chat bubble:** Display a short label next to the chat bubble icon, to make it more noticeable and encourage visitors to start a conversation.
#### Localization
The chat bubble supports localization, so you can translate action buttons and interface text into multiple languages.
**Language source**: choose how the chat bubble detects which language to display:
* **Visitor's browser:** Uses the language configured in the visitor's browser. This is the default.
* **Website language:** Uses the language specified in the page's `html lang` attribute. Recommended for multilingual websites with their own language switcher, so the chat bubble matches the language of the page the visitor is viewing.
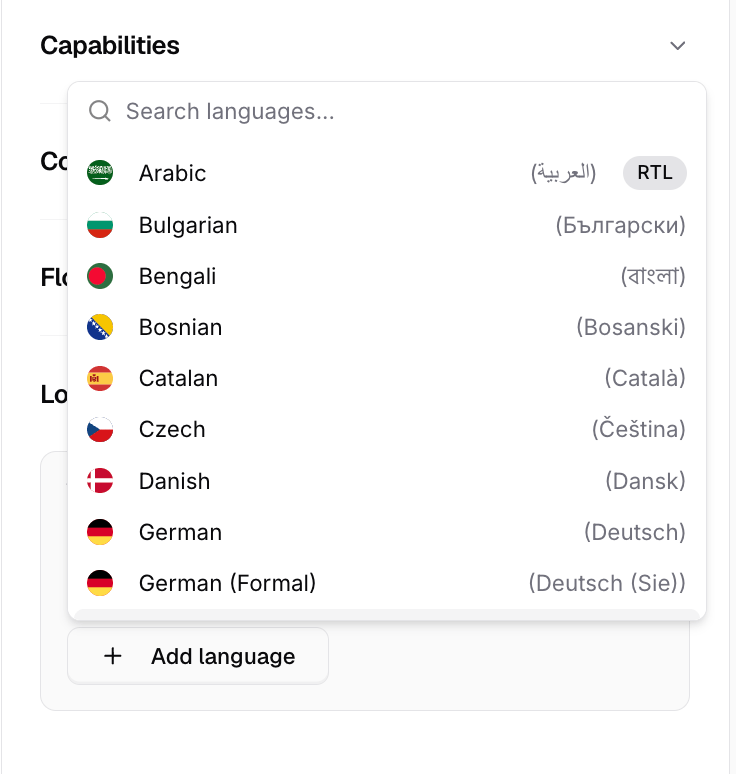
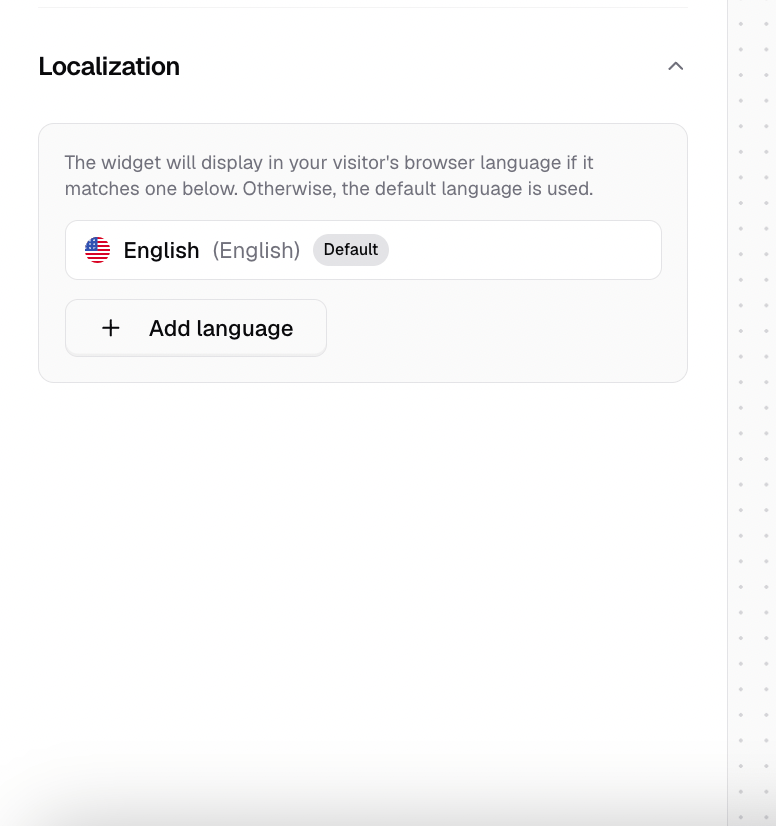 You can add multiple languages by clicking **Add language** and selecting from the available list, including right-to-left (RTL) languages. One language must be set as the **default**.
 Once a language is enabled, action buttons and the [chat bubble menu](#the-chat-bubble-menu) items are automatically translated: starting a new conversation, ending a conversation, and viewing previous conversations.
 The chat bubble only displays languages you've added under **Localization**. If the detected language hasn't been added, the chat bubble falls back to your default language.
**Localize dynamic chat bubble content:** You can also use `setOptions` to localize the display name, initial message, message placeholder, footer, dismissable notice, and suggested messages. See [Runtime options](/docs/developer-guides/chat-bubble-control#runtime-options).
#### A/B testing
You can run **A/B tests** by choosing the percentage of visitors who will see your agent. For example, setting the percentage to **10%** shows it to 10% of your visitors, while the remaining 90% won't see it.
This is especially useful for **gradual rollouts**, letting you introduce your agent to a smaller group before making it available to everyone.
A/B testing is available on both the **Chat bubble** and **Center Stage** channels.
Go to **Display → A/B testing** and enable **Show to a percentage of visitors**.
Enter the percentage of visitors you want to see your agent.
Click **Save changes** to apply the A/B test.
### Attachments
Chatbase lets your end users upload attachments during conversations. The agent can analyze supported files and generate responses based on their content.
**Supported formats**
* Images: `.png`, `.jpg`, `.jpeg`
* Documents: `.pdf`
Some platforms (such as Instagram, Messenger, and WhatsApp) may allow users to upload additional file types, for example GIF. These formats are not supported. Any unsupported file types are automatically discarded and not processed.
**Limits**
To maintain performance and reliability, the following limits apply:
| Limit | Value |
| ------------------------------- | --------------------------------- |
| Maximum attachments per message | 5 files |
| Maximum file size | 5 MB per file |
| Maximum PDF length | 5 pages per file |
| Maximum characters per PDF page | 2,000 tokens (\~8,000 characters) |
Any attachments that exceed these limits are **ignored and not processed**.
**Billing**
When a message contains attachments, the credits consumed include **both the text response and the attachments processed**. Each AI model has separate pricing for text requests, image analysis, and PDF file analysis (per page).
So for every reply the agent generates, credits are consumed for the **text response**, plus additional credits for **each attachment**: images charged per image, PDFs charged per page.
Example, with a model cost of 1 credit:
| Message | Credit calculation | Total |
| --------------------------------- | --------------------------------------------- | ----- |
| `Hi` | 1 (text) | **1** |
| `Hi + 1 image` | 1 (text) + 1 × 1 (image) | **2** |
| `Hi + 2 images` | 1 (text) + 2 × 1 (image) | **3** |
| `Hi + 1 PDF (3 pages)` | 1 (text) + 3 × 1 (PDF pages) | **4** |
| `Hi + 2 images + 1 PDF (3 pages)` | 1 (text) + 2 × 1 (images) + 3 × 1 (PDF pages) | **6** |
**Actions and attachments**
If the message triggers an [action](/docs/user-guides/chatbot/actions/actions-overview), for example booking a meeting, the attachments are processed more than once: charged once when the action is executed, and again when the agent generates a response.
| Message | Credit calculation | Total |
| --------------------------------- | -------------------------------------------- | ----- |
| `Hi + 1 image` (action triggered) | 1 (text) + 1 × 1 (image) (processing action) | **2** |
| `Agent response` (after action) | 1 (text) + 1 × 1 (image) (generating reply) | **2** |
| `Total for this message` | 2 + 2 | **4** |
In this case the image is billed twice: once when processing the action, and again when generating the agent's response.
**Other channels that support attachments**
Help page, Center Stage, Email, Instagram, Messenger, and WhatsApp.
### Voice
Configure channel-specific voice settings that override your agent's default voice configuration. See [Settings → Voice](/docs/user-guides/chatbot/settings#voice).
### Deploy button
The **Deploy** button provides the code needed to add the chat bubble to your website. It opens a dropdown with **Website widget**, **Website iframe**, **Shopify**, and **WordPress**.
**Allowed domains:** Restrict where your agent is allowed to load by specifying approved domains. When enabled, the agent only works on the domains listed.
| Embed type | Notes |
| -------------------------------- | ------------------------------------------------------------------------------------------------------------------------------------------------------------------------------------- |
| **Website widget** (recommended) | A floating chat bubble on your website. Supports all advanced features, fully customizable from the **Display** and **Overview** tabs, and the best option for most use cases. |
| **Website iframe** | The chat interface embedded directly via an iframe. Simple to integrate, but **advanced features are not supported**. Recommended only if iframe embedding is required by your setup. |
Copy the embed script and paste it into your site's HTML, typically before the closing `` tag.
The chat bubble only displays languages you've added under **Localization**. If the detected language hasn't been added, the chat bubble falls back to your default language.
**Localize dynamic chat bubble content:** You can also use `setOptions` to localize the display name, initial message, message placeholder, footer, dismissable notice, and suggested messages. See [Runtime options](/docs/developer-guides/chat-bubble-control#runtime-options).
#### A/B testing
You can run **A/B tests** by choosing the percentage of visitors who will see your agent. For example, setting the percentage to **10%** shows it to 10% of your visitors, while the remaining 90% won't see it.
This is especially useful for **gradual rollouts**, letting you introduce your agent to a smaller group before making it available to everyone.
A/B testing is available on both the **Chat bubble** and **Center Stage** channels.
Go to **Display → A/B testing** and enable **Show to a percentage of visitors**.
Enter the percentage of visitors you want to see your agent.
Click **Save changes** to apply the A/B test.
### Attachments
Chatbase lets your end users upload attachments during conversations. The agent can analyze supported files and generate responses based on their content.
**Supported formats**
* Images: `.png`, `.jpg`, `.jpeg`
* Documents: `.pdf`
Some platforms (such as Instagram, Messenger, and WhatsApp) may allow users to upload additional file types, for example GIF. These formats are not supported. Any unsupported file types are automatically discarded and not processed.
**Limits**
To maintain performance and reliability, the following limits apply:
| Limit | Value |
| ------------------------------- | --------------------------------- |
| Maximum attachments per message | 5 files |
| Maximum file size | 5 MB per file |
| Maximum PDF length | 5 pages per file |
| Maximum characters per PDF page | 2,000 tokens (\~8,000 characters) |
Any attachments that exceed these limits are **ignored and not processed**.
**Billing**
When a message contains attachments, the credits consumed include **both the text response and the attachments processed**. Each AI model has separate pricing for text requests, image analysis, and PDF file analysis (per page).
So for every reply the agent generates, credits are consumed for the **text response**, plus additional credits for **each attachment**: images charged per image, PDFs charged per page.
Example, with a model cost of 1 credit:
| Message | Credit calculation | Total |
| --------------------------------- | --------------------------------------------- | ----- |
| `Hi` | 1 (text) | **1** |
| `Hi + 1 image` | 1 (text) + 1 × 1 (image) | **2** |
| `Hi + 2 images` | 1 (text) + 2 × 1 (image) | **3** |
| `Hi + 1 PDF (3 pages)` | 1 (text) + 3 × 1 (PDF pages) | **4** |
| `Hi + 2 images + 1 PDF (3 pages)` | 1 (text) + 2 × 1 (images) + 3 × 1 (PDF pages) | **6** |
**Actions and attachments**
If the message triggers an [action](/docs/user-guides/chatbot/actions/actions-overview), for example booking a meeting, the attachments are processed more than once: charged once when the action is executed, and again when the agent generates a response.
| Message | Credit calculation | Total |
| --------------------------------- | -------------------------------------------- | ----- |
| `Hi + 1 image` (action triggered) | 1 (text) + 1 × 1 (image) (processing action) | **2** |
| `Agent response` (after action) | 1 (text) + 1 × 1 (image) (generating reply) | **2** |
| `Total for this message` | 2 + 2 | **4** |
In this case the image is billed twice: once when processing the action, and again when generating the agent's response.
**Other channels that support attachments**
Help page, Center Stage, Email, Instagram, Messenger, and WhatsApp.
### Voice
Configure channel-specific voice settings that override your agent's default voice configuration. See [Settings → Voice](/docs/user-guides/chatbot/settings#voice).
### Deploy button
The **Deploy** button provides the code needed to add the chat bubble to your website. It opens a dropdown with **Website widget**, **Website iframe**, **Shopify**, and **WordPress**.
**Allowed domains:** Restrict where your agent is allowed to load by specifying approved domains. When enabled, the agent only works on the domains listed.
| Embed type | Notes |
| -------------------------------- | ------------------------------------------------------------------------------------------------------------------------------------------------------------------------------------- |
| **Website widget** (recommended) | A floating chat bubble on your website. Supports all advanced features, fully customizable from the **Display** and **Overview** tabs, and the best option for most use cases. |
| **Website iframe** | The chat interface embedded directly via an iframe. Simple to integrate, but **advanced features are not supported**. Recommended only if iframe embedding is required by your setup. |
Copy the embed script and paste it into your site's HTML, typically before the closing `` tag.