> ## Documentation Index
> Fetch the complete documentation index at: https://chatbase.co/docs/llms.txt
> Use this file to discover all available pages before exploring further.
# Client-Side Custom Actions
> Execute custom actions directly in your user's browser with full control and seamless integration
Client-side custom actions allow you to execute code directly in your user's browser, giving you complete control over the execution environment and enabling seamless integration with your existing frontend systems.
## Benefits of Client-Side Actions
Integrate seamlessly with your existing frontend architecture and user systems
Access user-specific information and browser APIs not available on the server
Create interactive, responsive experiences with immediate feedback and smooth workflows
Use your existing authentication, state management, and API integration patterns
## How Client-Side Actions Work
When a user interacts with your chatbot and triggers a client-side action:
1. The Agent sends an event to your website window with action details
2. Your registered tool function executes in the browser
3. The result is sent back to the Agent
4. The conversation continues with the action response
## Setup Guide
### Prerequisites
A website with the Chatbase embed script already installed and working.
New to Chatbase? Check out [Your First Agent](/user-guides/quick-start/your-first-agent) to get started with the embed script first.
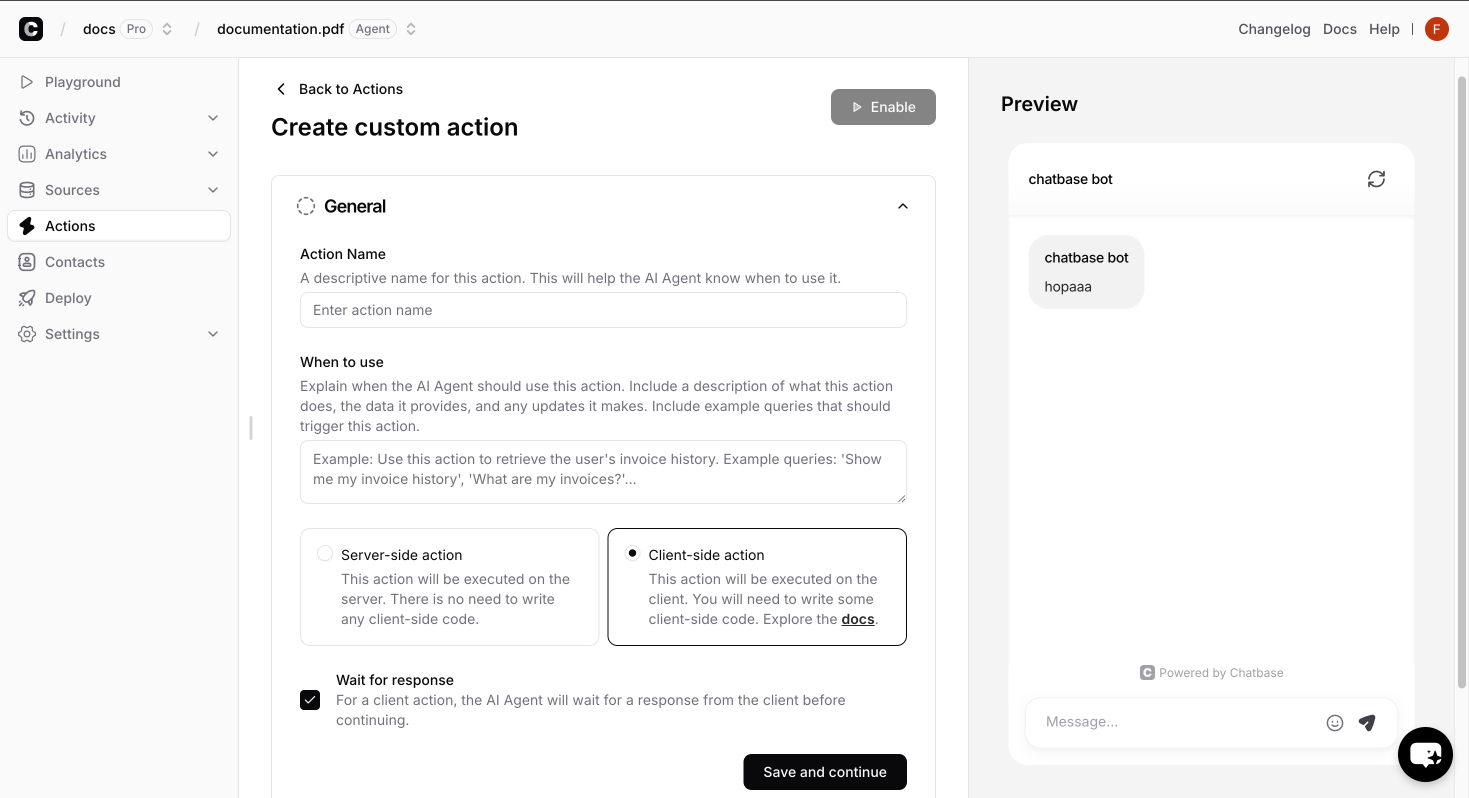
Create a new custom action in your Chatbase dashboard:
1. Go to Chatbase dashboard [dashboard](https://chatbase.co/dashboard) page
2. Select the agent you want to create the custom action for
3. Navigate to **Actions** → **Create action** → **Custom action**
4. Fill in the action details:
* **Name**: A unique identifier (e.g., `get_weather`)
* **Description**: What the action does
* **Parameters**: Define any data needed to have the Agent collect from the user
5. **Important**: Select **"Client"** as the action type to enable client-side execution
6. Click on the **Save and Continue** button and enable the action.
 Use the `registerTools` method to provide the actual implementation for your actions:
```javascript theme={null}
window.chatbase("registerTools", {
get_weather: async (args, user) => {
try {
// Access the parameters defined in your action configuration
const { location } = args;
// Make API requests to your backend
const response = await fetch(`/api/weather?location=${location}`);
if (!response.ok) {
throw new Error('Failed to fetch weather data');
}
const weatherData = await response.json();
return {
status: "success",
data: {
temperature: weatherData.temperature,
condition: weatherData.condition,
location: location
}
};
} catch (error) {
return {
status: "error",
error: error.message
};
}
},
send_notification: async (args, user) => {
try {
// Show a simple alert with data collected from the user by the Ai agent
alert(`${args.title}\n\n${args.message}`);
return {
status: "success",
data: "Alert shown successfully"
};
} catch (error) {
return {
status: "error",
error: "Failed to show alert"
};
}
}
});
```
Register all your tools in a single `registerTools` call. Multiple calls will override previously registered tools.
The action names created in the dashboard must exactly match the function names you register with `registerTools`.
## Function Parameters
Every client-side action function receives two parameters:
Contains all the parameters defined in your custom action configuration. The structure matches exactly what you defined in the dashboard.
Contains user information that varies depending on your identity verification setup.
Unique identifier for the authenticated user as provided during the identify call.
Hash of the user\_id used for verification (generated server-side).
Internal anonymous user identifier. You can ignore this field.
Internal Chatbase anonymous identifier. You can ignore this field.
Custom user data passed during the identify call (e.g., name, email, company). This field is only present if metadata was provided during identification.
Internal anonymous user identifier. You can ignore this field.
Internal Chatbase anonymous identifier. You can ignore this field.
Custom user data passed during any identify calls. This field is only present if metadata was provided during identification.
The anonymous IDs (`anon_user_id` and `chatbase_anon_id`) are internal identifiers used by Chatbase and can be safely ignored in your custom form implementations.
## Response Format
Your action functions must return responses in a specific format:
When your action succeeds, return both `status` and `data`:
```javascript theme={null}
{
status: "success",
data: responseData // Can be string, object, array, etc.
}
```
**Examples:**
```javascript Object Response theme={null}
{
status: "success",
data: {
temperature: 72,
condition: "sunny",
humidity: 45,
forecast: ["Clear skies", "Light breeze"]
}
}
```
```javascript String Response theme={null}
{
status: "success",
data: "The weather in New York is currently 72°F and sunny with light winds."
}
```
```javascript Array Response theme={null}
{
status: "success",
data: [
{ name: "Product 1", price: 29.99 },
{ name: "Product 2", price: 49.99 }
]
}
```
When an error occurs, return `status` and `error`:
```javascript theme={null}
{
status: "error",
error: "Descriptive error message"
}
```
**Examples:**
```javascript theme={null}
// API failure
{
status: "error",
error: "Unable to connect to weather service. Please try again."
}
// Validation error
{
status: "error",
error: "Location parameter is required"
}
// Authentication error
{
status: "error",
error: "User must be logged in to perform this action"
}
```
## Advanced Examples
This example shows client-side actions utilizing the browser geolocation API to get the user's zip code.
Use the `registerTools` method to provide the actual implementation for your actions:
```javascript theme={null}
window.chatbase("registerTools", {
get_weather: async (args, user) => {
try {
// Access the parameters defined in your action configuration
const { location } = args;
// Make API requests to your backend
const response = await fetch(`/api/weather?location=${location}`);
if (!response.ok) {
throw new Error('Failed to fetch weather data');
}
const weatherData = await response.json();
return {
status: "success",
data: {
temperature: weatherData.temperature,
condition: weatherData.condition,
location: location
}
};
} catch (error) {
return {
status: "error",
error: error.message
};
}
},
send_notification: async (args, user) => {
try {
// Show a simple alert with data collected from the user by the Ai agent
alert(`${args.title}\n\n${args.message}`);
return {
status: "success",
data: "Alert shown successfully"
};
} catch (error) {
return {
status: "error",
error: "Failed to show alert"
};
}
}
});
```
Register all your tools in a single `registerTools` call. Multiple calls will override previously registered tools.
The action names created in the dashboard must exactly match the function names you register with `registerTools`.
## Function Parameters
Every client-side action function receives two parameters:
Contains all the parameters defined in your custom action configuration. The structure matches exactly what you defined in the dashboard.
Contains user information that varies depending on your identity verification setup.
Unique identifier for the authenticated user as provided during the identify call.
Hash of the user\_id used for verification (generated server-side).
Internal anonymous user identifier. You can ignore this field.
Internal Chatbase anonymous identifier. You can ignore this field.
Custom user data passed during the identify call (e.g., name, email, company). This field is only present if metadata was provided during identification.
Internal anonymous user identifier. You can ignore this field.
Internal Chatbase anonymous identifier. You can ignore this field.
Custom user data passed during any identify calls. This field is only present if metadata was provided during identification.
The anonymous IDs (`anon_user_id` and `chatbase_anon_id`) are internal identifiers used by Chatbase and can be safely ignored in your custom form implementations.
## Response Format
Your action functions must return responses in a specific format:
When your action succeeds, return both `status` and `data`:
```javascript theme={null}
{
status: "success",
data: responseData // Can be string, object, array, etc.
}
```
**Examples:**
```javascript Object Response theme={null}
{
status: "success",
data: {
temperature: 72,
condition: "sunny",
humidity: 45,
forecast: ["Clear skies", "Light breeze"]
}
}
```
```javascript String Response theme={null}
{
status: "success",
data: "The weather in New York is currently 72°F and sunny with light winds."
}
```
```javascript Array Response theme={null}
{
status: "success",
data: [
{ name: "Product 1", price: 29.99 },
{ name: "Product 2", price: 49.99 }
]
}
```
When an error occurs, return `status` and `error`:
```javascript theme={null}
{
status: "error",
error: "Descriptive error message"
}
```
**Examples:**
```javascript theme={null}
// API failure
{
status: "error",
error: "Unable to connect to weather service. Please try again."
}
// Validation error
{
status: "error",
error: "Location parameter is required"
}
// Authentication error
{
status: "error",
error: "User must be logged in to perform this action"
}
```
## Advanced Examples
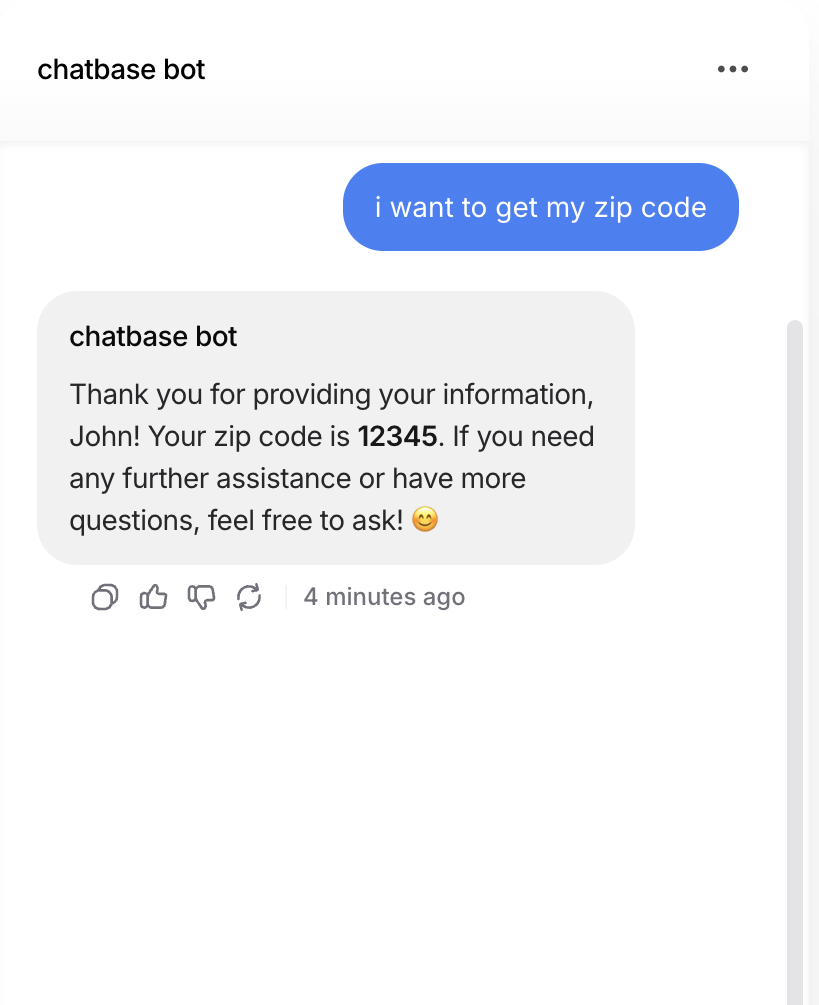
This example shows client-side actions utilizing the browser geolocation API to get the user's zip code.
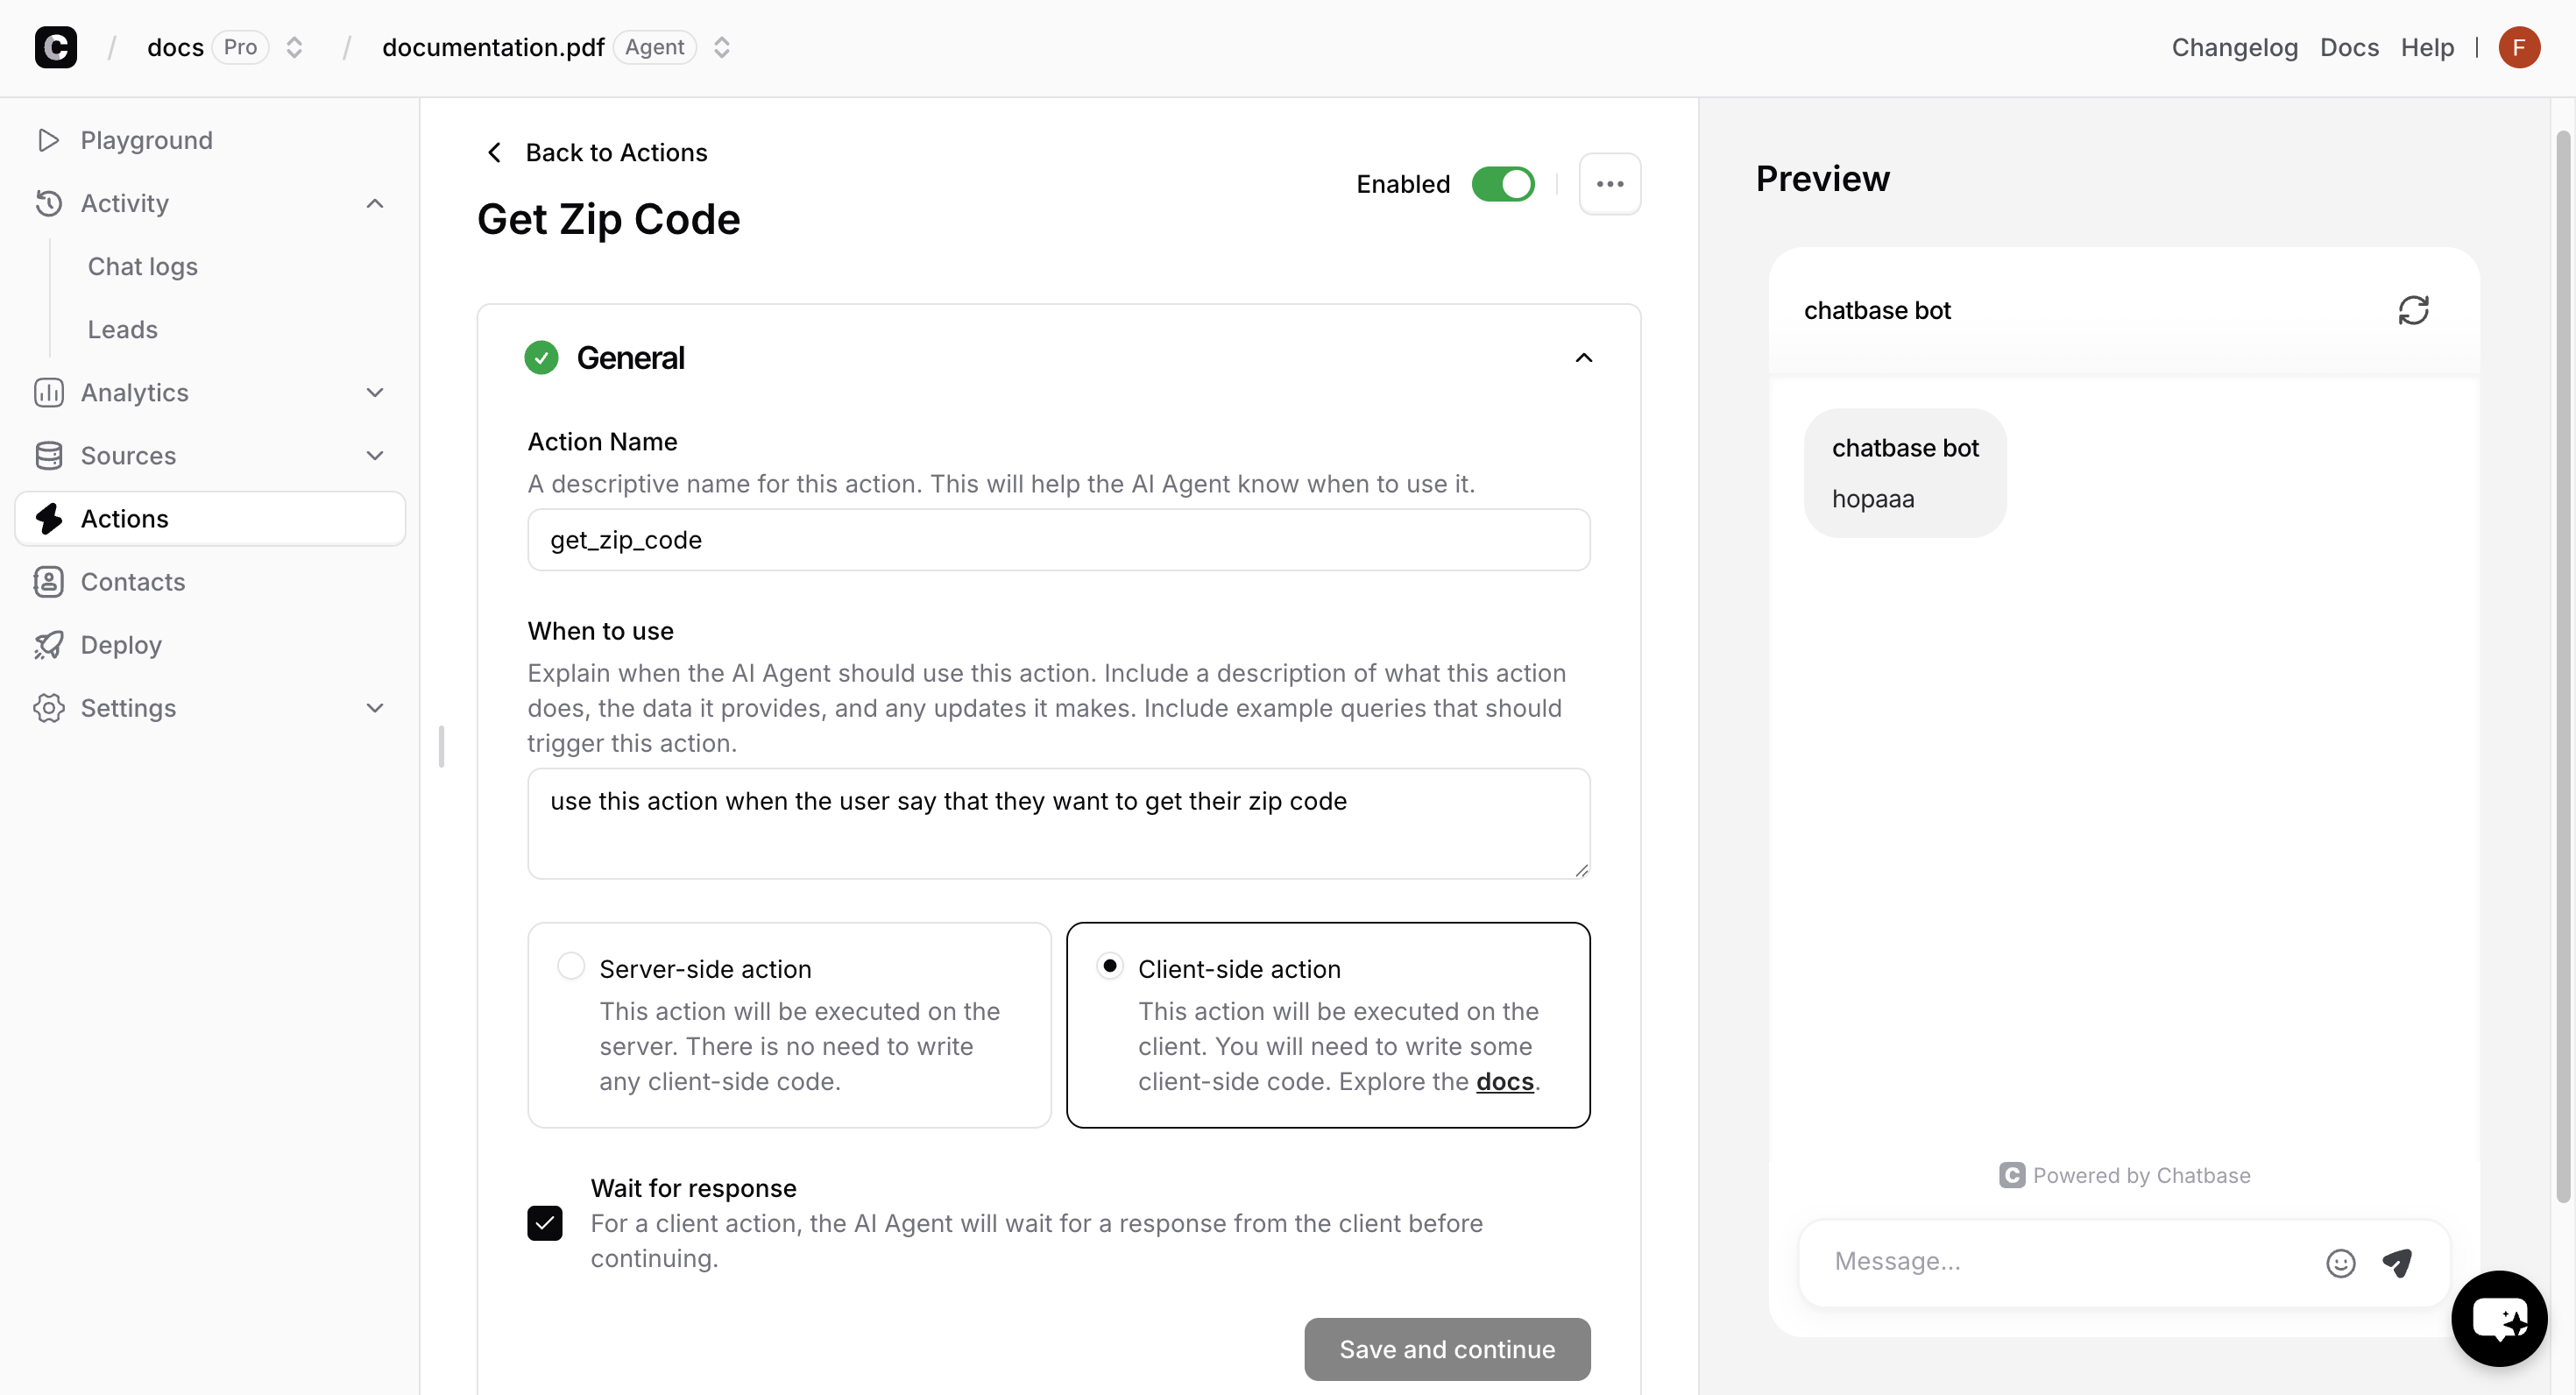 ```javascript Browser Integration theme={null}
window.chatbase("registerTools", {
get_zip_code: async (args, user) => {
try {
// Use browser geolocation API
const position = await new Promise((resolve, reject) => {
navigator.geolocation.getCurrentPosition(resolve, reject);
});
const { latitude, longitude } = position.coords;
const response = await fetch(`/api/location-info?lat=${latitude}&lon=${longitude}`);
const { zip_code } = await response.json();
return {
status: "success",
data: {
zip_code: zip_code,
}
};
} catch (error) {
return {
status: "error",
error: "Unable to access location information"
};
}
}
});
```
```javascript Browser Integration theme={null}
window.chatbase("registerTools", {
get_zip_code: async (args, user) => {
try {
// Use browser geolocation API
const position = await new Promise((resolve, reject) => {
navigator.geolocation.getCurrentPosition(resolve, reject);
});
const { latitude, longitude } = position.coords;
const response = await fetch(`/api/location-info?lat=${latitude}&lon=${longitude}`);
const { zip_code } = await response.json();
return {
status: "success",
data: {
zip_code: zip_code,
}
};
} catch (error) {
return {
status: "error",
error: "Unable to access location information"
};
}
}
});
```
 ## Best Practices
Always wrap your action logic in try-catch blocks and return meaningful error messages:
```javascript theme={null}
window.chatbase("registerTools", {
my_action: async (args, user) => {
try {
// Validate input parameters
if (!args.requiredParam) {
return {
status: "error",
error: "Required parameter is missing"
};
}
// Your action logic here
const result = await performAction(args);
return {
status: "success",
data: result
};
} catch (error) {
// Log for debugging.
console.error('Action failed:', error);
return {
status: "error",
error: "Action failed. Please try again."
};
}
}
});
```
Always validate user inputs and handle edge cases:
```javascript theme={null}
window.chatbase("registerTools", {
calculate_shipping: async (args, user) => {
const { weight, destination, shippingMethod } = args;
// Validate required parameters
if (!weight || weight <= 0) {
return {
status: "error",
error: "Valid weight is required"
};
}
if (!destination || destination.length < 2) {
return {
status: "error",
error: "Valid destination is required"
};
}
try {
const result = await calculateShipping(weight, destination, shippingMethod);
return { status: "success", data: result };
} catch (error) {
return { status: "error", error: "Shipping calculation failed" };
}
}
});
```
* Cache frequently used data in browser storage
* Use appropriate timeouts for external API calls
* Minimize the size of returned data
```javascript theme={null}
window.chatbase("registerTools", {
get_cached_data: async (args, user) => {
const cacheKey = `data_${args.type}`;
const cached = localStorage.getItem(cacheKey);
if (cached) {
const { data, timestamp } = JSON.parse(cached);
const isStale = Date.now() - timestamp > 300000; // 5 minutes
if (!isStale) {
return { status: "success", data };
}
}
// Fetch fresh data if not cached or stale
const freshData = await fetchData(args.type);
localStorage.setItem(cacheKey, JSON.stringify({
data: freshData,
timestamp: Date.now()
}));
return { status: "success", data: freshData };
}
});
```
**Environment Limitations**: Client-side custom forms will not function in:
* Chatbase Playground environment
* Action Preview mode
* Compare features
Testing this action should be done in your actual website environment. Embed the [JavaScript script](/developer-guides/javascript-embed) in your website and test the action.
**Response Size Limits:** Keep your response data under reasonable size limits to ensure good performance. Very large responses may be truncated or cause timeouts.
## Troubleshooting
**Problem:** Console shows "Tool \[name] not found"
**Solutions:**
* Ensure action names match exactly between dashboard and `registerTools`
* Check that `registerTools` is called after the chatbot loads
* Verify the action is marked as "client-side" in dashboard
**Problem:** Action executes but chatbot doesn't receive response
**Solutions:**
* Check browser console for JavaScript errors
* Ensure you're returning the correct response format
* Verify async functions are properly awaited
* Check for uncaught exceptions in your action code
**Problem:** User parameter is null when expected
**Solutions:**
* Verify [identity verification](/developer-guides/identity-verification) is properly configured
* Test with and without authenticated users in your implementation
* Add fallback logic for when user context is unavailable
## Next Steps
Add interactive forms and data collection to your chat
Programmatically control the chat interface
Learn to listen for and respond to chat events in real-time
Create dynamic, personalized initial messages for users
## Best Practices
Always wrap your action logic in try-catch blocks and return meaningful error messages:
```javascript theme={null}
window.chatbase("registerTools", {
my_action: async (args, user) => {
try {
// Validate input parameters
if (!args.requiredParam) {
return {
status: "error",
error: "Required parameter is missing"
};
}
// Your action logic here
const result = await performAction(args);
return {
status: "success",
data: result
};
} catch (error) {
// Log for debugging.
console.error('Action failed:', error);
return {
status: "error",
error: "Action failed. Please try again."
};
}
}
});
```
Always validate user inputs and handle edge cases:
```javascript theme={null}
window.chatbase("registerTools", {
calculate_shipping: async (args, user) => {
const { weight, destination, shippingMethod } = args;
// Validate required parameters
if (!weight || weight <= 0) {
return {
status: "error",
error: "Valid weight is required"
};
}
if (!destination || destination.length < 2) {
return {
status: "error",
error: "Valid destination is required"
};
}
try {
const result = await calculateShipping(weight, destination, shippingMethod);
return { status: "success", data: result };
} catch (error) {
return { status: "error", error: "Shipping calculation failed" };
}
}
});
```
* Cache frequently used data in browser storage
* Use appropriate timeouts for external API calls
* Minimize the size of returned data
```javascript theme={null}
window.chatbase("registerTools", {
get_cached_data: async (args, user) => {
const cacheKey = `data_${args.type}`;
const cached = localStorage.getItem(cacheKey);
if (cached) {
const { data, timestamp } = JSON.parse(cached);
const isStale = Date.now() - timestamp > 300000; // 5 minutes
if (!isStale) {
return { status: "success", data };
}
}
// Fetch fresh data if not cached or stale
const freshData = await fetchData(args.type);
localStorage.setItem(cacheKey, JSON.stringify({
data: freshData,
timestamp: Date.now()
}));
return { status: "success", data: freshData };
}
});
```
**Environment Limitations**: Client-side custom forms will not function in:
* Chatbase Playground environment
* Action Preview mode
* Compare features
Testing this action should be done in your actual website environment. Embed the [JavaScript script](/developer-guides/javascript-embed) in your website and test the action.
**Response Size Limits:** Keep your response data under reasonable size limits to ensure good performance. Very large responses may be truncated or cause timeouts.
## Troubleshooting
**Problem:** Console shows "Tool \[name] not found"
**Solutions:**
* Ensure action names match exactly between dashboard and `registerTools`
* Check that `registerTools` is called after the chatbot loads
* Verify the action is marked as "client-side" in dashboard
**Problem:** Action executes but chatbot doesn't receive response
**Solutions:**
* Check browser console for JavaScript errors
* Ensure you're returning the correct response format
* Verify async functions are properly awaited
* Check for uncaught exceptions in your action code
**Problem:** User parameter is null when expected
**Solutions:**
* Verify [identity verification](/developer-guides/identity-verification) is properly configured
* Test with and without authenticated users in your implementation
* Add fallback logic for when user context is unavailable
## Next Steps
Add interactive forms and data collection to your chat
Programmatically control the chat interface
Learn to listen for and respond to chat events in real-time
Create dynamic, personalized initial messages for users